


How To Add Fonts To Microsoft Word 2010?

If you’re looking to add a unique touch to your Word 2010 documents, then you’re in luck! With a few simple steps, you can easily add fonts to Microsoft Word 2010. Whether you want to use a fancy handwritten font or a more professional-looking font, this guide will show you how to add fonts to Word 2010 with ease. So let’s get started!
Adding fonts to Microsoft Word 2010 is a simple process that lets you customize the look of your documents. Here’s how to do it:
- Open Word 2010 and click on the “File” tab.
- Click on the “Options” button at the bottom of the window.
- Select the “Advanced” tab at the top of the window.
- Scroll down to the “Display” section and click on the “Fonts” button.
- Choose the font you want to install and click on the “Install” button.
- Once the font is installed, click “OK” to close the window.
Your new font will now be available in the font list in Word 2010.
How to Add Fonts to Microsoft Word 2010?
Microsoft Word 2010 is one of the most widely used word processors in the world, and it offers a variety of features to make creating documents and formatting text easier than ever. One of the most important features of any word processor is the ability to add fonts. Adding fonts to Microsoft Word 2010 is a simple process that will give you access to hundreds of new fonts for your documents.
Step 1: Download New Fonts
The first step in adding fonts to Microsoft Word 2010 is to download new fonts from the internet. There are many free and paid font sites available, such as DaFont, Font Space, and Font Squirrel. Once you find a font that you like, simply click the download button and save the font file to your computer.
Step 2: Install New Fonts
Once you have downloaded the font, it is time to install it. To install a font in Microsoft Word 2010, simply double-click on the font file and then click the “Install” button. The font will then be installed on your computer and ready to use in Microsoft Word.
Step 3: Select Font in Microsoft Word 2010
Once you have installed the font, you can select it in Microsoft Word 2010. To do this, simply open the “Format” menu, select the “Font” option, and then select the font that you have installed from the list of available fonts. Your text will then be formatted with the font that you have selected.
Step 4: Use Fonts in Microsoft Word 2010
Once you have selected the font in Microsoft Word 2010, you can start using it in your documents. You can type text in the font, change the font size, and even add special effects such as bold or italic. You can also use your new font to create beautiful documents that stand out from the crowd.
Step 5: Save Documents with New Fonts
Once you have finished creating a document with the new font, you will need to save it. To save the document in Microsoft Word 2010, simply click the “Save” button located in the upper left corner of the window. You can then choose a destination for the document, such as your desktop or a flash drive.
Step 6: Share Documents with New Fonts
Once you have saved the document with the new font, you can then share it with others. To share the document, simply click the “Share” button located in the upper right corner of the window. You can then choose to share the document via email or through a cloud storage service such as Google Drive or Dropbox.
Step 7: Manage Fonts in Microsoft Word 2010
Microsoft Word 2010 also allows you to manage your fonts. To manage your fonts, simply open the “Tools” menu and then select the “Fonts” option. From here, you can delete fonts that you no longer need, install new fonts, and even change the default font for your documents.
Step 8: Troubleshoot Font Issues in Microsoft Word 2010
If you are having problems with fonts in Microsoft Word 2010, you can also troubleshoot the issue. To do this, simply open the “Help” menu and then select the “Troubleshoot Fonts” option. This will open a window that will help you identify and fix any font-related issues.
Step 9: Uninstall Fonts from Microsoft Word 2010
If you no longer need a font that you have installed in Microsoft Word 2010, you can also uninstall it. To uninstall a font, simply open the “Tools” menu and select the “Fonts” option. From here, you can select the font that you want to uninstall and then click the “Uninstall” button.
Step 10: Reinstall Fonts in Microsoft Word 2010
If you ever need to reinstall a font in Microsoft Word 2010, you can do so by following the same steps that you used to install the font initially. Simply double-click on the font file and then click the “Install” button. The font will then be installed on your computer and ready to use in Microsoft Word.
Related Faq
What is the Process of Adding Fonts to Microsoft Word 2010?
The process of adding fonts to Microsoft Word 2010 is fairly simple. First, you need to download the font you would like to use from an online source. After the font has finished downloading, you need to open the font file and click “Install”. Once the font has been installed, you can open Microsoft Word 2010 and the newly added font will be available for use.
The second step is to select the text which you would like to format and click on the “Font” drop-down menu. From there, you can select the font you have just installed and the text will be changed accordingly. You can also change the font size, colour and style from the same drop-down menu.
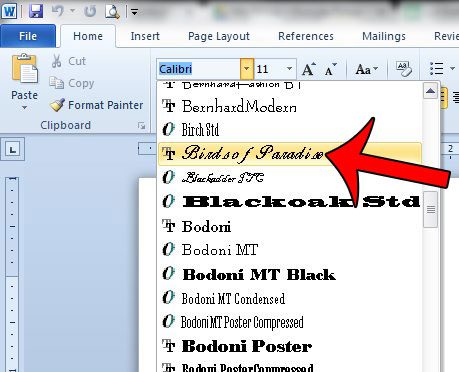
How Do I Access the “Font” Drop-Down Menu in Microsoft Word 2010?
The “Font” drop-down menu can be accessed by clicking on the “Home” tab on the main ribbon. Once the “Home” tab is opened, you will see the “Font” drop-down menu on the far left side. By clicking on the menu, you will be able to select the font you would like to use and modify the font size, colour and style.
In addition, you can also access the “Font” drop-down menu by selecting the text you would like to edit and clicking on the “Format” tab on the main ribbon. The “Font” drop-down menu will then appear on the far left side of the “Format” tab.
What Types of File Formats are Compatible with Microsoft Word 2010?
Microsoft Word 2010 is compatible with a variety of different file formats, such as .doc and .docx for Microsoft Word documents, .txt for plain text files, .rtf for Rich Text Format documents and .pdf for Adobe Acrobat documents.
In addition, Microsoft Word 2010 also supports several different image file formats, such as .jpg, .png and .gif. By inserting images into your Microsoft Word document, you can add visual elements to your text and make your documents more engaging.
What is the Difference Between Installing and Embedding Fonts in Microsoft Word 2010?
When installing a font in Microsoft Word 2010, the font will be available for use in the program for all documents. However, if you choose to embed a font in a document, the font will only be available in the document it has been embedded in and will not be available for use in other documents.
Embedding fonts is useful if you are sending a document to someone and want to ensure that the font used in the document remains the same when they open it. This is because the font will be stored in the document and will not rely on the user’s computer having the same font installed.
Are All Fonts Compatible with Microsoft Word 2010?
Not all fonts are compatible with Microsoft Word 2010. The program only supports TrueType fonts, which are the most commonly used font format. Therefore, if you download a font in a different format, such as OpenType or PostScript, you will not be able to install it in Microsoft Word 2010.
If you are unsure which format a font is in, you can check the file extension of the font, which will usually be .ttf for TrueType fonts and .otf for OpenType fonts. If the file extension does not match one of these formats, it is likely that the font is not compatible with Microsoft Word 2010.
How To Add New Fonts to Microsoft Word
Adding fonts to Microsoft Word 2010 is a great way to customize your documents and make them stand out. With a few simple steps, you can easily add any font of your choice to your Word documents. Whether you’re looking to create a stylish headline or a more professional look, adding fonts to Word 2010 is the perfect way to ensure your document looks its best.


