


How to Use Snipping Tool on Windows 10?

Do you want to learn how to use the Snipping Tool on Windows 10? Snipping Tool is an incredibly useful tool that allows you to capture a screenshot of any part of your screen. With it, you can take a screenshot of a specific area, window, or the entire screen. In this article, we will show you how to use the Snipping Tool on Windows 10. Read on to find out how you can make the most of this powerful tool.
How to Use Snipping Tool on Windows 10?
- Open the Start Menu and search for “Snipping Tool.”
- Select “Snipping Tool” to open the application.
- To start a snip, click “New” in the upper-left corner of the Snipping Tool.
- Drag the cursor across the area of the screen you would like to capture.
- The snip will appear in the Snipping Tool window.
- To save the snip, select “File” and then “Save As.”
How to Use Snipping Tool on Windows 10
What is the Snipping Tool?
The Snipping Tool is a Windows 10 utility that allows users to take screenshots of their desktop, active windows, or rectangular areas of the screen. It has been around since Windows Vista, and can be an extremely useful tool for capturing screenshots quickly and easily.
The Snipping Tool is available in all versions of Windows, from Windows Vista to Windows 10. It is a free and easy-to-use utility for taking screenshots, and can be used to capture any part of the screen, from the entire screen to a single window or even a single element on the screen.
The Snipping Tool also provides basic editing tools, such as a pen, marker, and highlighter, for annotating the screenshot before saving it. It also allows users to save screenshots in multiple formats, including .png, .jpg, and .gif.
How to Access the Snipping Tool
The Snipping Tool can be accessed in several different ways. The most direct way to access it is to open the Start menu, type “Snipping Tool” into the search box, and select the app from the list of results.
The Snipping Tool can also be accessed through the Accessories folder in the Start menu. To do this, open the Start menu, select All Apps, select Windows Accessories, and select Snipping Tool.
Additionally, the Snipping Tool can be accessed through the Run command. To do this, press the Windows key + R and type “Snipping Tool” into the Run dialog box.
Using the Snipping Tool
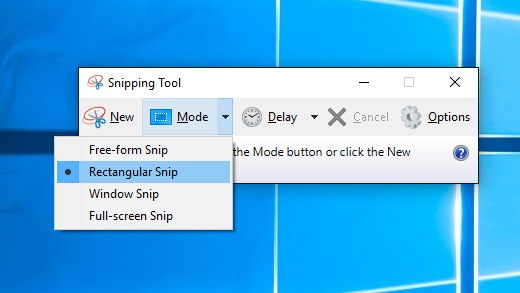
Once the Snipping Tool is open, users can select from four different screenshot types: free-form, rectangular, window, and full-screen.
To take a screenshot, select the desired screenshot type, and then use the mouse to draw the area of the screen that you want to capture. When you are finished drawing, the screenshot will be saved to the clipboard.
The Snipping Tool also provides basic editing tools, such as a pen, marker, and highlighter, for annotating the screenshot before saving it. These tools can be accessed via the menu at the top of the window.
Once you have finished editing the screenshot, click the save icon in the menu bar to save the screenshot. You can then choose the file format you would like to save the screenshot in, as well as the filename and location.
Using Snipping Tool Keyboard Shortcuts
The Snipping Tool also provides several keyboard shortcuts for quickly taking screenshots.
The most useful keyboard shortcuts are the following:
Ctrl + Prt Sc
This shortcut will take a screenshot of the entire screen and save it to the clipboard.
Alt + Prt Sc
This shortcut will take a screenshot of the active window and save it to the clipboard.
Ctrl + Shift + Prt Sc
This shortcut will open the Snipping Tool, allowing you to select which area of the screen you want to capture.
Ctrl + Alt + Prt Sc
This shortcut will open the Snipping Tool in delay mode, allowing you to select a delayed capture of any area of the screen.
Conclusion
The Snipping Tool is a powerful and easy-to-use screenshot utility that is included in all versions of Windows. It can be used to take screenshots of the entire screen, active windows, or any rectangular area of the screen. It also provides basic editing tools and allows users to save screenshots in multiple formats. Additionally, it provides several keyboard shortcuts for quickly taking screenshots.
Few Frequently Asked Questions
What is the Snipping Tool?
The Snipping Tool is a Windows utility that allows users to capture screenshots of their computer screen. It is used to take screenshots of windows, the entire screen, or portions of the screen, and then save it as an image file. It is a useful tool for creating tutorials or capturing images to share with others.
How do I access the Snipping Tool?
The Snipping Tool can be found in the Windows 10 Accessories folder. To access it, click the Windows Start button, type “Snipping Tool” in the search box, and then click the Snipping Tool icon. Alternatively, you can press the Windows key + R, type “Snipping Tool” in the Run box, and then click OK.
How do I use the Snipping Tool?
Once you’ve opened the Snipping Tool, you can choose from four different types of screenshots: free-form, rectangular, window, and full-screen. After selecting the type of screenshot you’d like to take, click the New button and the screen will be frozen. You can then draw a shape around the area of the screen you’d like to capture with your mouse. Once you’ve selected the area, the screenshot will be captured and displayed in the Snipping Tool window.
How do I save a screenshot with the Snipping Tool?
Once you have taken a screenshot with the Snipping Tool, you can save it as an image file. To do this, click the Save Snip button and select the image format you’d like to save it as (e.g. PNG, JPEG, GIF). You can then select a destination for the image file, enter a file name, and then click the Save button.
How do I edit a screenshot with the Snipping Tool?
The Snipping Tool also allows you to edit your screenshot before saving it. To do this, click the Edit button and a new window will open with the screenshot. You can then draw shapes, add text, or highlight areas of the screenshot as desired. Once you have finished editing the screenshot, click the File menu and select Save As to save the file.
Are there any other features in the Snipping Tool?
Yes, there are a few other features included in the Snipping Tool. You can open a previously saved screenshot by selecting the Open button, or you can delay the screenshot by selecting the Delay button and setting a time limit. You can also choose to email the screenshot directly from the Snipping Tool by selecting the Send Snip button.
How to use Snipping Tool in Windows 10
To conclude, using the Snipping Tool on Windows 10 is a great way to quickly and easily capture screenshots. This tool is especially useful for those who need to quickly capture images to annotate or share. It’s very easy to use and requires no prior knowledge or technical skills. With just a few clicks, you can capture any image on your screen and save it for future use. Give it a try today and see what it can do for you!


