


How to Add a Footer in Powerpoint?
The footer is an essential part of any presentation, as it helps to add a professional touch and give your slides a polished look. If you’re using Microsoft PowerPoint for your presentation, you may be wondering how to add a footer. Thankfully, it’s easy to do and this tutorial will show you how to add a footer to your PowerPoint slides in just a few simple steps.
- Open the PowerPoint file.
- Go to the Insert tab.
- Select Text box from the Text group.
- Draw a text box and enter your footer text.
- Right-click the text box and select Size and Position.
- Set your desired position and size in the dialog box.
- Click OK to save the changes.
Adding a Footer in PowerPoint
Adding a footer in PowerPoint is a great way to add a personalized touch to your presentation. Footers can include information such as the date, the presentation’s title, or even the presenter’s name. A footer can also be used to give credit to the original source of any images or quotes used in the presentation. Footers can be added to all slides, or just to selected slides, and the text can be formatted to match the overall presentation theme.
Steps to Add a Footer in PowerPoint
The first step to adding a footer in PowerPoint is to open the presentation in which you want to add the footer. Once you’re in the presentation, select the “View” tab from the ribbon at the top of the PowerPoint window. Under the “View” tab, select the “Slide Master” option. This will open the “Slide Master” view, which is where you can edit the footer.
In the Slide Master view, you will see a list of all your slides. Select the slide you want to add the footer to. Once you have selected the slide, you will see a “Footer” section at the bottom of the slide. Here you can enter the text you want to show as a footer. You can also format the text to match the theme of your presentation.
Formatting the Footer in PowerPoint
Once you have entered the text for the footer, you can format it to match the theme of the presentation. To do this, click on the “Format” tab on the ribbon at the top of the PowerPoint window. Under the “Format” tab, you will find a variety of options for formatting the footer. You can change the font and font size, as well as the color of the text. You can also add a border or drop shadow to the footer to make it stand out.
Saving the Footer in PowerPoint
Once you have formatted the footer to your liking, you can save it by clicking the “Save” button at the top of the PowerPoint window. This will save the footer to the selected slide and all future slides. If you want to apply the footer to all slides, you can click the “Apply to All” button to apply the footer to all slides.
Editing the Footer in PowerPoint
If you want to edit the footer at a later date, you can do so by opening the presentation and going to the “Slide Master” view. Here you can edit the footer for all slides or for a specific slide. You can also delete the footer from the selected slide or from all slides.
Adding a Logo to the Footer in PowerPoint
You can also add a logo to the footer in PowerPoint. To do this, click on the “Insert” tab on the ribbon at the top of the PowerPoint window. Under the “Insert” tab, select the “Picture” option. This will open a window where you can select the picture you want to insert. Once you have chosen a picture, click “Insert” to add it to the footer.
Conclusion
Adding a footer in PowerPoint is a great way to add a personalized touch to your presentation. Footers can include information such as the date, the presentation’s title, or even the presenter’s name. You can add a footer to all slides, or just to selected slides, and the text can be formatted to match the overall presentation theme. You can also add a logo to the footer in PowerPoint by selecting the “Picture” option under the “Insert” tab.
Related Faq
What is a Footer in Powerpoint?
A footer in Powerpoint is a text or graphical element that appears at the bottom of each slide in the presentation. It can be used to provide additional information or branding to the presentation, such as the author’s name or copyright information.
How do I Add a Footer in Powerpoint?
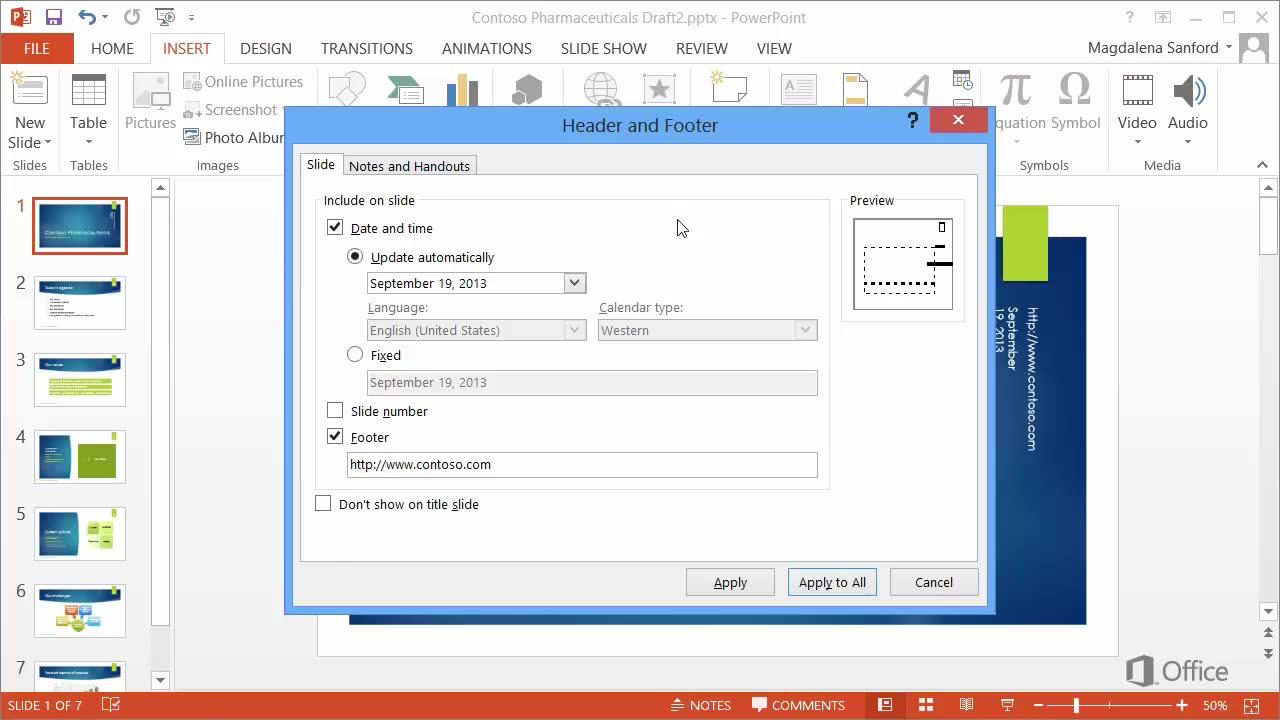
To add a footer to a Powerpoint presentation, open the Powerpoint application, and open the presentation you want to add the footer to. Then, click the “Insert” tab at the top of the window. In the “Text” section, click the “Header & Footer” button, and the “Header and Footer” window will appear. Check the box next to “Footer,” and enter the text you would like to appear in the footer. You can also customize the footer by clicking the “Options” button, which will allow you to choose the font, size, color, alignment, and other properties. When finished, click “Apply” to save the footer.
Can I Add a Footer to Just One Slide in Powerpoint?
Yes, you can add a footer to just one slide in Powerpoint. To do this, open the slide you want to add the footer to, click the “Insert” tab at the top of the window, and click the “Header & Footer” button in the “Text” section. In the “Header and Footer” window, check the box next to “Slide number,” and add the text you would like to appear in the footer. You can also customize the footer by clicking the “Options” button, which will allow you to choose the font, size, color, alignment, and other properties. When finished, click “Apply” to save the footer.
Can I Add an Image to the Footer in Powerpoint?
Yes, you can add an image to the footer in Powerpoint. To do this, open the slide you want to add the image to, click the “Insert” tab at the top of the window, and click the “Header & Footer” button in the “Text” section. In the “Header and Footer” window, check the box next to “Slide number,” and then click the “Picture” button. Select the image you want to add to the footer, and then click “Insert.” You can also customize the footer by clicking the “Options” button, which will allow you to choose the font, size, color, alignment, and other properties. When finished, click “Apply” to save the footer.
Can I Add a Link to a Website in the Footer in Powerpoint?
Yes, you can add a link to a website in the footer in Powerpoint. To do this, open the slide you want to add the link to, click the “Insert” tab at the top of the window, and click the “Header & Footer” button in the “Text” section. In the “Header and Footer” window, check the box next to “Slide number,” and then click the “Hyperlink” button. Enter the URL of the website you want to link to in the “Address” field, and then click “OK.” You can also customize the footer by clicking the “Options” button, which will allow you to choose the font, size, color, alignment, and other properties. When finished, click “Apply” to save the footer.
Can I Edit an Existing Footer in Powerpoint?
Yes, you can edit an existing footer in Powerpoint. To do this, open the slide you want to edit the footer on, click the “Insert” tab at the top of the window, and click the “Header & Footer” button in the “Text” section. In the “Header and Footer” window, click the footer you want to edit, and then make the desired changes. You can customize the footer by clicking the “Options” button, which will allow you to choose the font, size, color, alignment, and other properties. When finished, click “Apply” to save the footer.
Can I Remove a Footer in Powerpoint?
Yes, you can remove a footer in Powerpoint. To do this, open the slide you want to remove the footer from, click the “Insert” tab at the top of the window, and click the “Header & Footer” button in the “Text” section. In the “Header and Footer” window, uncheck the box next to “Footer”, and then click “Apply” to save changes. The footer will be removed from the slide.
PowerPoint 2016 – Add Header & Footer – How to Insert Apply Headers & Footers in MS PPT 365 Tutorial
Adding a footer to your PowerPoint presentation is a great way to add a professional touch to your slides. Whether you’re using the footer to add your contact information, a logo, or a copyright notice, the process is simple and straightforward. Just follow the steps outlined in this article and you’ll be able to add a professional-looking footer to your presentation in no time!


