


How To Add A Shared Folder In Outlook?

For those of us who use Outlook to manage our emails, contacts, and other data, it can be extremely useful to add a shared folder in order to streamline collaboration and communication. The ability to share folders allows us to easily share documents, photos, files, and other information with our colleagues through Outlook. In this article, we’ll discuss how to add a shared folder in Outlook and how to use it to efficiently collaborate with others.
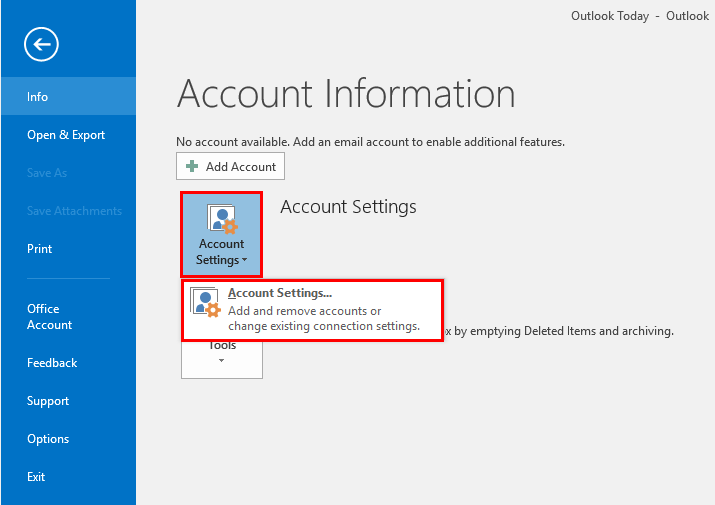
Adding a Shared Folder in Outlook:
- Open Microsoft Outlook and go to the File tab.
- Select Account Settings and then click Account Settings again.
- In the Account Settings window, select the Email tab and then click New….
- Choose Email Account and click Next.
- Enter your email address and click Next.
- Set up your account and click Next.
- Choose Advanced and click Add.
- Select the shared folder and click OK.
- Click Finish to complete the setup.
Adding a Shared Folder to Outlook
Adding a shared folder to Outlook is a simple process that can help you share important emails with colleagues or other contacts with whom you need to collaborate. This article will walk you through the steps of adding a shared folder in Outlook to make the process easier.
Step 1: Access Your Outlook Account
The first step in adding a shared folder to Outlook is to access your Outlook account. To do this, log in to your account on the Outlook website or open the Outlook app on your computer. Once you have logged in, you will be able to access the shared folder feature.
Step 2: Select the Shared Folder You Want to Add
The next step is to select the shared folder you want to add to your Outlook account. To do this, click the “Shared” tab in the navigation menu at the top of the screen. This will open a list of folders that you can share with others. Select the folder you want to add and click “Add”.
Step 3: Enter the Email Addresses of Those You Want to Share the Folder With
Once you have selected the folder you want to add, the next step is to enter the email addresses of those you want to share the folder with. Enter the email addresses of the people you want to share the folder with and select the permissions you want to give them. For example, you may want to give them editing or viewing privileges.
Step 4: Click “Share” to Send the Invitation
The final step is to click “Share” to send the invitation. This will send an email notification to the people you have shared the folder with, letting them know that they now have access to the shared folder. Once they have accepted the invitation, they will be able to view and edit the folder as necessary.
Step 5: Monitor the Shared Folder
Once the folder has been shared, it is important to monitor the folder to ensure that it is being used as intended. You should also keep an eye out for any suspicious activity or unauthorized changes to the folder. This will help you keep the shared folder secure and make sure that it is being used properly.
Frequently Asked Questions
What is Outlook?
Outlook is a personal information manager from Microsoft that is part of the Microsoft Office suite. It is primarily used as an email application, but also includes a calendar, task manager, contact manager, journal, and web browsing. It can be used as a stand-alone application, or can work with Microsoft Exchange Server and Microsoft SharePoint Server for multiple users in an organization, such as shared mailboxes and calendars, Exchange public folders, SharePoint lists, and meeting schedules.
How do I add a shared folder in Outlook?
To add a shared folder in Outlook, first open Outlook and select the folder you would like to share. Then right-click on the folder and select “Share Folder.” From the Sharing Wizard, enter the email address of the person you would like to share the folder with and select the level of access you would like them to have. After clicking “Share” the recipient will receive an email with a link to access the shared folder.
What are the different levels of access available when sharing a folder in Outlook?
When sharing a folder in Outlook, there are several different levels of access available to the recipient. These include “Owner,” which allows the recipient to view, add, modify, and delete items in the shared folder; “Editor,” which allows the recipient to view, add, and modify items in the shared folder; and “Reviewer,” which allows the recipient to view items in the shared folder.
Can I share a folder with multiple people in Outlook?
Yes, you can share a folder with multiple people in Outlook. To do this, simply select the folder you would like to share and right-click on it. Then select “Share Folder” and enter the email addresses of the people you would like to share the folder with. You can then select the level of access you would like each person to have.
Can I set an expiration date for a shared folder in Outlook?
Yes, you can set an expiration date for a shared folder in Outlook. To do this, select the folder you would like to share and right-click on it. Then select “Share Folder” and enter the email addresses of the people you would like to share the folder with. At the bottom of the Sharing Wizard window, there is an option to set an expiration date for the shared folder.
Can I control who can access my shared folder in Outlook?
Yes, you can control who can access your shared folder in Outlook. To do this, select the folder you would like to share and right-click on it. Then select “Share Folder” and enter the email addresses of the people you would like to share the folder with. At the bottom of the Sharing Wizard window, there is an option to select who can access the folder, such as “Only the people I specify” or “Anyone with the link.” This allows you to control who can access your shared folder.
Adding a Shared Folder in Outlook Web App 2020
In conclusion, adding a shared folder in Outlook is a simple process that can be done in a few easy steps. It’s important to be aware of the users who have access to the folder, as well as the permissions that are associated with the folder. This can help ensure that you maintain control over the content and keep confidential information secure. With the help of Outlook, you can easily add a shared folder and keep it organized and secure.


