


How To Add A Signature In Outlook App?
Are you looking for an easy way to add a signature in the Outlook App? Look no further! In this article, you will learn how to add a professional signature to your Outlook emails quickly and easily. We will cover everything from creating a signature, adding images, and more. By the end of this article, you will be able to add a signature to your Outlook App emails with confidence. Let’s get started!
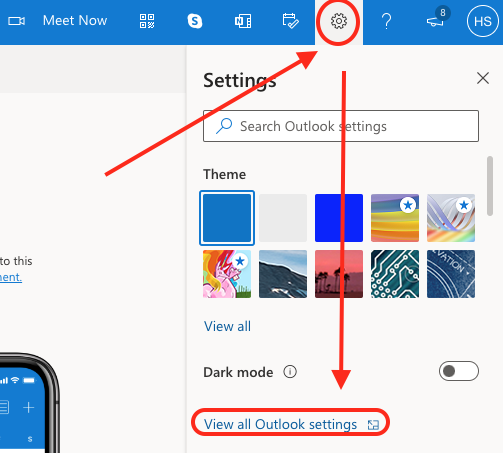
Adding a signature in Outlook App is easy! Here are the steps:
- Open the Outlook App on your device
- Go to the Settings tab
- Click on Signature
- Enter your desired signature
- Click Save
How to Create a Signature in Outlook App
Creating a signature in the Outlook app is a great way to quickly and easily add your name, contact information, and other details to the bottom of emails. Signatures are a great way to ensure that your emails look professional and are easily identifiable. This article will provide step-by-step instructions on how to add a signature to the Outlook app.
The first step in creating a signature in the Outlook app is to open the app and navigate to the “Settings” menu. From there, select “Signatures” and then “Create Signature.” This will open a new window where you can enter your signature information. Here, you can type in your name, contact information, website address, and any other details that you would like to include in your signature. Make sure to double-check your spelling and grammar before saving the signature.
Once you are satisfied with your signature, click “Save” and then “Apply” to apply the signature to all emails that you send from the Outlook app. You can also customize the signature for individual emails by selecting the “Signature” option from the “Message” menu. From here, you can select the signature that you would like to use for the particular email.
How to Customize a Signature in Outlook App
Customizing a signature in the Outlook app is easy and can be done in a few simple steps. To begin, open the Outlook app and navigate to the “Settings” menu. From here, select “Signatures” and then “Create Signature.” This will open a new window where you can enter your signature information.
Once you have entered your signature information, you can customize it by adding images, hyperlinks, and formatting. To do this, click the “Format” button and then select the options that you would like to apply to your signature. This includes bold, italic, underline, and font size. You can also add images and hyperlinks by clicking the “Insert” button.
Once you have finished customizing your signature, click “Save” and then “Apply” to apply the signature to all emails that you send from the Outlook app. You can also customize the signature for individual emails by selecting the “Signature” option from the “Message” menu. From here, you can select the signature that you would like to use for the particular email.
How to Add a Logo to a Signature in Outlook App
Adding a logo to a signature in the Outlook app is a great way to make your emails stand out and add a personal touch. To add a logo to your signature in the Outlook app, open the app and navigate to the “Settings” menu. From here, select “Signatures” and then “Create Signature.” This will open a new window where you can enter your signature information.
Once you have entered your signature information, click the “Insert” button and then select the “Picture” option. This will open a new window where you can select the logo that you would like to add to your signature. Once you have selected the logo, click “Insert” and the logo will be added to your signature.
To customize the logo, click the “Format” button and then select the options that you would like to apply. This includes font size, color, and text wrapping. Once you are satisfied with the logo, click “Save” and then “Apply” to apply the signature to all emails that you send from the Outlook app. You can also customize the signature for individual emails by selecting the “Signature” option from the “Message” menu. From here, you can select the signature that you would like to use for the particular email.
Frequently Asked Questions
Q1. What is an Outlook signature?
An Outlook signature is a small block of text at the bottom of emails that you can create and customize to include information like your name, company name, phone number, website, or other details. It can be used to personalize emails and give recipients more information about you and your organization.
Q2. How do I create a signature in Outlook?
Creating a signature in Outlook is very easy. First, open the Outlook application and go to the “File” tab. From there, click “Options” and then “Mail”. In the “Mail” tab, go to the “Signatures” section and click “New”. This will open a new window where you can enter the text for your signature. Once you’re done, click “OK” to save the signature.
Q3. How do I add a signature in Outlook for iOS?
Adding a signature in Outlook for iOS is just as simple as in the desktop version. First, open the Outlook app on your device and tap the “Settings” icon. From there, tap “Mail” and then “Signatures”. In the “Signatures” page, tap “Add New Signature” and enter the text for your signature. Once you’re done, tap “Save” to save the signature.
Q4. Can I use HTML tags in my Outlook signature?
Yes, you can use HTML tags in your Outlook signature. To do this, open the “Signatures” page in the Outlook settings, and then click the “HTML” checkbox. This will enable you to enter HTML tags in the signature text box. Once you’re done, click “OK” to save the signature.
Q5. Can I add images to my Outlook signature?
Yes, you can add images to your Outlook signature. To do this, open the “Signatures” page in the Outlook settings, and then click the “Image” checkbox. This will enable you to enter an image URL or select an image from your device. Once you’re done, click “OK” to save the signature.
Q6. How do I make sure my signature appears in all my emails?
To make sure your signature appears in all your emails, open the “Signatures” page in the Outlook settings, and then select the “Add signatures to all outgoing messages” checkbox. This will make sure that your signature is added to all emails sent from your Outlook account.
In conclusion, adding a signature in the Outlook App is an easy and straightforward process. All you need to do is go to the Settings tab, select the Signature option, and then enter your desired signature in the field. Once you have completed this process, you can now include a signature on all your emails with just a few clicks. With this simple process, you can easily add your signature to all your emails and make them more professional.


