


How To Create A Rule In Outlook For Specific Emails?

Creating rules in Outlook can be a great way to help you stay organized and manage your emails. Rules can be used to automatically organize your emails into specific folders, tag them with special categories, or even delete them before they reach your inbox. In this guide, we’ll show you how to create a rule in Outlook for specific emails so you can keep your inbox clutter-free and organized.
Creating a rule in Outlook for specific emails is easy. Here’s how to do it:
- Open Outlook and click the File tab in the top navigation bar.
- Select Manage Rules & Alerts from the drop-down menu.
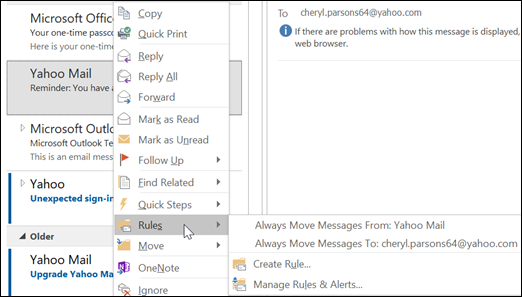
- Click the New Rule button.
- Choose a template from the list or select Start from a Blank Rule.
- Select the conditions you want to apply to the emails you want to filter.
- Choose the action you want Outlook to take when the condition is met.
- Set any exceptions to the rule.
- Click Finish to save the rule.
Create Rules For Outlook to Sort Specific Emails
Rules are a great way to keep Outlook organized and make sure important emails don’t get lost in the shuffle. It’s easy to create a rule that will route certain messages to a specific folder or take other actions.
To create a rule, open Outlook and select the “Rules” option from the “Tools” menu. This will bring up the Rules and Alerts window. Click the “New Rule” button to start the process. This will bring up the Rules Wizard, which will give you a number of options for creating the rule. You can choose from ready-made rules, or create a custom one.
Once you have chosen a rule to create, the next step is to specify which emails you want the rule to apply to. To do this, click on the “Step 2: Edit the Rule Description” link. This will bring up another window, which will allow you to define the criteria for the rule. For example, you can choose to filter emails based on their subject, sender, or other criteria.
Choose the Action to be Taken by the Rule
Once you have specified the criteria for the rule, it’s time to choose the action that you want Outlook to take when it finds a message that meets the criteria. To do this, click on the “Step 3: Select Actions” link. This will bring up a list of actions that you can choose from.
For example, you can choose to move the message to a specific folder, flag it for follow-up, delete it, or take any other action. To select an action, simply check the box next to it. You can also configure any additional settings that may be associated with the action.
Specify Additional Options for the Rule
The final step is to specify any additional options for the rule. To do this, click on the “Step 4: Specify Exceptions” link. This will bring up a list of exceptions that you can choose from. For example, you can choose to exclude certain emails from the rule, or you can specify a time frame for the rule to be effective.
Once you have configured all of the options for the rule, click on the “Finish” button. This will add the rule to Outlook, and it will be activated immediately.
Testing the Rule
Once you have created the rule, you should test it to make sure it is working correctly. To do this, send yourself a test email that meets the criteria specified in the rule. Then, check to make sure that Outlook takes the appropriate action.
Editing and Deleting Rules
If you need to make changes to the rule, you can do so by clicking on the “Rules” option in the “Tools” menu, and then selecting the rule that you want to edit. You can also delete the rule by selecting it and then clicking on the “Delete” button.
Few Frequently Asked Questions
1. What is a Rule in Outlook?
A rule in Outlook is a type of automated action that can be set to apply to incoming or outgoing email messages. For example, users can create rules to automatically move emails from a certain sender to a specific folder, delete emails with a certain subject line, or flag emails for follow-up. Rules can also be created to send an automatic response to incoming emails, forward emails to another address, or to play a sound when an email arrives.
2. How Do I Create a Rule in Outlook?
To create a rule in Outlook, open the Home tab and click Rules > Manage Rules & Alerts. On the Rules and Alerts dialog box, click the New Rule button and choose the type of rule you want to create. Then, follow the steps in the Rules Wizard to customize the rule as desired.
3. What Actions Can I Set in a Rule?
When creating a rule in Outlook, users can choose from a range of actions, such as moving the message to a specific folder, deleting the message, flagging the message for follow-up, or playing a sound. Other available actions include sending an auto-reply, forwarding the message to another address, or running a script.
4. Can I Create a Rule for Specific Emails?
Yes, it is possible to create a rule in Outlook specifically for certain emails. When creating the rule, users can specify the conditions that must be met for the rule to apply, such as the sender’s address, the subject line, or the content of the message.
5. How Do I Test a Rule?
To test a rule in Outlook, click the Test Rule Now button on the Rules and Alerts dialog box. This will run the rule on all emails currently in the Inbox, and display a report of which messages were affected by the rule.
6. Are Rules Only Applied to New Messages?
No, rules can be set to apply to messages already in the Inbox as well as new messages. To do this, users should select the ‘Run this rule now on messages already in “Inbox”’ option on the Rules Wizard.
Creating a rule in Outlook for specific emails can be a time-consuming process, but it doesn’t have to be. With a few simple steps, you can quickly and easily create a rule that will help you keep your inbox organized, and save time in the long run. By following the steps outlined in this article, you can ensure that your Outlook inbox is as organized as possible and that you are able to quickly and efficiently respond to important emails.


