


How to Enable Windows Audio Service in Windows 10?

If you’re having trouble getting sound to come out of your computer, you may need to enable the Windows Audio service in Windows 10. The Windows Audio service is responsible for playing sound on your computer, and it can be easily enabled with a few simple steps. In this article, we’ll show you how to enable the Windows Audio service in Windows 10, so that you can get back to enjoying the audio from your computer.
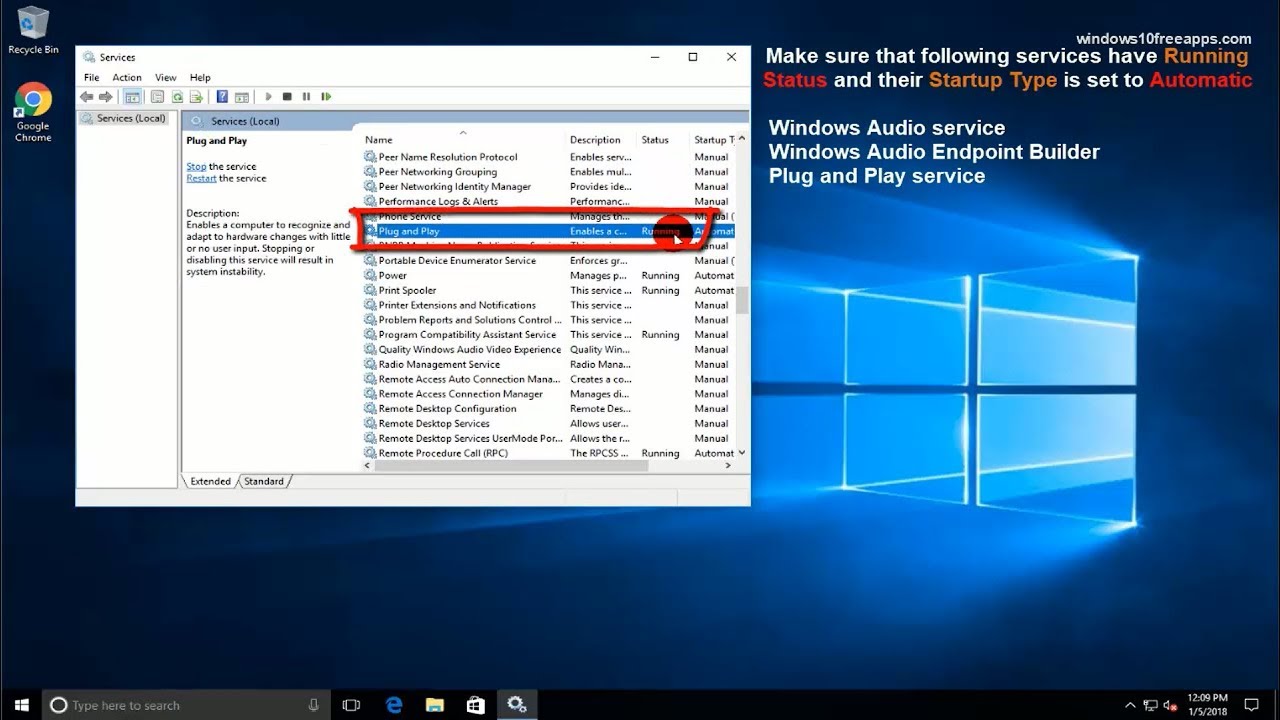
To enable Windows Audio Service in Windows 10, follow the steps below:
- Open Run by pressing Windows Key + R
- Type services.msc and press Enter
- Locate Windows Audio from the list of services
- Right-click and select Start from the drop-down menu
- Click OK on the confirmation window
What is Windows Audio Service?
Windows Audio Service is a Windows service that enables the operating system to play sound. It is also known as Windows Audio Endpoint Builder. It helps Windows applications that play sound to communicate with the audio device. This service is normally running in the background and is essential for audio to work properly.
The Windows Audio Service is responsible for managing the audio devices and providing audio signals to applications. It is also responsible for controlling the volume and muting. If the Windows Audio Service is disabled, you will not be able to hear any sound from your computer.
How to Enable Windows Audio Service in Windows 10?
Enabling the Windows Audio Service in Windows 10 is an easy process. It can be done in a few simple steps.
Step 1: Open the Services Window
The first step is to open the Services window. To do this, press the Windows key and type in ‘services’. Then, select the Services application.
Step 2: Find the Windows Audio Service
Once the Services window opens, scroll down and locate the Windows Audio Service. It should be listed under the ‘Windows Audio’ category.
Step 3: Enable the Windows Audio Service
Once you have located the Windows Audio Service, right-click on it and select ‘Properties’. In the Properties window, select ‘Automatic’ from the ‘Startup type’ drop-down menu. This will enable the Windows Audio Service.
Step 4: Start the Windows Audio Service
Once the Windows Audio Service is enabled, you need to start it. To do this, right-click on the Windows Audio Service again and select ‘Start’.
Step 5: Check the Status of the Windows Audio Service
Once you have started the Windows Audio Service, you can check its status by right-clicking on it and selecting ‘Status’. If the status is ‘Running’, then the Windows Audio Service has been successfully enabled.
Troubleshooting Tips
If you are still having trouble enabling the Windows Audio Service, here are some troubleshooting tips to help you out.
Restart Computer
If the Windows Audio Service is still not working after following the steps above, try restarting your computer. This could help resolve any issues that could be preventing the service from starting.
Check the Windows Audio Service Dependency
The Windows Audio Service may not be able to start if one of its dependencies is not running. To check this, right-click on the Windows Audio Service and select ‘Dependencies’. Make sure all the services listed are running. If any of them are not running, try starting them.
Conclusion
Enabling the Windows Audio Service in Windows 10 is an easy process. It can be done in a few simple steps. Additionally, if you are having trouble enabling the Windows Audio Service, there are some troubleshooting tips that can help you out.
Top 6 Frequently Asked Questions
What is a Windows Audio Service?
Windows Audio Service is a Windows service that ensures system sounds and audio devices, such as speakers, headsets, and microphones, work properly. It also maintains audio settings and allows applications to communicate with audio devices.
What Causes Windows Audio Service to be Disabled?
Windows Audio Service can be disabled due to a variety of reasons, including hardware or software issues, security changes, or power outages. It can also be disabled if the user manually disables the service.
How to Enable Windows Audio Service in Windows 10?
To enable Windows Audio Service in Windows 10, the user needs to open the Services window by typing “services.msc” in the Run dialog box. Then, they need to locate the Windows Audio service, right-click on it, and select Start. The user can also set the service to Automatic startup type to ensure the service starts automatically after a system reboot.
What are the Benefits of Enabling Windows Audio Service?
Enabling Windows Audio Service ensures that sound is working properly on the system, and that audio devices, such as speakers, headsets, and microphones, are functioning correctly. It also ensures that audio settings are maintained correctly and that applications can communicate with audio devices.
Are There Any Risks Associated with Enabling Windows Audio Service?
No, there are no risks associated with enabling Windows Audio Service. However, if the service is misconfigured, it can cause issues with sound and audio devices. Therefore, it is important to ensure that the service is properly configured.
What Should I Do If Windows Audio Service Fails to Start?
If Windows Audio Service fails to start, the user should first ensure that the service is set to Automatic startup type. If this does not solve the issue, the user should try to restart the service manually. If this fails, the user should try to reboot their system. If the problem persists, the user should look for any hardware or software issues that may be causing the issue.
In conclusion, enabling the Windows Audio Service in Windows 10 is easy to do and can be done in a few simple steps. With the help of this article, you can now enjoy all the audio-related features that Windows 10 has to offer. Keep in mind that if you experience any issues with the service, you can always use the troubleshooter to help resolve the problem.


