


How To Map A Network Drive To Sharepoint Online?

Are you a business owner looking for a way to collaborate with your team and store files in the cloud? With Sharepoint Online, you can easily map a network drive to store and share documents, photos, and other files with colleagues. In this article, we’ll show you how to map a network drive to Sharepoint Online so that you can access your files with ease. Read on to learn how to get started!
Mapping a Network Drive to Sharepoint Online
Sharepoint Online is a cloud-based service from Microsoft that provides storage and collaboration capabilities for businesses. It allows users to store and share documents, spreadsheets, and presentations in a secure environment. It also enables users to access their data from any device with an internet connection. With Sharepoint Online, users can store, sync, and manage their documents in real-time, securely and easily. In this article, we will discuss how to map a network drive to Sharepoint Online.
Creating a Network Drive Connection
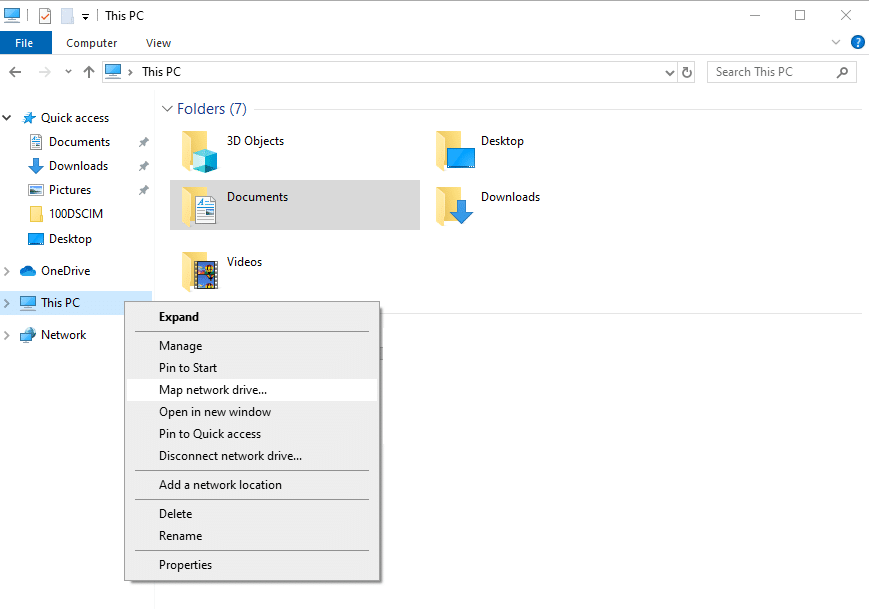
The first step in mapping a network drive to Sharepoint Online is creating the connection. To do this, open File Explorer and click on the Network tab. Then, click the Map Network Drive button. In the Map Network Drive window, enter the URL of the Sharepoint Online site you want to connect to. This URL should begin with “https://” followed by the name of the site. Then, enter your credentials for the Sharepoint Online site in the Username and Password fields. Once you have entered the correct information, click the Connect button to create the connection.
Adding the Network Drive to Windows Explorer
The next step is to add the mapped drive to Windows Explorer. To do this, open Windows Explorer and click the Computer tab. Then, click the Map Network Drive button. In the Map Network Drive window, select the drive letter you want to use for the mapped drive. Then, select the Reconnect at Logon checkbox and click the Finish button. This will add the mapped drive to the Windows Explorer window.
Accessing Sharepoint Online from the Network Drive
Once the network drive has been mapped to Sharepoint Online, you can access it from the mapped drive in Windows Explorer. To do this, open Windows Explorer and double-click the mapped drive. This will open the Sharepoint Online site in the Windows Explorer window. You can then browse through the folders and documents in the site and open any files you need.
Synchronizing Data with Sharepoint Online
The next step is to synchronize data with Sharepoint Online. To do this, open the mapped drive in Windows Explorer and click the Sync button. This will open the Sync Center window. Here, you can select which folders or files you want to sync with Sharepoint Online. Then, click the Sync Now button to begin the synchronization process.
Managing File Sharing with Sharepoint Online
Once the synchronization is complete, you can begin managing file sharing with Sharepoint Online. To do this, open the mapped drive in Windows Explorer and click the Share button. This will open the Share with window. Here, you can select which users you want to share the files or folders with and enter any comments you want to include. Then, click the Share button to finish sharing the files or folders.
Backing Up Data to Sharepoint Online
The next step is to back up data to Sharepoint Online. To do this, open the mapped drive in Windows Explorer and click the Backup button. This will open the Backup window. Here, you can select which folders or files you want to back up to Sharepoint Online. Then, click the Backup Now button to begin the backup process.
Viewing Backup Data in Sharepoint Online
Once the backup is complete, you can view the data in Sharepoint Online. To do this, open the mapped drive in Windows Explorer and click the Restore button. This will open the Restore window. Here, you can select which folders or files you want to view from the backup. Then, click the Restore button to view the data in Sharepoint Online.
Configuring Security Settings for Sharepoint Online
The next step is to configure security settings for Sharepoint Online. To do this, open the mapped drive in Windows Explorer and click the Security tab. This will open the Security Settings window. Here, you can select which settings you want to apply to the Sharepoint Online site. Then, click the Apply button to save the settings.
Maintaining Sharepoint Online
The last step is to maintain Sharepoint Online. To do this, open the mapped drive in Windows Explorer and click the Maintenance tab. This will open the Maintenance window. Here, you can select which tasks you want to run to maintain the Sharepoint Online site. Some of the tasks available are deleting unused files, running virus scans, and running backups. Then, click the Run Now button to start the maintenance process.
Related Faq
What is a Network Drive?
A network drive is a shared folder or drive on a local network that allows multiple users to store, access and manage files from one central location. It is often used as a way to store, organize and share data between multiple users and computers in an organization. Network drives can be accessed by users from any computer on the same local network, making it a convenient way to share data.
How do I Map a Network Drive to Sharepoint Online?
Mapping a network drive to Sharepoint Online is a simple process. First, you will need to log into your Sharepoint account and then open the ‘Site Settings’ page. Once there, you will need to select the ‘Shared Documents’ link, then click the ‘Map Network Drive’ button. You will then be prompted to enter the server address and the drive letter that you want to use. Finally, select the ‘Connect’ button and your network drive should be successfully mapped to Sharepoint Online.
What are the Benefits of Mapping a Network Drive to Sharepoint Online?
Mapping a network drive to Sharepoint Online has numerous benefits. It allows multiple users to access the same files and folders, making it easier for teams to collaborate and stay organized. It also provides a secure platform for storing files, as the data stored in Sharepoint Online is encrypted and stored in a secure cloud environment. Additionally, it eliminates the need for manual backups, as Sharepoint Online will handle all of the backups automatically.
What is the Difference Between Mapping a Network Drive and Syncing Files?
Mapping a network drive is a way to access files that are stored on a remote server, such as Sharepoint Online. It allows multiple users to access the same files and folders, making it easier for teams to collaborate and stay organized. Syncing files, on the other hand, is a way to keep local files in sync with files stored in the cloud. It allows users to access their files from any device, as long as they are connected to the internet.
Do I Need Special Software to Map a Network Drive to Sharepoint Online?
No, you do not need any special software to map a network drive to Sharepoint Online. All you need is an internet connection and a web browser. Once you have logged into your Sharepoint account, you can access the ‘Site Settings’ page and follow the instructions to map your network drive. It is a simple and straightforward process that does not require any special software or technical knowledge.
Mapping a network drive to Sharepoint Online is a great way to access, share and store files in the cloud. With the right credentials, you can easily connect to the network and have access to the files you need. By following the steps outlined above, you can easily map a network drive to Sharepoint online and have full access to the resources you need. With the added security of Sharepoint, you can rest assured that your files are safe and secure. Now you can take advantage of the power of the cloud with Sharepoint and ensure that your business or organization remains up to date and secure.


