


How To Remove Synced Folder From Sharepoint?

Are you struggling to remove synced folders from SharePoint? Do you feel like it’s taking up too much of your time and effort? Well, fret not! In this article, we will provide you with a step-by-step guide on how to remove synced folders from SharePoint in no time. Here, you will learn the simple techniques to quickly and easily remove synced folders from SharePoint, so you can get back to focusing on more important tasks.
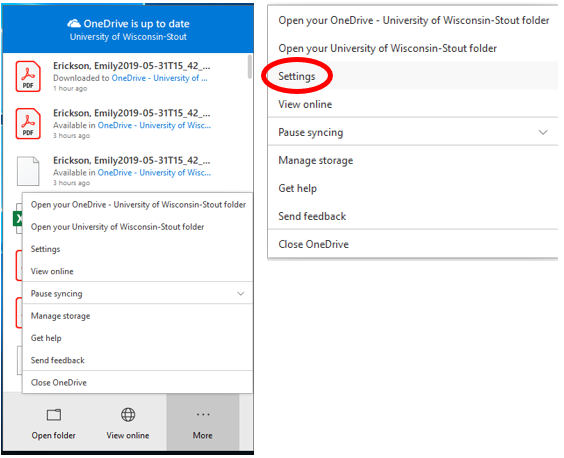
How to remove synced folder from SharePoint?
- Open Windows Explorer.
- Right click on the synced folder and select ‘Stop syncing a folder’.
- Confirm the process by clicking ‘Yes’ when the prompt appears.
- Once the folder is removed, it will no longer be visible in SharePoint.
language.
Removing a Synced Folder from SharePoint
SharePoint is a powerful collaboration platform that allows teams to securely store, share and manage documents for projects. It is possible to synchronize files between SharePoint and a local computer, so users can access the documents both online and offline. However, when a folder is no longer needed, it should be removed from SharePoint to ensure that the files are no longer shared or accessible to other users.
Step 1: Access the SharePoint Site
To begin, access the SharePoint site where the folder is located. The folder should appear in the list of available documents on the home page. Click the folder to open it and view its contents.
Step 2: Open the Sync Menu
Next, click the “Sync” button located in the top right-hand corner of the page. This will open the Sync menu, which provides an overview of the synced folders and files. Locate the folder you wish to remove and click the “Stop Syncing” button.
Step 3: Confirm the Removal
A warning window will appear to confirm the removal of the folder. Click “Yes” to confirm the removal, and the folder will be removed from the list of synced folders. The folder will remain in SharePoint, but it will no longer be synchronized with the local computer.
Step 4: Delete the Local Folder
The synced folder may still exist in the local computer. To delete the folder and its contents, open the “File Explorer” and navigate to the folder’s location. Right-click the folder and select “Delete” to remove it.
Step 5: Unsync All Folders
If you wish to unsync all folders associated with the SharePoint site, click the “Sync” button in the top right-hand corner and select the “Unsync All” option. A warning window will appear to confirm the action; click “Yes” to unsync all folders.
FAQs
Q: How do I know if a folder is synced?
A: To determine if a folder is synced, open the folder and check the “Sync” button in the top right-hand corner. If the button is highlighted, the folder is synced.
Q: What happens to the files in a synced folder when the folder is removed?
A: When a synced folder is removed, the files remain in SharePoint, but they are no longer accessible to other users. The files may still exist in the local computer if the folder was not deleted.
Q: How do I prevent a folder from being synced?
A: To prevent a folder from being synced, open the folder and click the “Sync” button in the top right-hand corner. This will remove the folder from the list of synced folders.
Frequently Asked Questions
How to remove synced folder from SharePoint?
Answer: Removing a synced folder from SharePoint is a straightforward process. The first step is to open File Explorer, then locate the folder that you want to remove. Once you have located the folder, right-click on it and select “Unsync” from the menu. This will remove the folder from your local system and will no longer be synced to SharePoint.
The second step is to open the SharePoint site that the folder was synced to. Once the site is open, navigate to the library where the folder was located and select the folder. Click the “More” button and select “Delete” from the menu. This will delete the folder from SharePoint. Once the folder is deleted, it will no longer be synced with your local system.
What is the difference between Unsync and Delete?
Answer: Unsync and Delete are two different actions that can be performed with synced folders in SharePoint. Unsync will remove the folder from the local system, but will not delete the folder from SharePoint. Delete will remove the folder from SharePoint and will no longer be synced with the local system.
It is important to understand the difference between Unsync and Delete as they have different effects on the folder. Unsync will remove the folder from the local system and will no longer be synced to SharePoint, while Delete will remove the folder from SharePoint and will no longer be synced to the local system.
What happens if I delete the synced folder from the local system?
Answer: If you delete the synced folder from the local system, the folder will still exist in SharePoint. However, the folder will no longer be synced with the local system. To re-enable syncing, you will need to open the SharePoint site and navigate to the library where the folder is located. Select the folder, click the “More” button, and select “Sync” from the menu. This will re-enable syncing with the local system.
It is important to note that if you delete the synced folder from the local system, you will need to manually re-enable syncing. This process cannot be automated and must be done manually.
What if I want to sync a folder from SharePoint to my local system?
Answer: Syncing a folder from SharePoint to your local system is a straightforward process. The first step is to open File Explorer and locate the folder that you want to sync. Once you have located the folder, right-click on it and select “Sync” from the menu. This will sync the folder with your local system.
The second step is to open the SharePoint site that the folder will be synced to. Once the site is open, navigate to the library where the folder will be located and select the folder. Click the “More” button and select “Sync” from the menu. This will enable syncing with your local system. Once the folder is synced, it will be kept in sync across both SharePoint and your local system.
Can I sync multiple folders from SharePoint to my local system?
Answer: Yes, you can sync multiple folders from SharePoint to your local system. To do this, you will need to open the SharePoint site and navigate to the library where the folders are located. Select the folders that you want to sync and click the “More” button. Select “Sync” from the menu and the folders will be synced to your local system.
It is important to note that when syncing multiple folders, they will all be synced to the same location on your local system. This means that any changes made to these folders in SharePoint will be reflected in the same location on your local system. You will not be able to specify different locations for each folder.
What if I want to sync a folder from my local system to SharePoint?
Answer: Syncing a folder from your local system to SharePoint is a straightforward process. The first step is to open File Explorer, then locate the folder that you want to sync. Once you have located the folder, right-click on it and select “Sync” from the menu. This will sync the folder with SharePoint.
The second step is to open the SharePoint site where the folder will be synced to. Once the site is open, navigate to the library where the folder will be located and select the folder. Click the “More” button and select “Sync” from the menu. This will enable syncing with your local system. Once the folder is synced, it will be kept in sync across both SharePoint and your local system.
Unsynch and Remove SharePoint Folders
Removing a synced folder from SharePoint can be a daunting task. However, with the right steps and proper guidance, anyone can quickly and easily delete any synced folder from their SharePoint account. By following the steps laid out in this article, you can quickly and easily remove any synced folder from your SharePoint account. So, if you are having difficulty with this task, take the time to follow these steps to quickly and easily remove any synced folder from your SharePoint account.


