


How to Set Password on Excel File?

Are you looking for a way to protect your important Excel files from unauthorized access? Setting a password to your Excel files is an easy and efficient way to ensure that your work and data remain secure. In this article, we will discuss the steps for how to set password on an Excel file. We will also discuss how to change or remove the password in case you want to make any changes to the file.
To set password on an Excel File, open the file and click the “Review” tab. Choose “Protect Sheet” from the “Changes” group. Enter the password you want and click “OK.” To confirm the password, enter it again. Now, the sheet is password-protected.
- Open the Excel File
- Click the “Review” tab
- Choose “Protect Sheet” from the “Changes” group
- Enter the password you want and click “OK”
- To confirm the password, enter it again
- Now, the sheet is password-protected
Setting Password Protection on Excel Files
The ability to password protect an Excel file is an important and useful feature for many users, as it allows them to restrict access to sensitive information. This tutorial will teach you how to set a password on an Excel file, so that anyone attempting to open the file will need to enter the correct password.
When setting a password on an Excel file, it is important to choose a strong password that is difficult to guess. A strong password should be at least 8 characters long and contain a mix of letters, numbers, and symbols. It should also not be a commonly used word or phrase. Once a strong password has been chosen, it can be used to protect the Excel file.
Enabling Password Protection in Excel
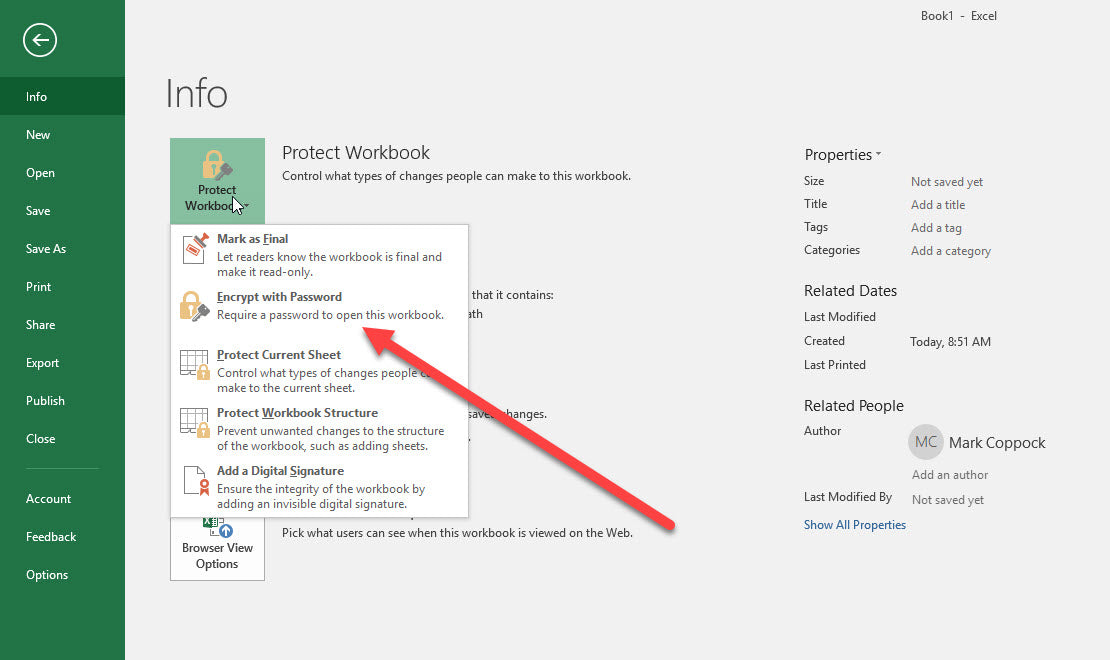
The first step in setting a password on an Excel file is to open the file in Excel and select the “File” tab. From the File menu, select “Info” and then “Protect Workbook.” This will open a window where the user can choose the type of password protection they would like to use.
The user can choose between “Encrypt with Password” and “Restrict Access.” Selecting “Encrypt with Password” will prompt the user to enter a password that will be required to open the file. Selecting “Restrict Access” will prompt the user to enter a password, but will also allow the user to set restrictions on who can view, edit, and print the file.
Confirming Password Protection in Excel
Once the user has chosen the type of password protection they would like to use, they can click “OK” to confirm the settings. The user will then be prompted to enter the password they would like to use. It is important to remember this password, as it will be required to open the file.
Once the user has entered the password and confirmed their settings, the Excel file is now password protected. Any attempts to open the file will require the user to enter the correct password.
Removing Password Protection in Excel
If the user ever needs to remove the password protection from an Excel file, they can do so by opening the file in Excel and selecting the “File” tab. From the File menu, select “Info” and then “Protect Workbook.” This will open a window where the user can choose to either “Remove Password” or “Change Password.” Selecting “Remove Password” will remove the password protection from the file.
Verifying Password Protection in Excel
Once the user has set or removed the password protection from an Excel file, they can verify that the password is working correctly by attempting to open the file. If the user has set a password, they will need to enter the correct password in order to open the file. If the user has removed the password protection, the file should open without prompting the user to enter a password.
Saving Password Protected Excel Files
Once the user has set a password on an Excel file, it is important to save the file in order to preserve the password protection. To save the file, select the “File” tab and then select “Save” or “Save As.” When prompted, enter the file name and select the folder where the file should be saved. The file will be saved with the password protection intact.
Sharing Password Protected Excel Files
When sharing a password protected Excel file, it is important to ensure that the recipient of the file is aware of the password. This can be done by sending the password along with the file, or by verbally informing the recipient of the password. It is important to remember that the recipient of the file will need to enter the correct password in order to open the file.
Frequently Asked Questions
What is a Password?
A password is a form of authentication that is used to protect a file, document, or other type of data from unauthorized access. Passwords typically consist of a combination of letters, numbers, and/or symbols and are typically stored in an encrypted format.
How to Set a Password on an Excel File?
To set a password on an Excel file, open the Excel file, click on the File tab, then click on the Protect Workbook button, and select the Encrypt with Password option. In the Password box, type in your desired password, and click OK. You will need to re-enter the password a second time for confirmation.
What are the Benefits of Setting a Password on an Excel File?
Setting a password on an Excel file provides an extra layer of security, as it prevents unauthorized users from accessing the file. It also ensures that the data in the file remains confidential and secure.
Are there any Disadvantages to Setting a Password on an Excel File?
The main disadvantage of setting a password on an Excel file is that if the password is lost or forgotten, the file will remain locked and inaccessible. Additionally, there is the potential risk of brute force attacks, which can be used to guess passwords and gain access to the file.
What is the Difference Between Encrypting and Setting a Password on an Excel File?
The main difference between encrypting and setting a password on an Excel file is that encryption scrambles the data in the file and makes it unreadable, while a password only prevents unauthorized users from accessing the file. Encryption is generally more secure than a password, as it is nearly impossible to decrypt the data without the encryption key.
How To Remove a Password from an Excel File?
To remove a password from an Excel file, open the Excel file, click on the File tab, then click on the Protect Workbook button, and select the Unprotect Sheet option. Enter the password in the Password box, and click OK. The password will then be removed from the file.
How to Protect Excel Sheet with Password | Lock Excel Sheet
Setting a password to protect your Excel files is a great way to ensure that no one else accesses your important data. Not only that, but it’s also a simple process that only takes a few minutes to complete. All you need to do is open the file, click on the ‘Review’ tab, select ‘Protect Sheet’, and then enter a password of your choice. And that’s it! With your Excel file now securely protected, you can rest assured that your data is safe from any potential intruders.


