


How To Setup Rules In Outlook?

If you’re using Microsoft Outlook to manage your email, you know how important it is to have your emails organized and sorted. Setting up rules in Outlook can save you time and help keep your inbox clean and clutter-free. In this guide, we’ll show you how to set up rules in Outlook so you can easily organize and manage your emails. With a few simple steps, you’ll be able to quickly and easily create custom rules to sort your emails and keep your inbox organized.
- Go to File > Manage Rules & Alerts.
- Click the “New Rule…” button.
- Choose a rule type in the “Start from a blank rule” section.
- Choose the conditions you want to use and click “Next.”
- Choose the actions you want Outlook to take and click “Next.”
- Specify any exceptions you want to add and click “Next.”
- Name the rule and click “Finish.”
How to Establish Rules in Outlook
Outlook provides users with the ability to set up rules to help manage and organize their email. Rules are an automated process that will sort emails based on a specific criteria and can be used to move emails to different folders, mark them as read, or even delete them automatically. The process for setting up rules in Outlook is relatively simple and can save users a lot of time and effort when managing their email.
Create a New Rule
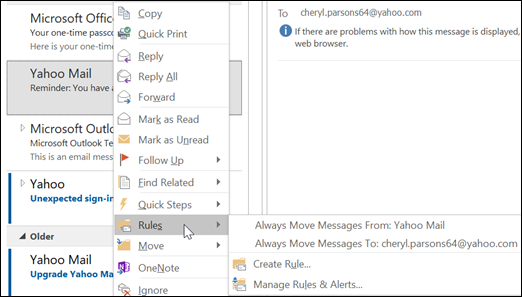
The first step in setting up a rule in Outlook is to create a new rule. This can be done by clicking the ‘Home’ tab, then clicking ‘Rules’, and finally selecting the ‘Create Rule’ option. This will open up a window with a set of conditions and actions that can be applied to emails.
Choose Conditions
The next step is to choose the conditions for the rule. This includes specifying criteria such as where the email was sent from, who it was sent to, or even the subject line of the email. These criteria can be used to sort emails into different folders or take other automated actions.
Choose Actions
After conditions have been selected, the user can choose the actions to be taken when the rule is triggered. This can include moving the email to a specific folder, marking it as read, or deleting it.
Name the Rule
Once the conditions and actions have been set, the user can name the rule and save it. This will ensure that the rule is applied to any incoming emails that match the specified criteria.
Edit or Delete Rules
After a rule has been saved, it can be edited or deleted at any time. To edit a rule, the user can simply click the ‘Home’ tab, select ‘Rules’, and then choose the ‘Manage Rules & Alerts’ option. This will open up a window where the user can edit or delete any existing rules.
Top 6 Frequently Asked Questions
What is Outlook?
Outlook is an email and personal information management program developed by Microsoft. It is part of the Microsoft Office suite and is used to manage emails, calendars, contacts, tasks, and more. It can also be used to set up rules to organize, filter, and manage messages in the inbox.
How Can I Set Up Rules in Outlook?
Setting up rules in Outlook is easy. First, open the Outlook program and click on the “Rules” tab. From there, you will be able to create, edit, and delete rules. You can also choose from a variety of pre-set rules to help organize and manage your inbox.
What Types of Rules Can I Set Up?
There are a variety of rules that can be set up in Outlook. You can set up rules to move messages to a specific folder, delete messages, mark messages as read or unread, forward or redirect messages, and more. You can also create custom rules to meet your specific needs.
What is a Condition and an Action?
A condition is a condition that must be met in order for the rule to be triggered. For example, you can set up a condition that a message must come from a certain sender or have a certain subject. An action is an action that will be taken when the condition is met. For example, you can set up an action that will move the message to a specific folder or delete the message.
How Do I Set Up a Rule?
To set up a rule, first click on the “Rules” tab in the Outlook program. Then, click “Create Rule” and choose from the available options. You will then be able to specify the conditions and actions for the rule. Once you have created the rule, click “OK” to save it.
Where Can I Find More Information About Setting Up Rules in Outlook?
Microsoft has a number of helpful resources available to help you set up rules in Outlook. You can visit the Microsoft support page for more information. You can also refer to the Outlook help documents and tutorials for step-by-step instructions on setting up rules.
How to Create Rules in Outlook
Having rules in Outlook can help you stay organized, prioritize your emails and make sure you never miss an important message. With the step-by-step instructions outlined above, you can easily setup rules in Outlook. Following these steps will ensure that your emails are sorted and organized properly, so that you can focus on what is truly important.


