


How to Open Document Recovery in Excel?

Are you trying to open document recovery in Excel but having trouble? Don’t worry, you’re not alone. Working with Microsoft Excel can be difficult and frustrating, especially if you are not tech-savvy. This article will help you understand how to open document recovery in Excel and make your life easier. With this guide, you will learn how to access the document recovery options available in Excel and understand how to use the features to easily recover your lost documents. So, let’s get started!
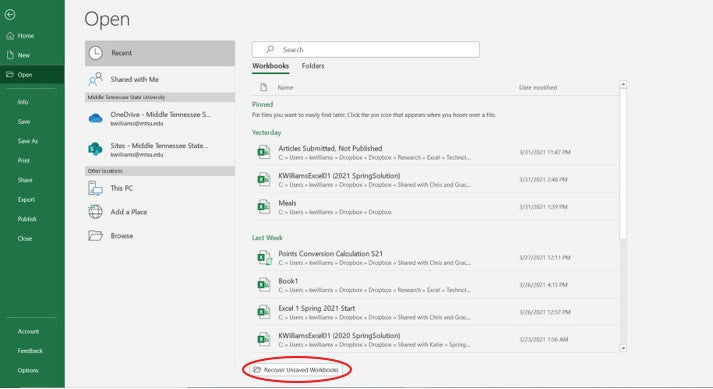
- Open Microsoft Excel program.
- Click on the File tab.
- Select the Open option.
- Choose the Recover Unsaved Workbooks option.
- Select the file which you wish to recover and click Open.
You should now be able to see the recovered document in the Excel program.
What is Document Recovery in Excel?
Document recovery in Excel is a feature in Microsoft Excel that allows users to recover saved documents. It is a useful tool to have in the event that a document is accidentally closed without being saved or when a power outage occurs while a document is in use. Document recovery in Excel ensures that all of the work that has been done in the document is not lost.
Document recovery in Excel can be enabled or disabled in the program’s options. When enabled, Excel will automatically scan for documents that have not been saved and will give the user the option to recover them. This feature is enabled by default in Excel, but can be turned off if desired.
Document recovery in Excel is a helpful feature that can save users from losing their work in the event of an unexpected event. It is important to remember to save documents regularly to ensure that document recovery in Excel can help in the event of an unexpected event.
How to Open Document Recovery in Excel?
Opening document recovery in Excel is a simple process that can be done in a few short steps. The first step is to open Excel and click on the File tab in the top left corner of the window. This will open a list of options related to the document. From here, the user should select Options and then click on the Advanced tab.
Within the Advanced tab, the user should scroll down the page until they find the ‘Document Recovery’ section. This section will allow the user to enable or disable document recovery in Excel. If document recovery is enabled, then Excel will automatically scan for documents that have not been saved and will give the user the option to recover them.
Finally, the user should click the ‘OK’ button to save their changes and close the window. Document recovery in Excel is now enabled and will be able to help recover documents that have not been saved.
Advantages of Document Recovery in Excel
Document recovery in Excel is a helpful feature that can save users from losing their work in the event of an unexpected event. This feature allows users to recover their documents in the event of an accidental closure or power outage, ensuring that all of the work done in the document is not lost.
Document recovery in Excel is also helpful for users who are working on documents that cannot be saved, as it allows them to recover their work if the document is unexpectedly closed or if a power outage occurs. This feature is also helpful for users who are working on large documents and do not want to lose their work due to a power outage or accidental closure.
Finally, document recovery in Excel is easy to enable and can be done in just a few steps. This feature is enabled by default, but can be disabled if desired, allowing users to decide whether or not they want to use it.
What is Document Recovery in Excel Used For?
Document recovery in Excel is a useful feature that can help users recover documents that have not been saved in the event of an unexpected event. This feature is most commonly used to help recover documents that have been accidentally closed without being saved or in the event of a power outage.
Document recovery in Excel can also be used to recover documents that cannot be saved, such as documents that are too large to save or documents that are being edited by multiple people. This feature is also helpful for users who are working on long and complex documents and want to ensure that their work is not lost in the event of an unexpected event.
How to Enable Document Recovery in Excel?
Enabling document recovery in Excel is a simple process that can be done in just a few steps. The first step is to open Excel and click on the File tab in the top left corner of the window. From here, the user should select Options and then click on the Advanced tab.
Within the Advanced tab, the user should scroll down the page until they find the ‘Document Recovery’ section. This section will allow the user to enable or disable document recovery in Excel. If document recovery is enabled, then Excel will automatically scan for documents that have not been saved and will give the user the option to recover them.
Finally, the user should click the ‘OK’ button to save their changes and close the window. Document recovery in Excel is now enabled and will be able to help recover documents that have not been saved.
What is the Difference Between Document Recovery and File Recovery?
Document recovery in Excel is different from file recovery, as document recovery is used to recover documents that have not been saved and file recovery is used to recover files that have been lost or deleted. Document recovery in Excel is enabled by default, but can be turned off if desired.
File recovery, on the other hand, is a more complex process that requires the use of specialized software to recover files that have been lost or deleted. This type of recovery is often used when a file has been deleted by mistake or when a hard drive has been damaged and the files have become corrupted.
How to Use Document Recovery in Excel?
Using document recovery in Excel is a simple process that does not require any additional software or specialized knowledge. Once document recovery has been enabled, Excel will automatically scan for documents that have not been saved and will give the user the option to recover them.
When a document is recovered, the user will be presented with a list of documents that have been recovered and the user can choose which one to open. If the document is opened, the user should make sure to save it in order to avoid any further issues with it.
If the user is unable to open the document that was recovered, then they should contact Microsoft support for additional assistance with the issue.
Top 6 Frequently Asked Questions
What is Document Recovery in Excel?
Document Recovery in Excel is a feature that allows users to recover and restore lost or corrupted documents from a previously saved version. It can also be used to recover documents that have been accidentally deleted. The Document Recovery feature can be found in the File tab in Excel.
How to Open Document Recovery in Excel?
To open the Document Recovery option in Excel, the user must first open the Excel program. Once the program is open, they must select the “File” tab at the top of the window. Then, they must select the “Info” tab and then the “Manage Document” option. Finally, they must select the “Recover Unsaved Documents” button, which will open the Document Recovery window.
What is Saved in Document Recovery in Excel?
Document Recovery in Excel will save any changes that were made to a document since the last time it was saved. This includes any changes made after the document was closed, but before the program was closed. It will also save any changes that were made after the document was saved, but before the program was closed.
What if Document Recovery in Excel does not Work?
If Document Recovery in Excel does not work, it is possible that the document was not saved or that the changes were not saved. In this case, it is recommended that the user check the “Recover Unsaved Documents” button in the File tab in Excel. If the document is not there, then it is likely that the changes were not saved. In this case, it is recommended that the user try to recover the document from the most recent backup or try to recover the document from a different program.
What are the Benefits of Document Recovery in Excel?
The main benefit of Document Recovery in Excel is that it allows users to recover and restore lost or corrupted documents from a previously saved version. This can be especially helpful if the user accidentally deletes the document or makes changes that they want to undo. Additionally, Document Recovery in Excel can be used to recover documents that have not been saved, which can help users avoid losing their work.
How to Use Document Recovery in Excel?
The user must first open the Excel program and then select the “File” tab at the top of the window. Then, they must select the “Info” tab and then the “Manage Document” option. Finally, they must select the “Recover Unsaved Documents” button, which will open the Document Recovery window. From here, the user can select the document they wish to recover, and then click the “Recover” button. The document will then be restored to its original version.
How to Recover Excel file Unsaved or Lost
Writing a successful document in Excel requires you to be organized and able to save your work. Fortunately, Excel has a feature called Document Recovery that saves your documents in case of a system failure or power outage. Opening Document Recovery in Excel is easy and can help you save your documents and avoid losing valuable data. With a few simple steps, you can access Document Recovery and get back to work.


