


How To Remove Unique Permissions In Sharepoint Online?

If you’re looking for a straightforward guide on how to remove unique permissions in Sharepoint Online, you’ve come to the right place. In this article, we’ll explain exactly how to do it in just a few simple steps. So, you’ll be able to take control of your Sharepoint and customize it to your exact needs. We’ll also explain why unique permissions are useful and how to use them to your advantage. With this information, you’ll be able to make sure your Sharepoint site is secure and easily accessible.
- Open the SharePoint Online site.
- Go to the page or document library from which unique permissions need to be removed.
- Click the Settings gear and select Site Settings.
- In the Users and Permissions section, select Site permissions.
- Select the check box for the item with unique permissions.
- Select the Stop Inheriting Permissions menu item.
- Confirm the removal of unique permissions by selecting OK.
- To delete the permissions, select Delete User Permissions.
- Confirm the deletion of the user’s permissions by selecting OK.
How To Remove Unique Permissions in SharePoint Online?
SharePoint Online is one of the most comprehensive enterprise content management systems available today. It allows users to store and manage documents, photos, videos, and other data in a secure, cloud-based environment. One of the key features of SharePoint Online is its ability to set unique permissions for different users, groups, and files. This allows for more granular control over who has access to what information. However, if you no longer need the unique permissions set, it is possible to remove them.
Check For Unique Permissions
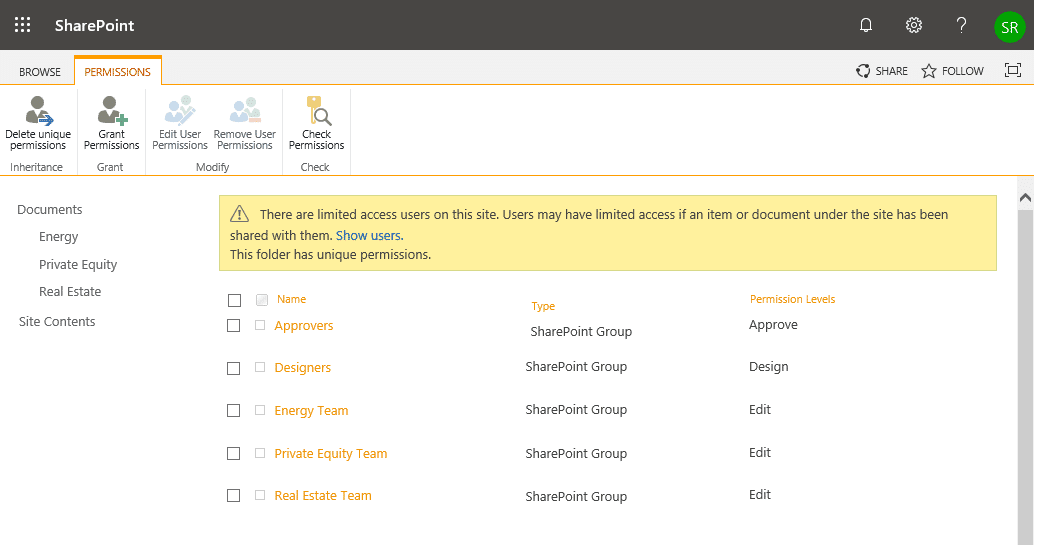
The first step in removing unique permissions is to check whether they have been set. To do this, navigate to the desired document library or list, then click on the “Library Settings” option in the ribbon. On the resulting page, click on the “Permissions for this document library” link. If unique permissions have been set, you will see a message stating “This document library has unique permissions”.
Stop Inheriting Permissions
Once you have confirmed that unique permissions have been set, you can proceed to stop the inheritance of permissions from the parent site or library. To do this, click on the “Stop Inheriting Permissions” link at the top of the page. This will remove all existing permissions and allow you to set new ones.
Remove Existing Permissions
Before you can add new permissions, you need to remove the existing ones. To do this, select the “Check Permissions” option in the ribbon. This will display a list of all the users, groups, and files with permissions set on the document library. Select the permissions you wish to remove and click the “Delete” button at the top of the page.
Add New Permissions
Once the existing permissions have been removed, you can then add new ones. To do this, click on the “Add Users” option in the ribbon. This will display a list of all available users, groups, and files. Select the ones you wish to give permission to and click the “Add” button at the top of the page.
Set Permissions Level
The next step is to set the permissions level for each user or group. To do this, select the desired user or group and click the “Edit Permissions” button at the bottom of the page. This will open a dialog box where you can select the desired permissions level. Once you have made your selection, click the “OK” button to save the changes.
Save Changes
Once you have set the desired permissions levels, you can then save the changes. To do this, click the “Save” button at the bottom of the page. This will save the changes and the unique permissions will be removed from the document library.
Verify Changes
To verify the changes have been applied, navigate to the document library or list and click the “Check Permissions” option in the ribbon. This will display a list of all the users, groups, and files with permissions set on the document library. If the desired permissions have been applied, you will see a message stating “This document library has unique permissions”.
Enable Unique Permissions
If you wish to enable unique permissions on the document library, you can do so by clicking on the “Enable Unique Permissions” option in the ribbon. This will allow you to set different permissions for different users, groups, and files.
Disable Unique Permissions
If you wish to disable unique permissions on the document library, you can do so by clicking on the “Disable Unique Permissions” option in the ribbon. This will reset the permissions to the default level set by the parent site or library.
Auditing
If you wish to keep track of who has accessed the document library or list, you can enable auditing. To do this, navigate to the desired document library or list and click on the “Auditing” option in the ribbon. This will display a list of all the users, groups, and files with permissions set on the document library.
Manage Access Requests
If you wish to allow users to request access to the document library or list, you can enable access requests. To do this, navigate to the desired document library or list and click on the “Manage Access Requests” option in the ribbon. This will display a list of all the users, groups, and files with access requests.
Permission Levels
The last step in managing permissions for a SharePoint Online document library or list is to set the appropriate permission levels. To do this, click on the “Permission Levels” option in the ribbon. This will open a dialog box where you can select the desired permissions level for each user or group. Once you have made your selections, click the “OK” button to save the changes.
Frequently Asked Questions
Question 1: What is a unique permission in SharePoint Online?
Answer: A unique permission in SharePoint Online is a type of permission that is applied to a specific item, list, library, or folder within a site collection. This type of permission overrides any permissions set at the parent level, allowing you to grant different levels of access to different people. This is useful when you have a group of people with different roles and access levels and you want to control their access to specific items.
Unique permissions can be set by opening the item’s properties and clicking the “Advanced” button. This will open a window where you can select the permissions you want to give to the item. You can choose to give only the permissions you want to give, or you can select the “Inherit permissions from parent” option to give the same permissions that the parent has.
Question 2: How do I remove unique permissions in SharePoint Online?
Answer: Removing unique permissions in SharePoint Online is a simple process. First, open the item’s properties and click the “Advanced” button. In the window that opens, select the “Inherit permissions from parent” option. This will remove any unique permissions that have been applied to the item and replace them with the permissions of the parent item.
Next, if you have already granted unique permissions to the item, you can click the “Stop Inheriting Permissions” button. This will remove all of the unique permissions from the item and leave the parent’s permissions intact. Finally, click “OK” to save the changes and the unique permissions will be removed from the item.
Question 3: Is it possible to remove unique permissions from multiple items in SharePoint Online?
Answer: Yes, it is possible to remove unique permissions from multiple items in SharePoint Online. This can be done by using the “Check Permissions” tool. This tool allows you to select multiple items and then set the permissions for those items in one go.
To use this tool, open the library or list containing the items, click the “Library” or “List” tab, select “Check Permissions” from the ribbon, and then select the items you want to change. Finally, select the “Inherit permissions from parent” option to remove the unique permissions from the selected items.
Question 4: What happens if I remove unique permissions from an item in SharePoint Online?
Answer: Removing unique permissions from an item in SharePoint Online will restore the permissions to what the parent item has. This means that any users or groups that had unique access to the item will no longer have access to it. All users or groups with access to the parent item will have access to the item.
It is important to note that if you remove unique permissions from an item and then grant unique permissions to the parent later, the item will inherit the new permissions and the users or groups with access to the parent will be able to access the item.
Question 5: Can I set unique permissions for multiple items at once in SharePoint Online?
Answer: Yes, it is possible to set unique permissions for multiple items at once in SharePoint Online. This can be done using the “Manage Permissions” tool. This tool allows you to select multiple items and then set the permissions for those items in one go.
To use this tool, open the library or list containing the items, click the “Library” or “List” tab, select “Manage Permissions” from the ribbon, and then select the items you want to change. Finally, select the permissions you want to give and click “OK” to save the changes. The unique permissions will be applied to all of the selected items.
In conclusion, removing unique permissions in SharePoint Online can be a tricky task, but with the right guidance, it can be accomplished quickly and easily. By understanding the basics of SharePoint and its security features, you can confidently remove unique permission to ensure the safety of your data, and the integrity of your site. With the right approach, you can ensure a secure and successful SharePoint Online environment.


