


How to Set a Restore Point in Windows 10?
Are you looking for an effective way to keep your Windows 10 computer running smoothly? Setting a restore point is one of the best ways to protect your system from software malfunctions, viruses, and other problems. In this article, we will explore how to create a restore point in Windows 10, so that you can quickly and easily restore your system to a previous point in time if something goes wrong. Read on to learn more!
To create a Restore Point in Windows 10:
- Open the Start menu and type ‘Create a Restore Point’ in the search bar.
- Select ‘Create a Restore Point’ from the search results.
- Choose the drive for which you want to create the Restore Point.
- Click the ‘Create’ button.
- Type in a name for your Restore Point.
- Click ‘Create’.
Your Restore Point is now created.
What is a Restore Point in Windows 10?
A restore point is a snapshot of your Windows 10 system files and settings which allows you to easily revert back to a previous state in case something goes wrong. It’s an important feature of Windows 10, since it allows you to undo any changes that have been made to your system and restore it to a previous state. This can be used to undo any system changes, such as installing new software, deleting files, or updating drivers.
Restore points are created automatically by Windows 10 at regular intervals, but you can also create them manually whenever you want to. This allows you to go back to a time when your system was working properly, without having to reinstall Windows or go through the time consuming process of troubleshooting the problem.
Why You Should Set a Restore Point in Windows 10
Setting a restore point in Windows 10 is an important part of keeping your system running smoothly. It allows you to easily undo any changes that have been made to your system, such as installing new software, deleting files, or updating drivers. This means that if anything goes wrong, you can easily revert back to a previous state without having to reinstall Windows or go through the time consuming process of troubleshooting the problem.
Creating a restore point also allows you to experiment with your system without worrying about the consequences. For example, if you want to try out a new software but are worried about it causing problems, you can create a restore point before installing it. This way, if anything does go wrong, you can easily revert back to a previous state without having to reinstall Windows or go through the time consuming process of troubleshooting the problem.
Finally, creating a restore point can help you save time if you ever need to reinstall Windows. Instead of having to go through the time consuming process of reinstalling all your programs and settings, you can simply restore your system to the point you created the restore point. This can save you hours of time and effort.
How to Set a Restore Point in Windows 10
Setting a restore point in Windows 10 is simple and easy. Here are the steps to follow:
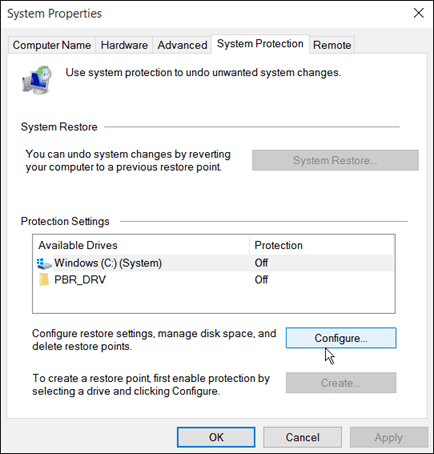
Step 1: Open System Properties
The first step is to open the System Properties window. To do this, go to the Start menu and type “System Properties” into the search box. Then, click on the “System Properties” link that appears.
Step 2: Select the System Protection Tab
Once the System Properties window has opened, click on the “System Protection” tab. This will open the System Protection window, which will allow you to configure your system’s restore points.
Step 3: Create a Restore Point
Once you’re in the System Protection window, you can create a new restore point by clicking on the “Create” button. This will open the “Create a Restore Point” window, which will allow you to name your restore point and provide a description. Once you’ve done this, click “Create” and your restore point will be created.
Tips for Setting a Restore Point in Windows 10
Set a Regular Schedule
It’s a good idea to set a regular schedule for creating restore points. This will ensure that you always have a recent restore point that you can revert to if anything goes wrong.
Check for Problems Regularly
It’s also a good idea to check for any problems with your system regularly. This will help you identify any issues before they become serious, and you can create a restore point to undo any changes you may have made.
Top 6 Frequently Asked Questions
What is a Restore Point?
A Restore Point is a snapshot of your Windows 10 system settings at a particular point in time. It contains information about system files, registry settings, software, and hardware settings. The Restore Point can be used to restore your system to a previous state if something goes wrong or you make changes that you don’t want to keep.
How often should I set a Restore Point?
It is a good practice to set a Restore Point before making any major changes to your system or installing any new software. It is also recommended to set a Restore Point after any significant system updates or driver installations.
How do I set a Restore Point in Windows 10?
Setting a Restore Point in Windows 10 is easy. First, open the Control Panel and select “System and Security”. Next, click on “System” and select “System Protection”. Finally, click on “Create” and enter a name for the Restore Point. Once the Restore Point is created, it will be listed in the “System Protection” tab.
How do I restore to a Restore Point in Windows 10?
To restore to a Restore Point, open the Control Panel and select “System and Security”. Next, click on “System” and select “System Protection”. Then, click on “System Restore” and select the Restore Point that you want to restore to. Finally, click on “Next” and follow the instructions to restore your system to the selected Restore Point.
Can I restore to a Restore Point in Safe Mode?
Yes, you can restore to a Restore Point in Safe Mode. To do so, you will need to boot into Safe Mode and then open the Control Panel and select “System and Security”. Next, click on “System” and select “System Protection”. Then, click on “System Restore” and select the Restore Point that you want to restore to. Finally, click on “Next” and follow the instructions to restore your system to the selected Restore Point.
Do Restore Points get deleted automatically?
No, Restore Points do not get deleted automatically. Restore Points are stored until you manually delete them or until the system runs out of disk space. It is recommended to periodically delete older Restore Points to free up disk space. To delete a Restore Point, open the Control Panel and select “System and Security”. Next, click on “System” and select “System Protection”. Then, click on “System Restore” and select the Restore Point that you want to delete. Finally, click on “Delete” and follow the instructions to delete the selected Restore Point.
Windows 10 – How to Create a System Restore Point
In conclusion, setting a Restore Point in Windows 10 is an important and easy step to protect your computer and data. By following the steps outlined in this article, you can quickly and easily create a Restore Point in Windows 10 and add an extra layer of security to your computer. Restoring your computer to the Restore Point is also easy, and can save you a lot of time and trouble if you ever need to restore your computer to an earlier state.


