


How to Share Screen Windows 10?

If you are looking for an easy way to share your screen with others on Windows 10, then this article is for you. In this article, you will learn how to quickly and easily share your screen with family, friends, and colleagues. You will learn the steps to set up screen sharing and the various tools available to use. We will also discuss the security features to keep your screen secure. By the end of this article, you will be able to share your screen with anyone in no time. Let’s get started!
Sharing your Screen in Windows 10 is Easy
Windows 10 has a built-in tool that allows you to share your screen with another person. Here’s how to do it:
- Open the Windows 10 Action Center and click the “Project” button.
- Select the “Connect to a Wireless Display” option.
- Select the wireless display you want to connect to.
- Follow the on-screen instructions to finish connecting.
- Once connected, you can share your screen with the other person.
Steps for Screen Sharing on Windows 10
Screen sharing is a great way to work collaboratively with colleagues, friends and family. Fortunately, Windows 10 makes it easy to share your screen with others. This article will provide an overview of how to share your screen on Windows 10.
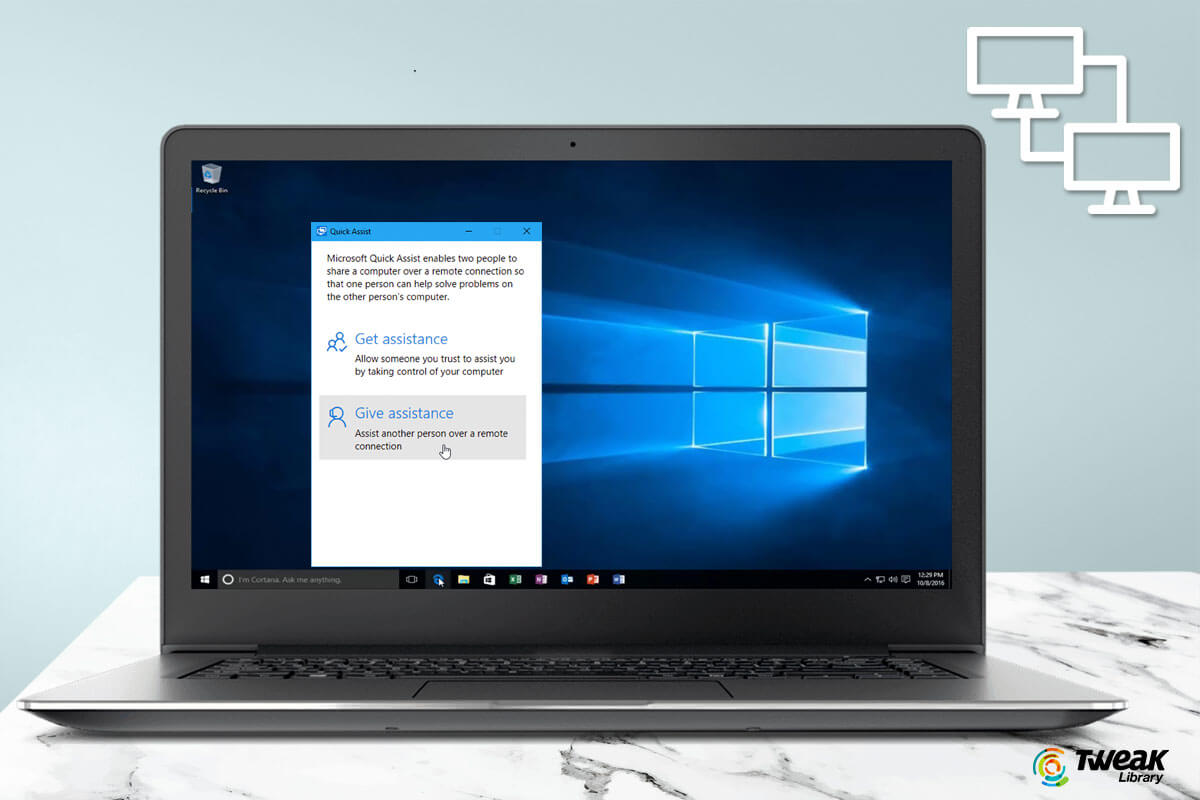
Windows 10 has several options for screen sharing, including the Quick Assist app, the built-in Windows 10 Game Bar, and third-party programs like Skype, TeamViewer, and Zoom. This article will focus on how to use the Quick Assist app to share your screen.
Quick Assist is a built-in app in Windows 10 that allows you to share your screen with someone else, who can then control your computer remotely. It’s great for providing tech support to family and friends, or for collaborating with colleagues. In this article, we’ll walk you through the steps for sharing your screen on Windows 10 using Quick Assist.
Step 1: Open Quick Assist on Both Computers
The first step is to open Quick Assist on both computers. To do this, press the Windows key and type “Quick Assist”, then click the Quick Assist app when it appears in the search results. This will open the Quick Assist app on both computers.
Once the app is open on both computers, the person who wants to share their screen should click the “Share” button, while the person who wants to view the shared screen should click the “Assist” button.
Step 2: Connect the Computers
The next step is to connect the two computers. The person sharing their screen should click the “Generate Code” button and then send the code to the person who is assisting. The person assisting should then enter the code into the Quick Assist app to connect the two computers.
Once the connection is established, the person sharing their screen will be able to see the person assisting’s screen, and the person assisting will be able to see the person sharing’s screen.
Step 3: Start Sharing the Screen
Once the connection has been established, the person sharing their screen should click the “Start Sharing” button to begin sharing their screen. This will allow the person assisting to view and control the person sharing’s computer remotely.
The person sharing their screen can also choose to grant the person assisting access to their mouse and keyboard, which will allow the person assisting to control the person sharing’s computer as if they were sitting in front of it.
Step 4: Stop Sharing the Screen
When you are finished sharing your screen, the person sharing should click the “Stop Sharing” button to end the session. This will disconnect the two computers and the person assisting will no longer be able to access the person sharing’s computer.
The person sharing their screen can also click the “Disconnect” button to end the session without stopping the sharing. This will disconnect the two computers, but the person sharing can still continue to share their screen if they wish.
Step 5: End the Session
When you are finished with the session, the person sharing their screen should click the “End Session” button to end the session. This will close the Quick Assist app on both computers.
Once the session is ended, the person sharing their screen will no longer be able to share their screen with the person assisting, and the person assisting will no longer be able to view or control the person sharing’s computer.
Few Frequently Asked Questions
Q1. What is screen sharing?
Screen sharing is a technology that allows users to view and control another user’s computer screen over the internet. It enables users to share their computer screens with other users in real-time, allowing them to collaborate and share information easily. It can be used for remote support, online meetings, webinars, and more.
Q2. How does screen sharing work?
Screen sharing works by connecting two computers over the internet, allowing the user to view and control the other user’s screen. The user with the shared screen will be able to see what the other user is doing on their screen in real-time, allowing them to make changes or provide feedback as needed. The user with the shared screen will also be able to control the other user’s computer remotely, allowing them to perform tasks such as installing software or troubleshooting issues.
Q3. What is the procedure for sharing the screen in Windows 10?
In order to share a screen in Windows 10, you will need to use the “Project” feature. This feature can be found in the Action Center, which can be accessed by clicking the notification icon in the taskbar. Once you have opened the Action Center, click on “Project” and select “Connect to a wireless display”. You will then be given the option to select the device you wish to share your screen with.
Q4. Are there any special requirements for sharing a screen in Windows 10?
Yes, in order to share a screen in Windows 10, you will need to have a computer that supports Miracast technology. Miracast is a wireless display protocol that allows you to wirelessly share your computer’s screen with another device. Check your computer’s manual to see if it supports Miracast and if it does, you should be able to share your screen in Windows 10.
Q5. How secure is screen sharing in Windows 10?
Screen sharing in Windows 10 is a secure process. It uses a secure connection over the internet and the data that is shared is encrypted, so it is not visible to anyone who may be intercepting the connection. Additionally, the user with the shared screen will only be able to view the other user’s screen and will not be able to control the other user’s computer remotely.
Q6. What are the benefits of using screen sharing in Windows 10?
Using screen sharing in Windows 10 has several benefits. It allows users to collaborate more easily and quickly, as they can view and control the other user’s screen in real-time. It also makes it easier to troubleshoot issues remotely, as the user with the shared screen can see what the other user is doing and help them out. Finally, it is a secure process, as the data is encrypted and the user with the shared screen will not be able to control the other user’s computer remotely.
How to Cast Phone to Windows 10 PC
If you’ve been wanting to share your screen on Windows 10, then you now have the tools to do it. With the simple steps outlined in this article, you can quickly and easily share your screen with any colleagues, friends, or family members who may need to access what you are working on. So get out there and share your screen with the world!


