


How to Turn Off Mic Monitoring Windows 10?

Do you use your computer for audio recordings, gaming or video calls? If so, you know how important it is to have good sound quality. But did you know that the sound from your microphone might be leaking out of your speakers? This is called Mic Monitoring and, if you’re not careful, it can cause an echo or feedback from your speakers. Don’t worry though, we’re here to walk you through the process of how to turn off Mic Monitoring on Windows 10. Read on to learn more about this process and get your audio back to normal!
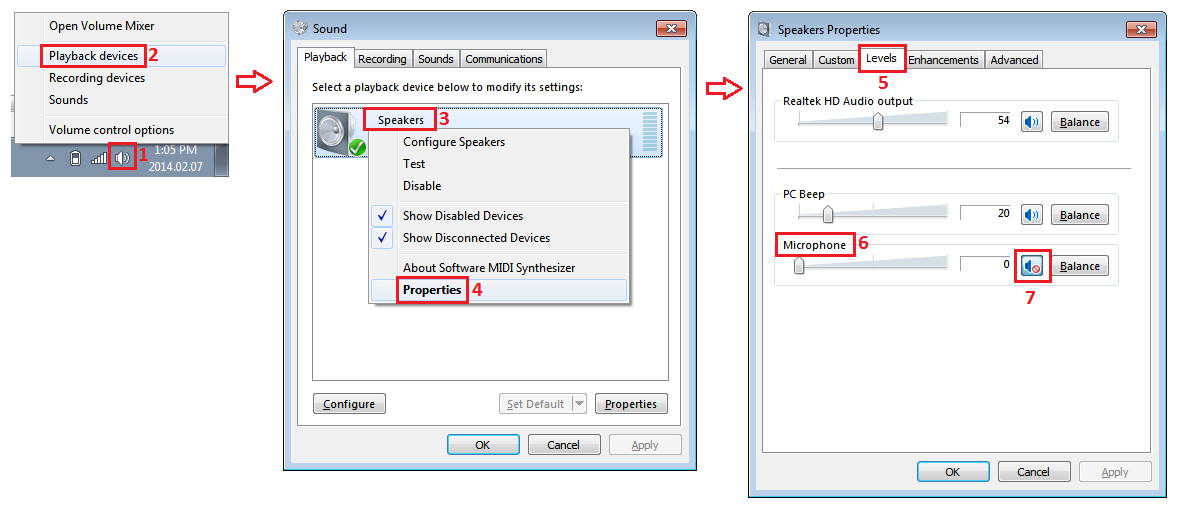
1. Go to your sound settings by pressing Win + I and then selecting Sound from the list of options.
2. Next, select your microphone from the list and then click the Properties button.
3. Now, select the Levels tab from the properties window and uncheck the box for monitoring.
4. Click OK to save your changes and then restart your computer for the changes to take effect.
What is Mic Monitoring and How to Turn it Off in Windows 10
Mic monitoring is a feature that allows sound from your microphone to be heard in your headset. This can be helpful when recording audio, but it can also be a distraction or cause feedback issues when streaming or gaming. Fortunately, there are a few simple steps you can take to turn off mic monitoring in Windows 10.
The first step is to open the Control Panel. You can do this by typing “Control Panel” into the Windows search bar and selecting the app. Once the Control Panel is open, you will need to click on the “Hardware and Sound” option. From there, you should see a “Sound” option. Click on that to open the Sound window.
Once the Sound window is open, you will need to select the “Recording” tab. This tab will show all the connected microphones. You will need to right-click on the microphone you want to turn off mic monitoring for and select “Properties”.
Adjusting the Microphone Properties in Windows 10
In the microphone properties window, you will need to select the “Listen” tab. This tab will allow you to adjust the mic settings. You will need to uncheck the “Listen to this device” box to turn off mic monitoring. You can also adjust the volume level of the mic in this window if needed.
Once you have adjusted the settings, you can click “OK” to save the changes. You should now be able to use the microphone without any mic monitoring. If you need to turn it back on, you can simply return to the microphone properties window and check the “Listen to this device” box.
Changing the Default Playback Device in Windows 10
Another option to turn off mic monitoring is to change the default playback device. This will ensure that the microphone is not being monitored by the computer. To do this, you will need to open the Sound window from the Control Panel. Once the Sound window is open, select the “Playback” tab.
From here, you will need to select a different playback device as the default. You can do this by right-clicking on the desired device and selecting “Set as Default Device”. This will ensure that the microphone is not being monitored.
Checking the Default Communications Device in Windows 10
If you are still having issues with mic monitoring, you may need to check the default communications device. To do this, you will need to open the Sound window from the Control Panel. Once the Sound window is open, select the “Communications” tab.
This tab will show all the connected microphones. You will need to right-click on the microphone you want to turn off mic monitoring for and select “Set as Default Communication Device”. This will ensure that the microphone is not being monitored by the computer.
Checking the Default Recording Device in Windows 10
The last step to turn off mic monitoring is to check the default recording device. To do this, you will need to open the Sound window from the Control Panel. Once the Sound window is open, select the “Recording” tab. This tab will show all the connected microphones.
You will need to right-click on the microphone you want to turn off mic monitoring for and select “Set as Default Recording Device”. This will ensure that the microphone is not being monitored by the computer. Once you have done this, you should be able to use the microphone without any mic monitoring.
Few Frequently Asked Questions
Q1: What is mic monitoring?
Answer: Mic monitoring is a feature that allows you to hear your own voice through your headset or speakers while you are talking. This is useful for online gaming, streaming, and other activities that require you to communicate with others. It also allows you to adjust the volume of your own voice to ensure that it is not too loud or too quiet.
Q2: How do I turn off mic monitoring in Windows 10?
Answer: To turn off mic monitoring in Windows 10, you will need to open the Sound settings. You can do this by typing “sound settings” in the Windows search bar or by going to the Control Panel > Hardware and Sound > Sound. Once you have opened the Sound settings, select the Recording tab and then select your microphone from the list of available devices. Finally, uncheck the box labeled “Listen to this device” to turn off mic monitoring.
Q3: Can I adjust the mic monitoring volume in Windows 10?
Answer: Yes, you can adjust the mic monitoring volume in Windows 10. Open the Sound settings as described above, select the Recording tab and select your microphone from the list of available devices. Then, click the Properties button and select the Levels tab. Here, you can adjust the volume of your microphone to ensure that your voice is not too loud or too quiet when you are talking.
Q4: Is there an easier way to turn off mic monitoring in Windows 10?
Answer: Yes, there is an easier way to turn off mic monitoring in Windows 10. You can open the Control Panel, select the Hardware and Sound category, and then click the Manage Audio Devices option. From here, select your microphone from the list of available devices and then uncheck the box labeled “Listen to this device”. This will turn off mic monitoring in Windows 10 without having to open the Sound settings.
Q5: What should I do if I can’t find my microphone in the list of available devices?
Answer: If you cannot find your microphone in the list of available devices, it is likely that it is not properly connected to your computer. First, make sure that your microphone is connected and that the drivers are installed correctly. If the drivers are not installed, you can download them from the manufacturer’s website. If the drivers are installed and the microphone is still not showing up, try connecting it to a different port on your computer.
Q6: What other features can I use to control my microphone settings in Windows 10?
Answer: In addition to turning off mic monitoring, you can also adjust the microphone settings in Windows 10. Open the Sound settings as described above, select the Recording tab and select your microphone from the list of available devices. Then, click the Properties button and select the Advanced tab. Here, you can adjust the sampling rate, bit depth, and other settings to improve the quality of your microphone.
How to turn off Mic Monitoring Windows 10
If you’ve been struggling to turn off Mic Monitoring on your Windows 10 device, we hope that this guide has provided you with the steps necessary to do so successfully. You should now be able to use your microphone without any issues and without any feedback or echoing. Remember, if you are having trouble with this process, it is always a good idea to reach out to a professional for help.


