


How To Curve Words In Powerpoint?

If you have ever had to create an engaging presentation using Powerpoint, you know how important it is to make it stand out from the rest. A great way to do this is by curving words in Powerpoint. Curving words in Powerpoint can help you create a visually appealing presentation that will attract the attention of your viewers. In this article, we will look at how to curve words in Powerpoint and discuss the best practices for doing so.
How to Curve Words in PowerPoint?
Introduction
PowerPoint is a very powerful tool for creating presentations and is used widely in both the corporate and academic world. It is an excellent way to convey information in a visually appealing and interesting way. Curving words in PowerPoint is a great way to make your presentation look more attractive and professional. In this article, we will discuss how to curve words in PowerPoint.
Creating Curved Text
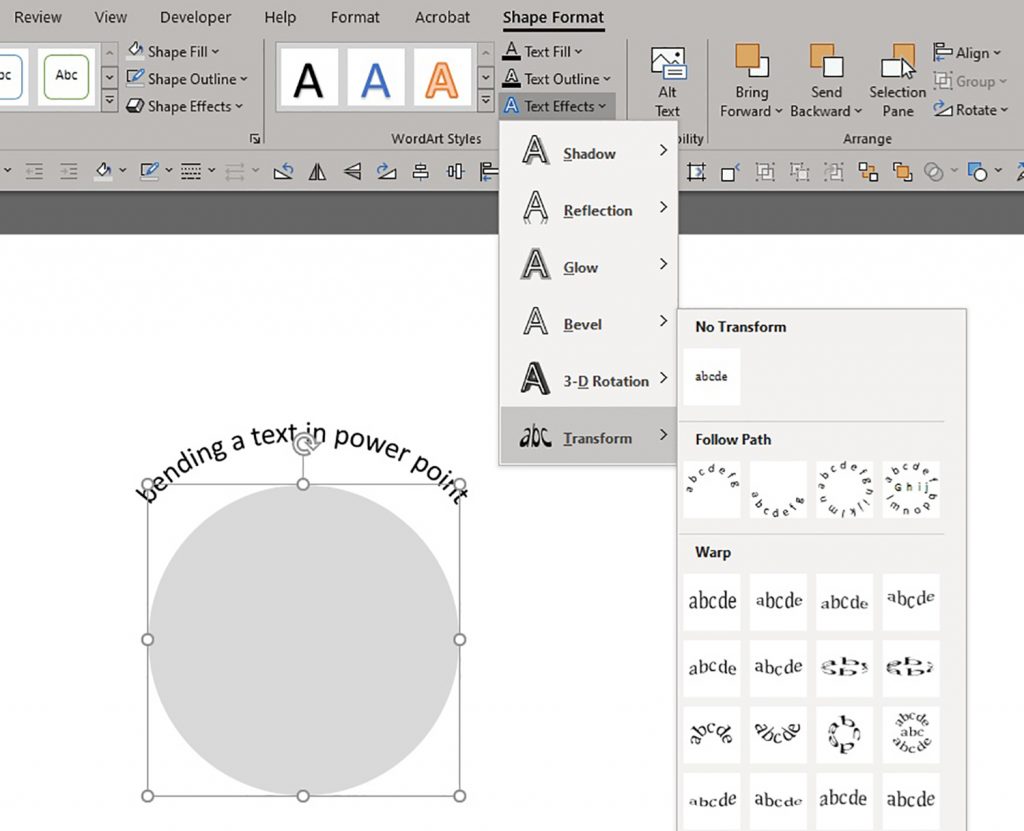
The process of creating curved text in PowerPoint is fairly simple, and can be done in a few easy steps. First, select the text you want to curve. Then, open up the “Format” tab from the ribbon and select the “Text Effects” option. From here, you will be able to select from a number of options for curving your text. You can choose to curve the text around any shape, or to make it wavy or circular. Once you have selected the option you want, simply click “OK” and your text will be curved.
Curving Text Around a Shape
If you want to curve your text around a shape, you will need to select the shape first. Then, select the text you want to curve and open up the “Format” tab. Select the “Text Effects” option and then select the “Curve” option. This will open up a window where you can select the shape you want to curve the text around. Simply select the shape and click “OK”.
Making Wavy or Circular Text
If you want to make your text wavy or circular, you will need to select the text first. Then open up the “Format” tab and select the “Text Effects” option. From here, select the “Wavy” or “Circular” option. This will open up a window where you can adjust the text’s curvature. Simply adjust the curvature to your liking and then click “OK”.
Editing Curved Text
The process of editing curved text in PowerPoint is also fairly simple. First, select the curved text you want to edit. Then, open up the “Format” tab and select the “Text Effects” option. This will open up a window where you can edit the curvature of the text. Simply adjust the curvature to your liking and then click “OK”.
Adjusting the Shape
If you want to adjust the shape of your curved text, you will need to select the text first. Then, open up the “Format” tab and select the “Text Effects” option. From here, select the “Edit Shape” option. This will open up a window where you can adjust the shape of the text. Simply adjust the shape to your liking and then click “OK”.
Changing the Color
If you want to change the color of your curved text, you will need to select the text first. Then, open up the “Format” tab and select the “Text Effects” option. From here, select the “Fill” option. This will open up a window where you can adjust the color of the text to your liking. Simply select the color you want and then click “OK”.
Frequently Asked Questions
What Is the Shortcut Key to Curve Words in Powerpoint?
The shortcut key to curve words in Powerpoint is Alt+Shift+W. This shortcut key allows you to quickly select the WordArt feature and create a curved word. After selecting the WordArt feature, you can type in the text you wish to curve and adjust the settings in the WordArt menu.
What Are the Steps to Curve Words in Powerpoint?
To curve words in Powerpoint, begin by selecting the “Insert” tab at the top of the page. Then, select the “WordArt” button and type the word you wish to curve in the text box. After that, select the “Format” tab on the right side and choose the “Text Effects” drop-down menu. Finally, choose the “Transform” option and then select the desired curve shape.
How Do You Adjust the Curve Settings in Powerpoint?
Once you have selected the desired curve shape, you can adjust the curve settings in Powerpoint. To do this, select the “Format” tab on the right side and choose the “Text Effects” drop-down menu. Then, select the “Transform” option and adjust the settings for the Width, Height, and Rotation.
How Do You Change the Color of Curved Words in Powerpoint?
To change the color of curved words in Powerpoint, select the “Format” tab on the right side and choose the “Text Effects” drop-down menu. Then, select the “WordArt Styles” option and choose the desired color from the color palette. You can also select the “Shape Fill” option and choose a color from the drop-down menu.
How Do You Add Shadows to Curved Words in Powerpoint?
To add shadows to curved words in Powerpoint, select the “Format” tab on the right side and choose the “Text Effects” drop-down menu. Then, select the “Shadow” option and choose the desired shadow type from the drop-down menu. You can also adjust the settings for the shadow, such as the color and size.
How Do You Add an Outline to Curved Words in Powerpoint?
To add an outline to curved words in Powerpoint, select the “Format” tab on the right side and choose the “Text Effects” drop-down menu. Then, select the “Outline” option and choose the desired outline type from the drop-down menu. You can also adjust the settings for the outline, such as the color and width.
How to Curve Text in Powerpoint
Writing curves in PowerPoint can be a great way to make a presentation look more visually appealing. By following the simple steps outlined in this article, you can learn how to create curved shapes in PowerPoint with ease. With a few clicks of the mouse, you can make your slides look more aesthetically pleasing and professional. So, go ahead and start curving your words in PowerPoint today!


