


How to Get Rid of Blank Rows in Excel?

If you’re like many of us, you’ve probably faced the dreaded blank rows in Excel. They can be a pain to deal with, but there are a few simple tricks to get rid of them quickly and efficiently. In this article, we’ll discuss how to get rid of blank rows in Excel, as well as tips for avoiding them in the future. Read on to learn more!
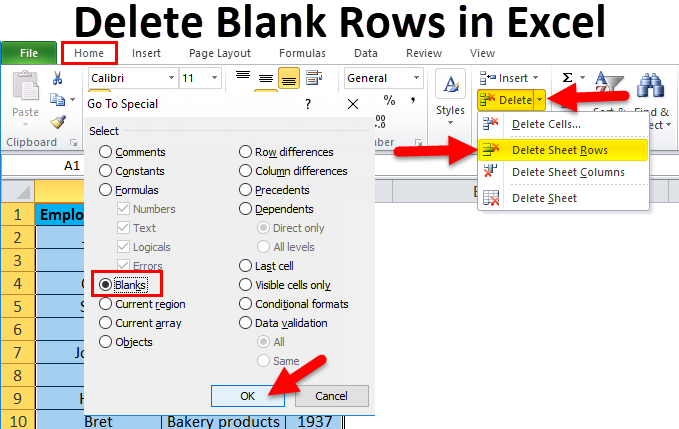
To get rid of blank rows in Excel, delete all the rows that contain blank cells. To do this, select the Home tab, then click Find & Select in the Editing group and select Go To Special. In the Go To Special dialog box, click Blanks and then click OK. Then press the Delete key and select Delete Sheet Rows.
- Select the Home tab
- Click Find & Select in the Editing group
- Select Go To Special
- Click Blanks
- Click OK
- Press the Delete key
- Select Delete Sheet Rows
How to Remove Blank Rows in Excel
Excel is a great tool for managing data. However, when working with large datasets, it can be difficult to keep track of everything. One of the most common problems is dealing with blank rows. Fortunately, there are several methods you can use to quickly and easily remove blank rows in Excel.
Using the Go To Special Command
The Go To Special command is one of the easiest and quickest ways to remove blank rows in Excel. To use this command, click on the Home tab and then the Find & Select button. From the drop-down menu, select the Go To Special command. From the Go To Special window, select Blanks and click OK. This will select all of the blank cells in the worksheet. Once the blank cells are selected, you can delete them or use the fill handle to quickly fill them with a value.
Using the Delete Key
Another way to remove blank rows in Excel is to use the delete key. To do this, select the row or rows you want to delete and then press the delete key. This will delete the selected rows, leaving no trace of them in your worksheet. This method is especially useful if you only want to delete a few rows.
Using a Filter
Filters can also be used to remove blank rows in Excel. To use this method, click the Data tab and then the Filter button. This will display a drop-down arrow next to each column heading. Click the drop-down arrow for the column containing the blank rows and select “Blanks”. This will filter the worksheet so that only the blank rows are visible. From here, you can select the blank rows and delete them.
Using the Find and Replace Command
The Find and Replace command is another useful tool for removing blank rows in Excel. To use it, click the Home tab, then the Find & Select button, and select the Find and Replace command. Type a value in the Find What field and leave the Replace With field blank. This will search the worksheet for cells containing that value and replace them with blank cells. You can then select the blank cells and delete them.
Using VBA to Remove Blank Rows
If you’re comfortable with VBA, you can also use it to remove blank rows in Excel. To do this, open the Visual Basic Editor and enter the following code:
Sub DeleteBlankRows()
Dim rng As Range
Set rng = Range(“A1:A10”)
For Each cell In rng
If cell.Value = “” Then
cell.EntireRow.Delete
End If
Next
End Sub
Running the Macro
Once the code is entered, run the macro by pressing the F5 key. This will search the range specified in the code for blank cells and delete the associated rows. This method is especially useful if you need to delete large number of rows quickly.
Using the Delete Duplicates Command
The Delete Duplicates command is another useful tool for removing blank rows in Excel. To use it, click the Data tab and then the Remove Duplicates button. This will display a window where you can select which columns to check for duplicates. Select the column containing the blank rows and click OK. This will remove all of the blank rows in the selected column.
Using the Clear Command
The Clear command is another way to quickly remove blank rows in Excel. To use it, select the row or rows you want to delete and then click the Home tab and then the Clear button. From the drop-down menu, select Clear All. This will delete the selected rows, leaving no trace of them in your worksheet.
Frequently Asked Questions
Question 1: How do I delete multiple blank rows in Excel?
Answer: To delete multiple blank rows in Excel, start by selecting the rows you want to delete. To do this, click and drag your mouse across the row numbers on the left side of the sheet. Then, right-click on the selection, and select “Delete” from the drop-down menu. A window will appear asking if you want to delete the rows or shift the cells up. Select “Delete Rows” and click “OK”. This will delete all of your selected rows, leaving no blank rows.
Question 2: How do I delete blank rows in Excel using Autofilter?
Answer: To delete blank rows in Excel using Autofilter, start by selecting all the rows that contain data. Then, click the “Data” tab in the ribbon, and select “Filter” from the “Sort & Filter” section. This will add drop-down arrows to your column headers. Click the drop-down arrow next to the first column header, and select “Blanks”. All of the blank rows in your selection will be highlighted. Then, right-click any of the highlighted rows and select “Delete” from the drop-down menu. A window will appear asking if you want to delete the rows or shift the cells up. Select “Delete Rows” and click “OK”. This will delete all of the blank rows in your selection.
Question 3: How do I delete blank rows at the top of a sheet in Excel?
Answer: To delete blank rows at the top of a sheet in Excel, start by selecting the rows you want to delete. To do this, click and drag your mouse across the row numbers on the left side of the sheet. Then, right-click on the selection, and select “Delete” from the drop-down menu. A window will appear asking if you want to delete the rows or shift the cells up. Select “Delete Rows” and click “OK”. This will delete all of the blank rows at the top of the sheet, leaving no blank rows.
Question 4: How do I delete blank rows at the bottom of a sheet in Excel?
Answer: To delete blank rows at the bottom of a sheet in Excel, select the rows you want to delete. To do this, click and drag your mouse across the row numbers on the left side of the sheet, starting at the bottom of the sheet and dragging to the top. Then, right-click on the selection, and select “Delete” from the drop-down menu. A window will appear asking if you want to delete the rows or shift the cells up. Select “Delete Rows” and click “OK”. This will delete all of the blank rows at the bottom of the sheet, leaving no blank rows.
Question 5: How do I delete blank rows between data in Excel?
Answer: To delete blank rows between data in Excel, start by selecting the rows you want to delete. To do this, click and drag your mouse across the row numbers on the left side of the sheet. Then, right-click on the selection, and select “Delete” from the drop-down menu. A window will appear asking if you want to delete the rows or shift the cells up. Select “Delete Rows” and click “OK”. This will delete all of the blank rows between data in your selection, leaving no blank rows.
Question 6: Is there a shortcut to delete blank rows in Excel?
Answer: Yes, there is a shortcut to delete blank rows in Excel. To do this, start by selecting the rows you want to delete. To do this, click and drag your mouse across the row numbers on the left side of the sheet. Then, press “Ctrl + -” on your keyboard. A window will appear asking if you want to delete the rows or shift the cells up. Select “Delete Rows” and click “OK”. This will delete all of your selected rows, leaving no blank rows.
How to Delete Blank Rows in Excel
If you have ever encountered any issues with blank rows in Excel, then you know how frustrating it can be to try to delete them. Fortunately, there are several methods you can use to quickly and easily get rid of them. From using the Go To command to using the filter feature, these methods are simple and effective. So next time you have to get rid of blank rows in Excel, you won’t have to worry.


