


How To Map Sharepoint Drive?

Do you need to access your SharePoint documents quickly and efficiently? Mapping SharePoint drives can be a great way to do just that. It enables you to save files to your computer and access them with just a few clicks. In this article, we’ll show you how to easily map your SharePoint drives and make your workflow more efficient.
Mapping Sharepoint Drive
Mapping Sharepoint drive allows you to quickly access your files stored in Sharepoint from your computer, without having to login to the web interface. Here’s how to do it:
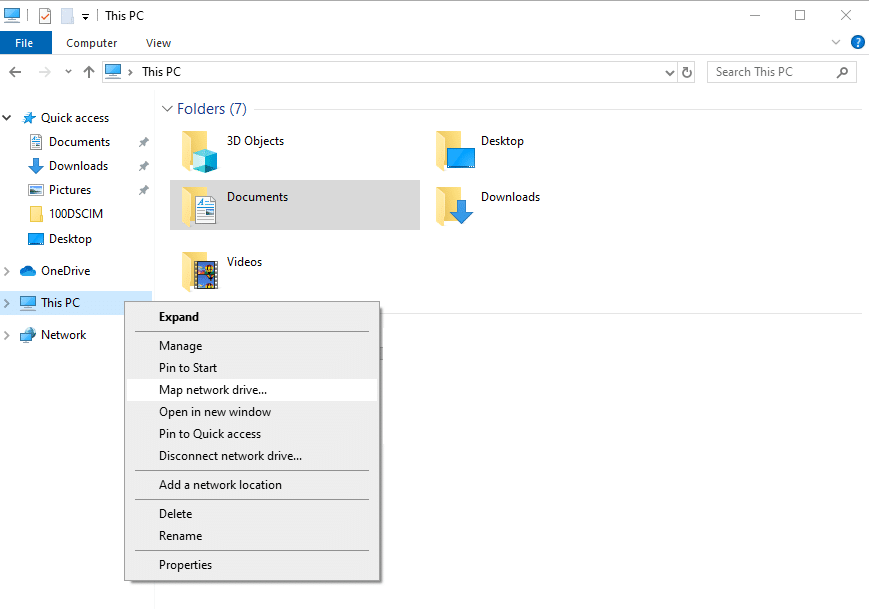
- Open Windows Explorer, click on “This PC” and then click on “Computer” (in the top menu).
- Click on “Map network drive”.
- In the Folder field, enter the URL of your SharePoint site.
- Choose an available drive letter from the drop-down menu.
- Check the box next to “Reconnect at sign-in”.
- Click “Finish”.
Your Sharepoint drive is now mapped, and you can access it just like any other folder on your computer.
What is SharePoint?
SharePoint is a web-based collaborative platform developed by Microsoft. It is mainly used for document management, but also provides a platform for other enterprise-level collaboration needs. SharePoint provides a shared workspace for teams to store, organize, collaborate, and share information. It is often used as an enterprise-level intranet system, and can be used to create web portals, document libraries, lists, and more.
How to Map SharePoint Drive?
Mapping a SharePoint drive is a simple process that allows you to quickly and easily access the files and folders stored in your SharePoint account. By mapping a SharePoint drive, you can access all of your SharePoint files and folders directly from your computer, without having to use a web browser.
Step by Step Guide to Map SharePoint Drive
Step 1: Open ‘Computer’ Window
To start mapping your SharePoint drive, open the ‘Computer’ window on your Windows computer. This window can be found in the Start menu, or by searching for ‘Computer’ in the search bar.
Step 2: Right Click and Select ‘Map Network Drive’
Once the ‘Computer’ window is open, right-click anywhere in the window and select the ‘Map Network Drive’ option.
Step 3: Enter SharePoint Address
In the ‘Map Network Drive’ window, enter the URL of the SharePoint site you would like to map. This URL should start with ‘https://’ and include the full name of the SharePoint site.
Step 4: Enter Login Credentials
Next, you will be asked to enter your login credentials. Enter the username and password that you use to access your SharePoint account.
Step 5: Select the ‘Reconnect at Sign In’ Option
Once you have entered your login credentials, make sure to select the ‘Reconnect at sign in’ option. This will ensure that your SharePoint drive is automatically connected when you log in to your computer.
Step 6: Choose a Drive Letter
You will then be asked to select a drive letter for your SharePoint drive. This is the letter that will be used to access your SharePoint drive in the ‘Computer’ window.
Step 7: Select the ‘Connect Using Different Credentials’ Option
If you are mapping a SharePoint drive that is not associated with the current user, you will need to select the ‘Connect using different credentials’ option. This will allow you to enter the login credentials of the account associated with the SharePoint drive.
Step 8: Check the ‘Reconnect at Sign In’ Option
If you select the ‘Connect using different credentials’ option, make sure to select the ‘Reconnect at sign in’ option. This will ensure that the drive is automatically connected when the user logs in.
Step 9: Click ‘Finish’
Once you have selected the drive letter and entered the login credentials, you can click the ‘Finish’ button to complete the process.
Step 10: Access the SharePoint Drive
Once the process is complete, you can access the SharePoint drive from the ‘Computer’ window. The drive will be listed with the drive letter you selected. You can then open the drive and access the files and folders stored in your SharePoint account.
Related Faq
What is Sharepoint Drive?
Sharepoint Drive is a business productivity platform that allows users to store, share, and collaborate on documents, tasks, and projects. It provides users with a secure platform to store and manage their data, as well as a centralized location to collaborate with colleagues and teams. Sharepoint Drive is part of Microsoft’s Office 365 suite and is available both in the cloud and on-premises.
Sharepoint Drive also provides a wide range of features, such as document libraries, task lists, calendars, blogs, wikis, and discussion boards, that help users manage their work. It also offers powerful search capabilities, which allow users to quickly find the information they need.
How to Map Sharepoint Drive?
Mapping Sharepoint Drive is a simple process that can be done in a few steps. First, open the Windows File Explorer and select the “Computer” tab. Then, click the “Map Network Drive” button and select the drive letter you would like to use for Sharepoint Drive. Next, enter the URL of the Sharepoint site you would like to map, and then click the “Connect” button. Finally, enter your username and password to authenticate the connection.
Once the connection is established, the Sharepoint Drive will appear in the File Explorer. You can now access the contents of the drive and collaborate with others on documents, tasks, and projects. Additionally, you can set up synchronization options to make sure that your local copy of the Sharepoint Drive is up to date with the latest changes.
What are the Benefits of Mapping Sharepoint Drive?
Mapping Sharepoint Drive offers a number of benefits for users. Firstly, it provides a convenient way to access the contents of a Sharepoint site. This makes it easier to find and manage documents, tasks, and projects. Moreover, mapping Sharepoint Drive allows users to collaborate on documents with their colleagues in a secure and centralized location. Finally, users can also set up synchronization options to keep their local copy of the Sharepoint Drive up to date.
In addition to these benefits, mapping Sharepoint Drive also improves user productivity by reducing the time and effort required to search for and access documents. Furthermore, by mapping Sharepoint Drive, users can also quickly share documents with colleagues and teams.
What is Required to Map Sharepoint Drive?
To map Sharepoint Drive, you need to have access to a Windows computer and the URL of the Sharepoint site you would like to map. Additionally, you need to have a valid username and password to authenticate the connection.
If you are using the Sharepoint Drive in the cloud, then you need to make sure that your computer is connected to the internet. Additionally, you need to make sure that your computer has the necessary software and hardware requirements to use Sharepoint Drive.
What is the Difference between Mapping and Synchronizing Sharepoint Drive?
Mapping Sharepoint Drive is a process of connecting to a Sharepoint site and its contents, while synchronization is a process of keeping the local copy of the Sharepoint Drive up to date with the latest changes.
Mapping Sharepoint Drive allows users to access the contents of the Sharepoint site and collaborate on documents with their colleagues. On the other hand, synchronization ensures that the local copy of the Sharepoint Drive is always up to date with the latest changes. By synchronizing Sharepoint Drive, users can ensure that their local copy of the documents is always up to date.
What are the Limitations of Mapping Sharepoint Drive?
Mapping Sharepoint Drive can be a convenient way to access the contents of a Sharepoint site, but it does have some limitations. Firstly, the mapping process requires a valid username and password to authenticate the connection. Additionally, if you are using the Sharepoint Drive in the cloud, then you need to make sure that your computer is connected to the internet.
Furthermore, the mapping process only allows users to access the contents of the Sharepoint site. It does not allow users to make changes to the Sharepoint site or its contents. Lastly, mapping Sharepoint Drive does not provide any synchronization options, which means that users need to manually update their local copy of the Sharepoint Drive to keep it up to date.
Once you have completed these steps, you will have successfully mapped your SharePoint drive. This will allow you to access and manage your files and documents in an organized and efficient manner. With your SharePoint drive mapped, you can now easily share documents, collaborate on projects, and store important files. With the help of SharePoint you can make sure your documents are secure and accessible from anywhere with an internet connection.


