


How to Add Fonts to Indesign Windows 10?

If you’re a Windows 10 user who loves to play around with fonts and add some extra flair to your work, then this guide is for you! In this article, we’ll walk you through the steps of adding fonts to Adobe InDesign on Windows 10. We’ll cover where to find new fonts, how to install them, and how to make them available in InDesign. With our help, you’ll be able to spice up your projects with amazing fonts in no time!
How to Add Fonts to Indesign Windows 10?
Adding fonts to Adobe InDesign is quite easy. Here are the steps you need to follow:
- Open the Control Panel.
- Go to Fonts.
- Copy the font you wish to install from your computer into the Fonts folder.
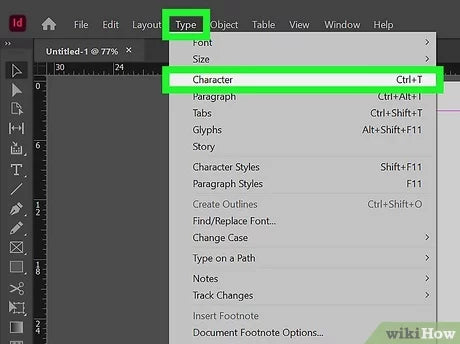
- Open the Adobe InDesign application.
- Go to Type, and then to Find Fonts.
- Select the font you wish to add.
- Click OK to add the font.
Adding Fonts to Indesign in Windows 10
Indesign is a desktop publishing program from Adobe that allows users to create publications, such as brochures and magazines. To ensure that your publication looks its best, you will need to add fonts to your Indesign program. This tutorial will provide instructions on how to add fonts to Indesign on Windows 10.
Downloading Fonts
The first step to adding fonts to Indesign is to download the font file. There are a few different ways to do this. You can purchase fonts from online font providers such as MyFonts.com or Fontspring.com. Alternatively, you can download free fonts from sites such as Font Squirrel or Google Fonts. Once you have found the font you want to use, download the font file to your computer.
Installing Fonts
Once you have downloaded the font file, you will need to install it. To do this, open the folder where the font file is stored. Then, double-click on the font file to open it. A window will open with an Install button. Click on the Install button to install the font.
Activating Fonts in Indesign
Once the font is installed, you will need to activate it in Indesign. To do this, open Indesign and select the Type menu. Then, select the Fonts submenu. In the Fonts window, select the Activate Fonts button. This will open a window with a list of all the fonts installed on your computer. Select the font you want to use and click the Activate button.
Using Fonts in Indesign
Once you have activated the font in Indesign, you can begin using it in your documents. To do this, select the Type menu and then select the Fonts submenu. In the Fonts window, select the font you want to use and click OK. The font will now be available to use in your documents.
Updating Fonts in Indesign
If you are using a font from an online provider, they may release updates to the font. To ensure that you are using the latest version of the font, you will need to update it in Indesign. To do this, open the Type menu and select the Fonts submenu. Then, select the Update Fonts button. This will open a window with a list of all the fonts installed on your computer. Select the font you want to update and click the Update button.
Deactivating Fonts in Indesign
If you no longer need a font, you can deactivate it to save space on your computer. To do this, open the Type menu and select the Fonts submenu. In the Fonts window, select the Deactivate Fonts button. This will open a window with a list of all the fonts installed on your computer. Select the font you want to deactivate and click the Deactivate button. The font will now be deactivated and will no longer be available to use in Indesign.
Frequently Asked Questions
1. What is Adobe Indesign?
Answer: Adobe InDesign is a desktop publishing and design software application developed by Adobe Systems. It is mainly used for typesetting, publishing layouts, and creating graphic designs and illustrations. InDesign allows users to create a variety of documents such as flyers, brochures, magazines, newspapers, and books. It also has features for page layout, vector drawing, image editing, and typesetting.
2. How do I add fonts to InDesign Windows 10?
Answer: To add fonts to InDesign on Windows 10, simply navigate to the fonts folder in the Control Panel and copy the font files into it. In Windows 10, the fonts folder is located at C:\Windows\Fonts. Once the font files are copied into the folder, they will be available for use in InDesign.
3. Do I need a specific type of font file?
Answer: Yes, in order to use a font in InDesign, the font file must be in a supported format. InDesign supports OpenType (.otf) and TrueType (.ttf) font formats. If a font is not in one of these formats, it cannot be used in InDesign.
4. Is there a way to preview fonts before adding them to InDesign?
Answer: Yes, Windows 10 has a built-in font preview tool. To access the font preview tool, open the fonts folder in the Control Panel. Then, simply double-click on any font file to open the preview window. This will allow you to view the font and its different styles before adding it to InDesign.
5. Can I add fonts from other sources?
Answer: Yes, you can add fonts from other sources. Many websites offer free fonts that can be downloaded and used in InDesign. To install a font from a website, simply download the font file to your computer and copy it into the fonts folder in the Control Panel.
6. Are there any limitations when adding fonts to InDesign?
Answer: Yes, there are some limitations to consider when adding fonts to InDesign. First, InDesign can only support a limited number of fonts. Additionally, some fonts may not be supported by InDesign due to their format or other restrictions. Finally, you should always make sure that you have the appropriate license to use any fonts you add to InDesign.
How to install new font in Adobe CC (InDesign | Illustrator | Photoshop)
Adding fonts to InDesign on Windows 10 is easier than ever! With just a few clicks, you can easily find and add any font you need for your project. With a wide selection of fonts to choose from and the ability to quickly install them, you’ll be able to take your InDesign projects to the next level without any hassle. So what are you waiting for? Start installing fonts and make your project stand out from the rest!


