


How to Allocate Unallocated Space in Windows 10?

Are you looking for a way to optimize your computer’s performance? Allocating unallocated space in Windows 10 is one of the best ways to ensure your computer is running at its best. In this article, we will explain how to allocate unallocated space in Windows 10 and why it is important. We will also provide tips on how to make sure your computer is running optimally. With the right steps, you can ensure your computer is working at its best and maximize its performance. So let’s get started and learn how to allocate unallocated space in Windows 10!
- Open the Disk Management tool by pressing Windows key+R and typing ‘diskmgmt.msc’ in the Run dialog box.
- Find the unallocated space and right-click it.
- Select ‘New Simple Volume’ and go through the wizard.
- Choose a drive letter, file system, and allocation size.
- Click ‘Finish’ and the process is complete.
How to Assign Unallocated Space on Windows 10
Windows 10 is a powerful operating system that offers users a lot of features and flexibility. One of the most useful features is the ability to assign unallocated space on the hard drive. Unallocated space is space on the hard drive that has not been assigned to any specific partition or file system. This space can be used to create new partitions, increase the size of an existing partition, or store files. In this article, we will discuss how to assign unallocated space on Windows 10.
The first step to assigning unallocated space on Windows 10 is to open the Disk Management utility. This can be done by typing ‘Disk Management’ in the Windows search bar and then selecting the Disk Management option from the list of results. Once the Disk Management window is open, you will be able to see a list of all the disks installed on your system.
Create a New Partition
If you want to create a new partition with the unallocated space, you will need to right-click on the unallocated space and select the ‘New Simple Volume’ option. This will open the New Simple Volume Wizard, which will ask you to specify the size of the partition and the file system type. Once you have specified the size and file system type, you will be able to click ‘Finish’ and the new partition will be created.
Extend an Existing Partition
If you want to extend an existing partition with the unallocated space, you will need to right-click on the existing partition and select the ‘Extend Volume’ option. This will open the Extend Volume Wizard, which will ask you to specify the size of the partition to be extended. Once you have specified the size, you will be able to click ‘Finish’ and the existing partition will be extended.
Format the Unallocated Space
If you want to format the unallocated space, you will need to right-click on the unallocated space and select the ‘Format’ option. This will open the Format window, which will allow you to specify the file system type, the allocation unit size, and the volume label. Once you have specified these settings, you will be able to click ‘OK’ and the unallocated space will be formatted.
Create a Volume Label
If you want to create a volume label for the unallocated space, you will need to right-click on the unallocated space and select the ‘Create Volume Label’ option. This will open the Create Volume Label window, which will allow you to enter a volume label for the unallocated space. Once you have entered a volume label, you will be able to click ‘OK’ and the volume label will be created.
Store Files on the Unallocated Space
If you want to store files on the unallocated space, you will need to create a new partition or extend an existing partition. Once you have created a new partition or extended an existing partition, you will be able to store files on the newly created partition or extended partition.
Few Frequently Asked Questions
What is Unallocated Space in Windows 10?
Unallocated space is a type of storage space in Windows 10 that has not been assigned to any specific storage drive, partition, or folder. Unallocated space can occur when a hard drive is first installed, when existing partitions are deleted, or when a new partition is created. This space can be allocated to any existing partition in order to increase its size.
How to Check Unallocated Space in Windows 10?
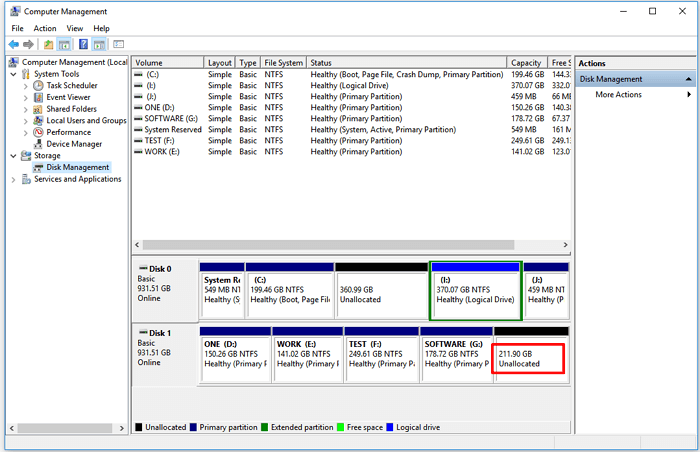
Unallocated space can be checked in Windows 10 by opening the Disk Management tool. To do this, type “Disk Management” into the search bar and select the “Create and format hard disk partitions” option. The Disk Management tool will open and show the partitions and their sizes, including any unallocated space.
How to Allocate Unallocated Space in Windows 10?
Unallocated space can be allocated to an existing partition in Windows 10 using the Disk Management tool. To do this, select the partition that is to be increased in size and right-click it. Select the “Extend Volume” option, and then enter the amount of unallocated space to be allocated. This will add the selected amount of unallocated space to the existing partition.
What is the Difference Between Unallocated Space and Free Space?
Unallocated space and free space are both types of storage space that are not assigned to any specific partition, folder, or file. The difference between them is that free space is space that is available to be used, while unallocated space is space that has not been assigned to any partition.
Can Unallocated Space be Converted to Primary Partition?
Yes, unallocated space can be converted to a primary partition in Windows 10. To do this, right-click the unallocated space and select the “New Simple Volume” option. Follow the instructions to create a partition, and then select the primary partition option when prompted.
Can Unallocated Space be Used for Data Storage?
Yes, unallocated space can be used for data storage in Windows 10. To do this, right-click the unallocated space and select the “New Simple Volume” option. Follow the instructions to create a partition, and then assign a drive letter to the new partition. This will allow the unallocated space to be used for data storage.
How to allocate unallocated space in windows 10
To wrap up, allocating unallocated space in Windows 10 is a straightforward process that doesn’t require any technical expertise. All users need to do is open the Disk Management utility, select the unallocated space, and assign it a drive letter. With this process, users can quickly and easily free up space and make the most of their hard drive.


