


How To Assign A Task In Outlook?

If you’re a busy professional or student who needs to manage tasks, Outlook offers an easy way to assign and track tasks. In this article, we’ll discuss how to assign tasks in Outlook, so you can manage your tasks more effectively and efficiently. We’ll also discuss how to use Outlook to view and track progress, and how to collaborate with others on tasks. So, let’s get started and learn how to assign tasks in Outlook!
Assigning a Task in Outlook: To assign a task in Outlook, follow these steps:
- Open Outlook and go to the Tasks section.
- Click “New Task” to create a new task.
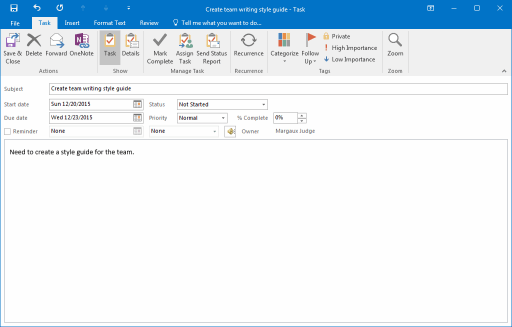
- Enter the task details such as title, start date, due date, etc.
- Click “Assign Task” to assign the task to someone.
- In the Assign Task window, enter the name of the assignee.
- Click “Send” to send the task to the assignee.
Outlook: How to Assign a Task
Assigning a task in Outlook lets you assign tasks to one or more people in your organization quickly and easily. It’s an excellent way to keep track of tasks and keep everyone on the same page. This guide will explain how to assign a task in Outlook and how to track the progress of the task.
Outlook is a powerful tool for managing tasks and keeping everyone informed. It allows you to assign tasks to one or more people, set deadlines, and track the progress of the task. You can also use Outlook to communicate with the assignee, which helps keep everyone on the same page.
Create a Task in Outlook
The first step to assigning a task in Outlook is to create the task. To do this, open Outlook and select the Tasks tab. Then, click the New Task icon in the top left corner of the window. This will open a new task window.
In the new task window, you can enter the details of the task. This includes the title, description, due date, assignee, and any other relevant information. Once you have entered the task details, click the Save icon at the top of the window.
Assign the Task
Once you have created the task, you can assign it to someone in your organization. To do this, click the Assign icon at the top of the task window. This will open a new window where you can select the assignee.
Once you have selected the assignee, you can add a message to the task. This message can be used to provide additional information or instructions to the assignee. Then, click the Send button to assign the task.
Track the Progress of the Task
Once you have assigned the task, you can track the progress of the task. To do this, open the task window and select the Tracking tab. This will show you the progress of the task.
You can also use the Tracking tab to communicate with the assignee. This can be done by clicking the Comments tab and entering a message. The assignee will receive the message and can reply to it.
Update the Task
Once the task is complete, you can update the task in Outlook. To do this, open the task window and select the Update tab. This will allow you to change the task details, such as the due date or assignee.
Once you have updated the task, click the Save icon at the top of the window. This will update the task in Outlook and notify the assignee of the changes.
Conclusion
Assigning tasks in Outlook is a quick and easy way to keep everyone informed about tasks and track the progress of the task. By following the steps outlined in this guide, you can create, assign, track, and update tasks in Outlook.
Related Faq
1. What is a Task in Outlook?
A Task in Outlook is a feature that allows you to create and track tasks, both for yourself and for other people. It lets you assign tasks, set deadlines, and track progress. You can also add notes and files to the task, making it easier to keep everyone on the same page.
2. How do I create a Task in Outlook?
Creating a Task in Outlook is easy. First, open the Outlook app, and select the “Tasks” icon in the lower left-hand corner of the screen. From there, you can select “New Task” to create your task. Enter a title, assignee, due date, and any other details, then click “Save”.
3. How do I assign a Task in Outlook?
Once you’ve created your task, you’ll need to assign it to someone. To do this, open the task, then click the “Assign” button. Enter the name or email address of the person you’d like to assign the task to, then click “Save”. You can also assign tasks directly from the “Tasks” list.
4. How do I track progress on a Task in Outlook?
Tracking progress on a Task in Outlook is easy. Just open the task, and you’ll see options for “Started”, “In Progress”, “Completed”, and “Deferred”. Select the appropriate option to track the task’s progress. You can also view a list of all tasks and their progress by selecting the “Tasks” icon in the lower left-hand corner of the screen.
5. How do I add notes and files to a Task in Outlook?
Adding notes and files to a Task in Outlook is easy. Open the task, and you’ll see a section for “Notes”. Here, you can type in any additional information you’d like to add. You can also add files by clicking the “Attach File” button. Select the file you’d like to attach, then click “Open”.
6. Can I assign a task to multiple people in Outlook?
Yes, you can assign a task to multiple people in Outlook. When you create a task, simply enter the names or email addresses of all the people you’d like to assign the task to. You can also assign a task to multiple people from the “Tasks” list. Just select the task, then click the “Assign” button. Enter the names or email addresses of the people you’d like to assign the task to, then click “Save”.
Assigning tasks in Outlook can be a daunting task for anyone who is not familiar with the program. It is important to take the time to understand the process and practice it to ensure that tasks are tracked and completed in a timely manner. By following the steps outlined in this article, you can easily assign tasks in Outlook and ensure that all of your tasks are tracked and completed.


