


How To Block Calendar In Outlook?

Are you overwhelmed with too many meetings clogging your Outlook calendar? Do you wish there was a way to block out certain times or even days to free up your schedule? If the answer is yes, then this article is for you. Here, we will be discussing how to block calendar in Outlook, a feature that can help you take back control of your schedule. From setting up calendar blocks to managing them, we will cover everything you need to know to make Outlook calendar blocking a breeze. So, let’s get started!
How to Block Calendar in Outlook?
- Open Outlook and switch to Calendar View.
- Click the Home tab and select Calendar Groups > Block Time.
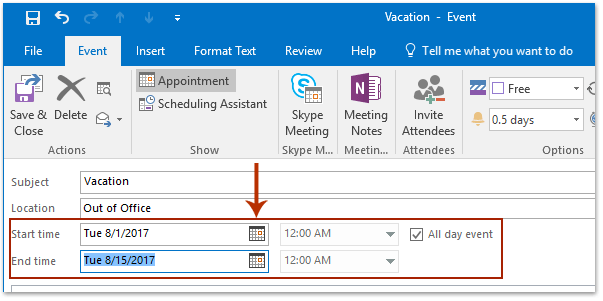
- Set a start and end time and select a color for the block of time.
- Click the Save & Close button.
How to Block Calendars in Outlook
Blocking calendars in Outlook can help you stay organized and keep track of your important events and meetings. Blocking calendars in Outlook can help you manage your time more efficiently and make sure you don’t miss any important events or meetings. In this article, we’ll show you how to block calendars in Outlook.
Step 1: Open the Calendar View
The first step in blocking calendars in Outlook is to open the calendar view. To do this, click on the Calendar icon in the navigation pane on the left side of the Outlook window. This will open the calendar view, where you can view your upcoming events and meetings.
Step 2: Select the Calendar You Want to Block
Once you are in the calendar view, you will need to select the calendar you want to block. To do this, click on the drop-down arrow next to the calendar you want to block. This will open a list of all the available calendars. Select the calendar you want to block and click on the “Block” button.
Step 3: Customize Your Blocked Calendar
Once you have selected the calendar you want to block, you can customize the blocked calendar to fit your needs. To do this, click on the “Options” button and then select the “Blocked Calendar” tab. Here you can choose the time frame you want to block the calendar and any other settings you might need.
Step 4: Save Your Blocked Calendar
Once you have customized your blocked calendar, click on the “Save” button to save your changes. Your blocked calendar will now be displayed in the calendar view and any events or meetings that are scheduled during the blocked time frame will be blocked.
Step 5: View Your Blocked Calendar
Once you have saved your blocked calendar, you can view it in the calendar view. To do this, click on the “View” button and select the “Blocked Calendar” option. This will open a window with all the blocked calendars that you have set up. Here you can view the blocked calendar and make any necessary changes.
Step 6: Unblock a Calendar
If you decide you no longer need to block a calendar, you can easily unblock it. To do this, click on the “Blocked Calendar” tab and select the calendar you want to unblock. Then, click on the “Unblock” button and the calendar will be unblocked.
Step 7: Delete a Blocked Calendar
If you want to delete a blocked calendar that you no longer need, you can do so by clicking on the “Delete” button. This will delete the blocked calendar and all of its associated events and meetings.
Related Faq
What is Outlook Calendar?
Outlook Calendar is a calendar application that is part of Microsoft Office, and is included in Outlook, an email client software. It allows users to manage their schedules, create events, and add contacts. It can also be used to sync with other calendar applications, such as Google Calendar.
How to Block Calendar in Outlook?
In order to block calendar in Outlook, users must first open the Outlook application and then click on the “Calendar” icon in the navigation pane. Then, select the “Options” tab and click on the “Calendar Options” button. In the Calendar Options window, click on the “Privacy” tab and then select the “Block” option. Finally, enter the email address of the person you want to block and click “OK”.
What is the Difference Between Blocking and Deleting a Calendar Event in Outlook?
The difference between blocking and deleting a calendar event in Outlook is that when a calendar event is blocked, it is no longer visible to the user and cannot be selected. When an event is deleted, it is completely removed from the calendar, and cannot be recovered.
How to Unblock a Calendar in Outlook?
In order to unblock a calendar in Outlook, users must first open the Outlook application and then click on the “Calendar” icon in the navigation pane. Then, select the “Options” tab and click on the “Calendar Options” button. In the Calendar Options window, click on the “Privacy” tab and then select the “Unblock” option. Find the email address of the person who you want to unblock and click “OK”.
How to Set a Calendar as Private in Outlook?
In order to set a calendar as private in Outlook, users must first open the Outlook application and then click on the “Calendar” icon in the navigation pane. Then, select the “Options” tab and click on the “Calendar Options” button. In the Calendar Options window, click on the “Privacy” tab and then select the “Private” option. This will make the calendar private, meaning it can only be accessed by the user and any other users who the user has specifically shared the calendar with.
How to Share a Calendar in Outlook?
In order to share a calendar in Outlook, users must first open the Outlook application and then click on the “Calendar” icon in the navigation pane. Then, select the “Options” tab and click on the “Calendar Options” button. In the Calendar Options window, click on the “Share” tab and then select the “Share” option. Enter the email address of the person you would like to share the calendar with and click “OK”. The user will then be able to view the calendar, but will not be able to make any changes.
Use Time Blocking for Productivity in an Outlook 365 Calendar
Blocking calendar in Outlook is a great way to stay organized and keep your work life and personal life separate. By following the steps outlined in this article, you can easily manage, add, and delete blocks of time in your Outlook calendar. With the ability to customize your calendar, you can make sure you are never overbooked or forget important meetings or events. Taking advantage of this feature makes it easier to stay on track and manage your time.


