


How to Calculate Area Under Curve in Excel?

Are you looking for an easy way to calculate the area under a curve in Excel? If so, you have come to the right place! In this article, I will show you how to quickly and accurately calculate the area under a curve in Excel. I will walk you through the step-by-step process, so that by the end of this article, you will confidently be able to calculate the area under any curve in Excel with ease. So, let’s get started!
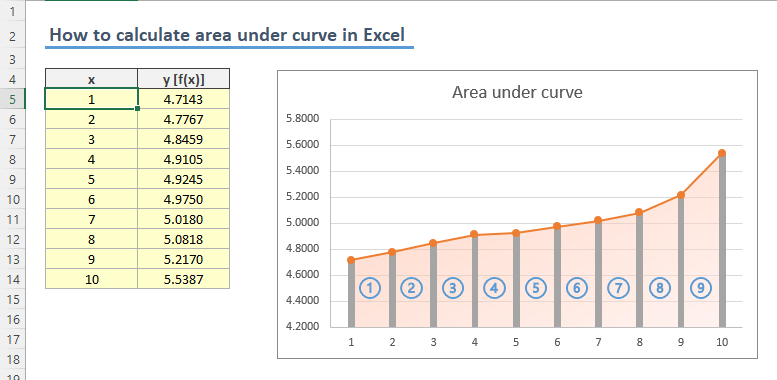
Calculate Area Under Curve in Excel: You can calculate the area under a curve in Excel using the area under the curve formula. Here are the steps:
- Open your Excel spreadsheet.
- Enter the x-axis and y-axis data points in two columns.
- Add a third column and enter the area under the curve formula, =Sum(x*y).
- Enter the formula in each cell of the third column.
- Add up the values in the third column to get the total area under the curve.
Calculating Area Under a Curve in Excel
Using Excel to calculate the area under a curve is a great way to save time and get accurate results. Microsoft Excel is a powerful spreadsheet program that can be used to calculate the area under a curve using a variety of methods. In this article, we will discuss how to calculate the area under a curve in Excel, as well as different methods for doing so.
Using the SUM Function to Calculate Area
The simplest method of calculating the area under a curve in Excel is to use the SUM function. This method involves creating a series of evenly spaced points along the curve and then adding up the area under each point to get the total area under the curve. To do this, start by entering the x-values for each point in a column and then enter the corresponding y-values in the column to the right. After entering the data, select the cells containing the x and y values and click the “Insert” tab. Then, select the “Column” option and choose the “Stacked Column” option. This will create a column graph of the data points.
The next step is to select the “Formulas” tab and select the “SUM” function. Enter the range of cells containing the y-values and click “OK”. This will calculate the area under the curve by adding up the area for each point.
Using the AREAS Function to Calculate Area
Another method of calculating the area under a curve in Excel is to use the AREAS function. This method involves plotting the data points on a graph and then calculating the area between the points. To do this, start by entering the x-values for each point in a column and then enter the corresponding y-values in the column to the right. After entering the data, select the cells containing the x and y values and click the “Insert” tab. Then, select the “Column” option and choose the “Stacked Column” option. This will create a column graph of the data points.
The next step is to select the “Formulas” tab and select the “AREAS” function. Enter the range of cells containing the y-values and click “OK”. This will calculate the area under the curve by adding up the area for each point.
Using the TREND Function to Calculate Area
The final method of calculating the area under a curve in Excel is to use the TREND function. This method involves fitting a line to the data points and then calculating the area under the line. To do this, start by entering the x-values for each point in a column and then enter the corresponding y-values in the column to the right. After entering the data, select the cells containing the x and y values and click the “Insert” tab. Then, select the “Line” option and choose the “Smooth Line” option. This will create a line graph of the data points.
The next step is to select the “Formulas” tab and select the “TREND” function. Enter the range of cells containing the x and y values and click “OK”. This will calculate the area under the curve by fitting a line to the data points and then calculating the area under the line.
Using the FILL Function to Calculate Area
The fourth method of calculating the area under a curve in Excel is to use the FILL function. This method involves filling in the area between the data points with a color and then calculating the area of the filled area. To do this, start by entering the x-values for each point in a column and then enter the corresponding y-values in the column to the right. After entering the data, select the cells containing the x and y values and click the “Insert” tab. Then, select the “Area” option and choose the “Area Chart” option. This will create an area graph of the data points.
The next step is to select the “Formulas” tab and select the “FILL” function. Enter the range of cells containing the x and y values and click “OK”. This will calculate the area under the curve by filling in the area between the points and then calculating the area of the filled area.
Using the CURVATURE Function to Calculate Area
The fifth and final method of calculating the area under a curve in Excel is to use the CURVATURE function. This method involves fitting a curve to the data points and then calculating the area under the curve. To do this, start by entering the x-values for each point in a column and then enter the corresponding y-values in the column to the right. After entering the data, select the cells containing the x and y values and click the “Insert” tab. Then, select the “Line” option and choose the “Smooth Line” option. This will create a line graph of the data points.
The next step is to select the “Formulas” tab and select the “CURVATURE” function. Enter the range of cells containing the x and y values and click “OK”. This will calculate the area under the curve by fitting a curve to the data points and then calculating the area under the curve.
Top 6 Frequently Asked Questions
What is the formula to calculate the area under a curve in Excel?
The formula to calculate the area under a curve in Excel is the trapezoidal rule: area = (b-a) * (f(a) + f(b))/2, where a and b are the two endpoints of the curve, and f(x) is the function value at x.
What is the trapezoidal rule?
The trapezoidal rule is an approximation method used to calculate the area under a curve. It works by approximating the area under a curve as a series of trapezoids, each with a base width of (b-a), and a height of the average of the two function values at the endpoints. The area of each trapezoid is then calculated and summed to give the total area under the curve.
What are the limitations of the trapezoidal rule?
The trapezoidal rule is only an approximation, so it is not always accurate. It is also limited by the number of trapezoids used – the more trapezoids used, the more accurate the approximation, but this also increases the calculation time. Additionally, the trapezoidal rule works best with smooth curves – it may not be as accurate for curves with sharp corners or discontinuities.
How do you calculate the area under a curve in Excel?
To calculate the area under a curve in Excel, you first need to create a table of values for the curve. Then, you can use the trapezoidal rule formula mentioned above to calculate the area. To do this, select the two endpoints of the curve (a and b) and the corresponding function values (f(a) and f(b)) and then enter the formula in a cell. This will give you the area under the curve between the two endpoints.
How can you graph the area under a curve in Excel?
You can graph the area under a curve in Excel by creating a scatter plot of the curve. To do this, first create a table of values for the curve. Then, select the two endpoints of the curve (a and b) and the corresponding function values (f(a) and f(b)). Next, create a new scatter plot with the two endpoints as the x-axis values and the function values as the y-axis values. This will graph the area under the curve between the two endpoints.
Are there any other methods to calculate the area under a curve in Excel?
Yes, there are several other methods to calculate the area under a curve in Excel. These include Simpson’s rule, the midpoint rule, the Romberg method, and the Monte Carlo method. All of these methods are more accurate than the trapezoidal rule, but they are also more computationally intensive.
Find the area under a curve in Excel
In conclusion, calculating the area under a curve in Excel is an easy task once you understand the basics of the process. Using the SUMPRODUCT formula, you can quickly and accurately calculate the area under a curve in just a few steps. Additionally, you can use the AVERAGE, SUM, and OFFSET functions to create a more complex formula to calculate the area under a curve with multiple data points. With these tools, you can easily calculate the area under a curve and make informed decisions with your data.


