


How to Change Screensaver on Windows 10?

Are you tired of looking at the same screensaver every time you turn on your Windows 10 computer? It’s time to switch things up! In this article, we will discuss how to change the screensaver on your Windows 10 computer. We will explain the different steps you need to follow in order to change the screensaver and make sure that your Windows 10 device is displaying the image of your choice. With a few simple steps, you can easily change the screensaver on your Windows 10 computer and start enjoying a fresh new look. So, let’s get started!
- Open Settings by pressing Windows Key+I.
- Click Personalization.
- Click the link Lock Screen on the left side of the Personalization window.
- Under Background, select Slideshow.
- To add pictures to your Slideshow, click Add at the right side of the window.
- Choose the pictures you want to include in the Slideshow.
- Select the Change picture every drop down box and choose the amount of time you want each picture to display.
- When you are finished, click Save changes.
How to Change Screensavers on Windows 10
A screensaver is a type of computer program designed to protect the screen of a computer from images being burned into the screen. Windows 10 includes several preinstalled screensavers, and users can easily install additional screensavers as well. This article provides step-by-step instructions for changing the screensaver on Windows 10.
Step 1: Open the Personalization Menu
The first step in changing the screensaver on Windows 10 is to open the Personalization menu. To do this, open the Start menu, then click on “Settings.” Next, click on “Personalization,” then select “Lock Screen.” This will open the Personalization menu, which contains several options for customizing the screensaver.
Step 2: Choose a Screensaver
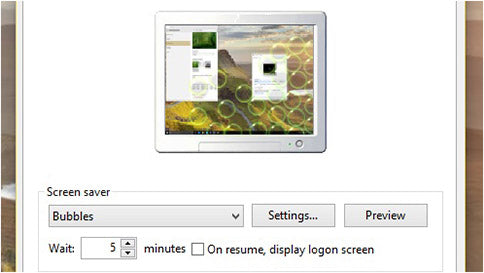
Once the Personalization menu is open, users can select a screensaver by clicking the “Screensaver Settings” option. This will open a menu with several options for selecting a screensaver. Windows 10 includes several pre-installed screensavers, such as “Bubbles” and “Mystify.” Users can also select a third-party screensaver from this menu.
Step 3: Adjust Screensaver Settings
Once the desired screensaver is selected, users can adjust the settings for the screensaver by clicking the “Settings” button. This will open a window where users can adjust the time before the screensaver activates, the time before the computer goes to sleep, and the time before the computer turns off. Once the desired settings are selected, click “OK” to save the changes.
Step 4: Preview the Screensaver
Once the settings are adjusted, users can preview the screensaver by clicking the “Preview” button. This will open a window where users can see what the screensaver will look like before it is activated. Once the desired screensaver is selected and the settings are adjusted, users can click “OK” to save the changes.
Step 5: Activate the Screensaver
Once the settings are adjusted and the desired screensaver is selected, users can activate the screensaver by clicking the “Activate” button. This will activate the screensaver and it will appear on the screen when the computer goes to sleep. Once the screensaver is activated, it will remain active until the user manually changes it or turns it off.
Step 6: Enjoy the Screensaver
Once the desired screensaver is activated, users can enjoy the new look on their computer. The screensaver will be displayed whenever the computer goes to sleep, providing a unique and interesting look for users to enjoy.
Few Frequently Asked Questions
What is a Screensaver?
A screensaver is a type of computer program used to prevent phosphor burn-in on CRT and plasma computer monitors by blanking the screen or filling it with moving images or patterns when the computer is not in use.
How do I Change the Screensaver on Windows 10?
To change the screensaver on Windows 10, open the Settings app and go to Personalization > Lock Screen. Then click on the dropdown menu under the Screensaver Settings heading and select the screensaver of your choice.
Where can I find Screensavers for Windows 10?
You can find screensavers for Windows 10 in the Microsoft Store. You can also search for them online, as there are many third-party websites offering free and paid screensavers for Windows 10.
What is the Default Screensaver on Windows 10?
The default screensaver on Windows 10 is the Windows Spotlight. It displays a variety of images from Bing, including amazing photographs, artwork, and other images.
How do I Set a Timeout for the Screensaver on Windows 10?
To set a timeout for the screensaver, open the Settings app and go to Personalization > Lock Screen. Then click on the dropdown menu under the Timeout Settings heading and select the desired timeout.
Can I Customize the Screensaver on Windows 10?
Yes, you can customize the screensaver on Windows 10 by changing the timeout, size, and other settings. To do this, open the Settings app and go to Personalization > Lock Screen. Then click on the dropdown menu under the Customize Settings heading and select the desired settings.
How to Change the Screensaver on Windows 10
If you have been wanting to change your screensaver on Windows 10, you now have the steps to do it. Follow the steps outlined above and you will be able to customize your Windows 10 experience to your own preferences. With a few simple steps, you can now enjoy a screensaver of your own choosing.


