


How to Completely Remove Kaspersky From Windows 10?

Are you looking for a way to completely remove Kaspersky from your Windows 10 device? If so, you’ve come to the right place. Removing Kaspersky can be a tricky process, and it’s important to follow the right steps to ensure that it’s completely and thoroughly removed. In this article, we’ll walk you through the process and help you ensure that Kaspersky is completely removed from your Windows 10 device.
How to Completely Remove Kaspersky From Windows 10?
- Click the Start menu and select the Settings option.
- Click Apps, then click Apps & Features.
- In the list of installed apps, look for Kaspersky Security and click it.
- Click the Uninstall button and follow the instructions on the screen.
- Once the uninstallation is complete, restart your computer.
How to Uninstall Kaspersky from Your Windows 10 Computer
Kaspersky is an antivirus software that is used to protect your Windows 10 computer from malicious software and viruses. However, if you no longer need Kaspersky or want to switch to a different antivirus program, you may want to uninstall Kaspersky from your computer. In this article, we’ll provide you with step-by-step instructions on how to completely remove Kaspersky from Windows 10.
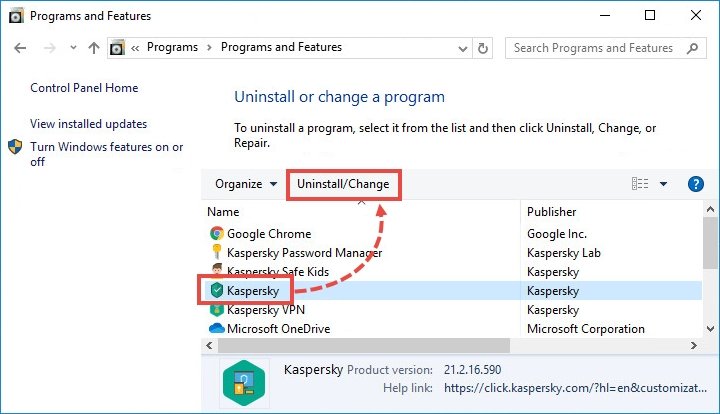
Step 1: Remove Kaspersky from the Control Panel
The first step to uninstalling Kaspersky from your Windows 10 computer is to remove it from the Control Panel. To do this, open the Control Panel and then click on “Programs”. Next, select “Uninstall a program” to open a list of all the programs installed on your computer. Find Kaspersky in the list of programs and then click on it to select it. Finally, click on the “Uninstall” button to begin the uninstallation process.
Step 2: Remove Kaspersky from the Registry
Once you have removed Kaspersky from the Control Panel, the next step is to remove it from the Registry. To do this, open the Registry Editor by typing “regedit” in the search box. Then, navigate to the following location: HKEY_LOCAL_MACHINE\SOFTWARE\Kaspersky Lab. Once you have located the Kaspersky Lab folder, delete it.
Step 3: Remove Kaspersky from the Task Manager
The next step is to remove Kaspersky from the Task Manager. To do this, open the Task Manager by pressing Ctrl+Alt+Del and then select the “Processes” tab. Find the Kaspersky process in the list and then right-click on it and select “End Process”. This will end the Kaspersky process and remove it from the Task Manager.
Step 4: Remove Kaspersky from the Startup Menu
The last step to completely remove Kaspersky from your Windows 10 computer is to remove it from the Startup menu. To do this, open the Task Manager again and then select the “Startup” tab. Find the Kaspersky process in the list and then right-click on it and select “Disable”. This will prevent Kaspersky from launching at startup and will completely remove it from your computer.
Step 5: Restart Your Computer
Once you have completed the steps above, the final step is to restart your computer to ensure that all the changes have taken effect. This will complete the uninstallation process and Kaspersky will no longer be on your computer.
Few Frequently Asked Questions
Q1: How do I uninstall Kaspersky from Windows 10?
A1: To uninstall Kaspersky from Windows 10, open the Start menu and type “Apps & Features” into the search bar. Select the option for Apps & Features and locate Kaspersky from the list of installed programs. Click on Kaspersky and select Uninstall. Follow the instructions provided by the uninstaller to complete the process.
Q2: What do I do if the Kaspersky uninstaller fails?
A2: If the Kaspersky uninstaller fails, you will need to use the Windows Uninstaller to remove the program. You can access the Windows Uninstaller by opening the Start menu and typing “Control Panel” into the search bar. Select the Control Panel option and open the Uninstall a Program option. From here, select Kaspersky and click Uninstall. Follow the instructions provided by the uninstaller to complete the process.
Q3: How do I delete all traces of Kaspersky from Windows 10?
A3: To delete all traces of Kaspersky from Windows 10, you will need to use a third-party tool such as IObit Uninstaller to completely remove the program. Download and install IObit Uninstaller, then open the program and locate Kaspersky from the list of installed programs. Select Kaspersky and click Uninstall. Follow the instructions provided by the uninstaller to complete the process.
Q4: How do I remove Kaspersky antivirus from Windows 10?
A4: To remove Kaspersky antivirus from Windows 10, open the Start menu and type “Apps & Features” into the search bar. Select the option for Apps & Features and locate Kaspersky from the list of installed programs. Click on Kaspersky and select Uninstall. Follow the instructions provided by the uninstaller to complete the process.
Q5: How do I remove Kaspersky from my registry?
A5: To remove Kaspersky from the registry, you will need to use a third-party tool such as CCleaner. Download and install CCleaner, then open the program and select Registry. Select the Kaspersky entries from the list, then click Fix Selected Issues. Follow the instructions provided by the program to complete the process.
Q6: How do I reinstall Kaspersky on Windows 10?
A6: To reinstall Kaspersky on Windows 10, you will need to download and install the latest version of the program from the Kaspersky website. Once the program is downloaded, open the installer and follow the instructions provided by the installer to complete the installation.
How To Completely Uninstall Or Remove Kaspersky Antivirus On Windows 10
Removing Kaspersky from Windows 10 is a simple process that can be completed with just a few clicks. The process is easy to understand and can be completed in a few minutes. The steps outlined in this guide should help you effortlessly uninstall Kaspersky from your Windows 10 system. With the right knowledge and guidance, you can be sure that you have successfully removed Kaspersky from Windows 10 and that your system is now free from any malicious or unwanted software.


