


How to Create D Drive in Windows 10?

Are you a Windows 10 user and want to know how to create D Drive in Windows 10? Then look no further! In this article, we will discuss the simple steps to create a D Drive in Windows 10 in the most straightforward way. So, get ready to learn the quick and easy steps to create a D Drive in Windows 10!
To create a D Drive in Windows 10:
- Open the Control Panel.
- Click on the Administrative Tools option.
- Click on the Computer Management option.
- Click on the Disk Management option.
- Right click on the unallocated space on your hard drive.
- Choose the New Simple Volume option.
- Choose the size for the drive.
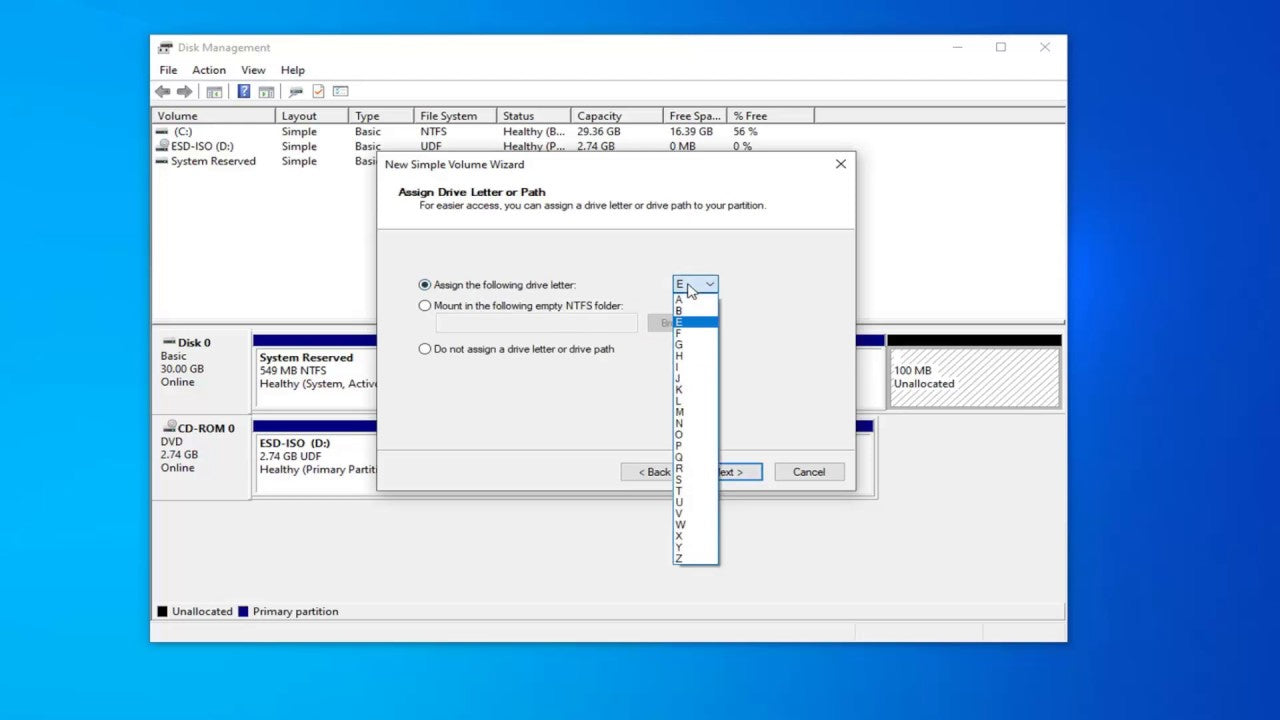
- Choose the drive letter for the partition.
- Format the partition.
- Name the volume.
- Click the Finish button.
How to Create a D Drive in Windows 10
Overview
Creating a D Drive in Windows 10 is a simple process that can be completed in a few minutes. It is an easy way to create an additional hard drive partition on your computer. This guide will provide a step-by-step tutorial for creating a D Drive in Windows 10.
Prerequisites
Before creating a D Drive in Windows 10, you will need to have a spare hard drive partition available. You can either create a new partition using a third-party partitioning tool or use the Windows built-in Disk Management utility.
You will also need to have administrator privileges on your computer. This is necessary in order to access the Disk Management utility and create the D Drive.
Steps for Creating a D Drive in Windows 10
Step 1: Open the Disk Management Utility
The first step in creating a D Drive in Windows 10 is to open the Disk Management utility. To do this, press the Windows key + R to open the Run dialog box. Enter “diskmgmt.msc” into the box and press Enter.
Step 2: Create a New Partition
The next step is to create a new partition for the D Drive. To do this, right-click on the unallocated space and select “New Simple Volume.” Follow the on-screen instructions to create the new partition.
Step 3: Format the Partition
Once the new partition has been created, it will need to be formatted. To do this, right-click on the partition and select “Format.” Select the file system you wish to use and click “OK” to format the partition.
Step 4: Assign a Drive Letter
The next step is to assign a drive letter to the new partition. To do this, right-click on the partition and select “Change Drive Letter and Paths.” Select the letter “D” and click “OK.”
Step 5: Access the D Drive
The final step is to access the new D Drive. To do this, open File Explorer and select the “This PC” option. The D Drive should now be listed in the list of drives.
Conclusion
Creating a D Drive in Windows 10 is a straightforward process that can be completed in a few minutes. All you need to do is create a new partition, format it, assign a drive letter, and then access the drive. Once the D Drive has been created, you can begin storing files and folders on it.
Few Frequently Asked Questions
Q1. What is a D Drive?
A D Drive is a virtual storage drive created on a computer system that allows for the storage of files and data. On the Windows 10 operating system, the D Drive is a logical drive that is created on the system’s hard drive and is used to store data and files. It is a separate drive from the C drive, which is the primary drive used by the OS to store system files and programs.
Q2. Why would someone want to create a D Drive?
Creating a D Drive can help reduce the strain on the primary C drive, which is used to store the operating system and other important files and programs. By creating a D Drive, users can store files and data that are not critical to the functioning of the system and that would otherwise take up valuable space on the C drive. It also provides a convenient place to store data and files that don’t need to be accessed frequently or backed up regularly.
Q3. What is the process for creating a D Drive in Windows 10?
The process for creating a D Drive in Windows 10 is relatively simple. First, you need to open the “Disk Management” utility by right-clicking on the Start menu and selecting “Disk Management” from the context menu. Once the Disk Management window is open, you can right-click on an unallocated area of the hard drive and select “New Simple Volume.” This will open the New Simple Volume Wizard, which will guide you through the process of creating your new D Drive.
Q4. What are the steps for formatting a D Drive?
When creating the D Drive in the Disk Management utility, you will be asked to select the file system format for the drive. Your options are NTFS, FAT32, exFAT, and ReFS. NTFS is the most common and recommended choice for Windows 10, but you can select the file system that best meets your needs. Once you have selected the file system, you will be asked to assign a drive letter and to provide a name for the drive. Finally, you will be asked to specify the size of the drive and to select the drive’s allocation unit size.
Q5. How can I access the new D Drive?
Once the new D Drive has been created and formatted, you can access it in the same way you would access any other drive on your computer. You can open File Explorer, select the drive, and view the contents. You can also assign a shortcut to the drive so that you can quickly access it from the Start menu or the desktop.
Q6. How do I delete a D Drive?
If you no longer need the D Drive or want to delete it for any other reason, you can do so from the Disk Management utility. First, you will need to delete any files or data that is stored on the drive. Once the drive is empty, you can right-click on it and select “Delete Volume.” This will delete the D Drive and free up the space on the hard drive for other uses.
How to Create Partition in Windows 10 & Windows 11 | Create New Drive (2021)
Creating a D drive in Windows 10 is a great way to give yourself extra space for storing your documents, photos, music, and other important files. With just a few simple steps, you can easily create a new D drive on your computer. By following the steps outlined in this guide, you can ensure that your files are being stored in the most efficient and secure way possible. With the help of this guide, you can now confidently create a D drive in Windows 10 and ensure that your files are stored safely and securely.


