


How to Disable Caps Lock Windows 10?

Are you frustrated by the Caps Lock key constantly turning on and off on your Windows 10 computer? Do you wish you could just turn the Caps Lock key off for good? If so, you’ve come to the right place. In this article, we will discuss how to disable Caps Lock on Windows 10 so you can finally stop the accidental usage of this key once and for all.
How to Disable Caps Lock on Windows 10?
- Open Settings by pressing the Windows key + I.
- Choose Time & language.
- Select Keyboard in the left pane.
- Find Caps Lock and toggle the switch to Off.
How to Turn Off Caps Lock Key in Windows 10
Caps Lock is a useful keyboard feature that allows you to type in uppercase letters without having to hold down the Shift key. However, it can be annoying when you accidentally press the Caps Lock key and type in uppercase letters. Fortunately, there are several ways to turn off Caps Lock on Windows 10.
Using the Keyboard Shortcut
The easiest way to turn off Caps Lock is to press the Caps Lock key again. This will toggle the Caps Lock off and back to lowercase typing. This is the simplest and quickest way to turn off Caps Lock.
Another way to turn off Caps Lock is to press the Shift key in combination with the Caps Lock key. This will also turn off the Caps Lock feature.
Using The On-Screen Keyboard
Another way to turn off Caps Lock is to use the on-screen keyboard. To open the on-screen keyboard, press the Windows key + R, type “osk” and press Enter. The on-screen keyboard will appear on your screen. Look for the Caps Lock key and click it to toggle Caps Lock off.
Using the Settings Menu
You can also turn off Caps Lock by going to the Settings menu. Open the Start menu and click on the gear icon to open the Settings menu. Go to the Ease of Access section and click on the Keyboard tab. In the Keyboard tab, look for the toggle for Caps Lock and switch it off.
Using a Third-Party Tool
If you don’t want to use the keyboard shortcut or the on-screen keyboard, you can also use a third-party tool to turn off Caps Lock. There are several third-party tools available that can help you turn off Caps Lock. All you need to do is download and install the tool and then activate it to turn off Caps Lock.
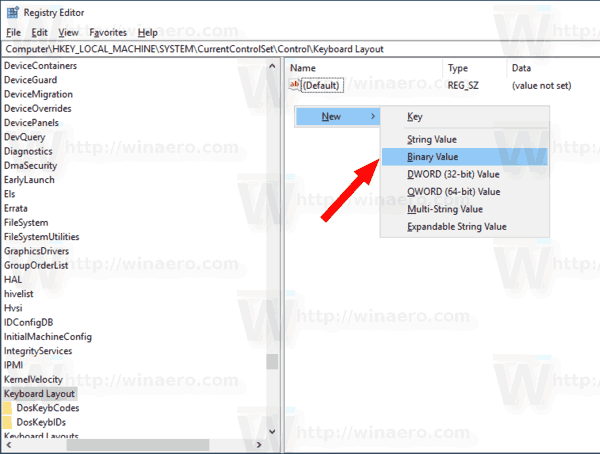
Using the Registry Editor
If you’re comfortable with using the Registry Editor, you can also use it to turn off Caps Lock. To do this, open the Registry Editor by pressing Windows key + R, typing “regedit” and pressing Enter. In the Registry Editor, navigate to the following key:
HKEY_LOCAL_MACHINE\SYSTEM\CurrentControlSet\Control\Keyboard Layout
In the right-hand pane, look for the Scancode Map value and delete it. This will turn off Caps Lock.
Few Frequently Asked Questions
Q1. What is Caps Lock?
Answer: Caps Lock is a key on the computer keyboard that, when pressed, causes all letters typed to be in uppercase. This can be helpful for quickly typing in all uppercase letters, such as for acronyms or company names. However, it can also be accidentally triggered, leading to confusion or frustration.
Q2. How do I disable Caps Lock on my Windows 10 computer?
Answer: Disabling Caps Lock on a Windows 10 computer is a fairly simple process. First, open the Start menu, and select the “Settings” option. Then, in the Settings window, select the “Devices” option. Finally, in the “Devices” window, select the “Typing” tab and click the toggle switch next to “Caps Lock” to turn it off.
Q3. How do I remap the Caps Lock key?
Answer: Remapping the Caps Lock key allows you to assign a different function or key to the Caps Lock key. To do this, open the Start menu, and select the “Settings” option. Then, in the Settings window, select the “Devices” option. Finally, in the “Devices” window, select the “Typing” tab, and click the “Advanced Key Settings” link. From here, you can select which key the Caps Lock key should be remapped to.
Q4. How do I turn off Caps Lock permanently?
Answer: To turn off Caps Lock permanently, you will need to make a change to the Windows Registry. First, open the Run window by pressing the Windows key + R. Type “regedit” in the Run window and press Enter. In the Registry Editor window, navigate to the “HKEY_LOCAL_MACHINE\SYSTEM\CurrentControlSet\Control\Keyboard Layout” folder. In this folder, double-click the “Scancode Map” entry and delete the value, then save your changes. This will permanently disable the Caps Lock key.
Q5. How do I make Caps Lock an additional Shift key?
Answer: To make Caps Lock an additional Shift key, you will need to make a change to the Windows Registry. First, open the Run window by pressing the Windows key + R. Type “regedit” in the Run window and press Enter. In the Registry Editor window, navigate to the “HKEY_LOCAL_MACHINE\SYSTEM\CurrentControlSet\Control\Keyboard Layout” folder. In this folder, right-click and select “New” and then “Binary Value”. Name this new value “Scancode Map” and set its value to “00 00 00 00 00 00 00 00 02 00 3A 00 1D 00 3A 00 3A 00 00 00”. This will make Caps Lock an additional Shift key.
Q6. How do I disable Caps Lock for just one specific program?
Answer: To disable Caps Lock for just one specific program, you will need to install a third-party program such as AutoHotkey. AutoHotkey is a program that allows you to create custom keyboard shortcuts and automate tasks. With AutoHotkey, you can create a script that will disable the Caps Lock key for just the program you are using.
How to Enable or Disable CapsLock in Windows 10 PC or Laptop
If you are looking for a way to disable the Caps Lock feature on Windows 10, then this article has provided you with the steps and information needed to do so. By following these easy steps, you can easily disable the Caps Lock feature and be able to use your keyboard in a more efficient way. Letting you quickly type your documents or emails without the fear of accidentally activating the Caps Lock feature.


