


How to Enter a Check Mark in Excel?

If you have ever used Microsoft Excel, you know that it is a powerful tool for managing data. But did you know that Excel also allows you to enter check marks? In this article, we’ll show you exactly how to enter a check mark in Excel. We’ll also provide some useful tips and tricks for making the process easier. So whether you’re a beginner or an experienced user, you’ll find all the information you need to create check marks in Excel.
How to Enter a Check Mark in Excel?
- Open Microsoft Excel and click on the cell in which you want to enter the check mark.
- Go to the Insert tab and click on the Symbol icon.
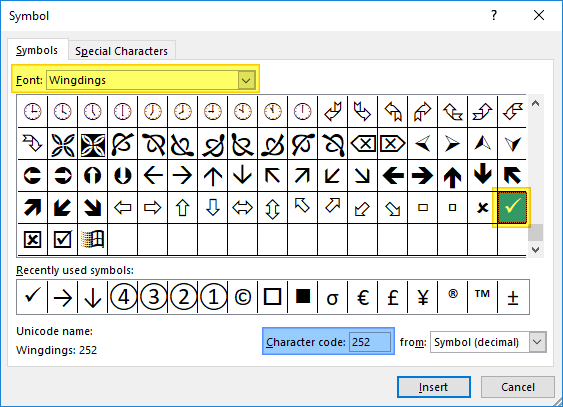
- Choose the Wingdings font from the drop-down menu in the Font section.
- Scroll down to find the check mark symbol and double-click on it.
- Press the Enter key to insert the symbol into the selected cell.
How to Enter a Check Mark in Excel Cells
Entering a check mark into an Excel cell is a great way to visually separate data and add clarity to a spreadsheet. There are several methods to insert a check mark, including using a symbol, inserting a checkbox, and using a formula. In this article, we’ll discuss the various methods to add a check mark in Excel.
Using Symbols
The easiest way to enter a check mark into an Excel cell is to use the symbols available in the Excel ribbon. To do this, select the cell in which the check mark should appear, then click on the “Insert” tab in the ribbon. Under the “Symbols” group, click on the “Symbol” button. This will open the “Symbol” dialogue box. In the “Symbol” dialogue box, select the “Wingdings” font, scroll down to the bottom of the list, and select the check mark. Once selected, click on the “Insert” button to insert the symbol into the cell.
Inserting a Checkbox
Another way to enter a check mark into an Excel cell is to insert a checkbox. To do this, select the cell in which the check mark should appear, then click on the “Developer” tab in the ribbon. Under the “Controls” group, click on the “Insert” button. This will open the “Form Controls” dialogue box. In the “Form Controls” dialogue box, select the “Check Box” option. Once the check box is inserted into the cell, select the cell and click on the “Check Box” option in the ribbon. This will open the “Format Control” dialogue box. In the “Format Control” dialogue box, enter the “Caption” value as “Check”. This will insert a check mark in the cell when the check box is checked.
Using Formulas
The last method to enter a check mark into an Excel cell is to use a formula. To do this, select the cell in which the check mark should appear and enter the following formula: =IF(A1=”Yes”,”✓”,””) This formula will enter a check mark into the cell if the cell A1 contains the value “Yes”. Otherwise, the cell will remain blank.
Using Keyboard Shortcuts
It is also possible to enter a check mark into an Excel cell using keyboard shortcuts. To do this, select the cell in which the check mark should appear. Then, press the “Alt” + “0252” keys on the keyboard. This will insert a check mark into the cell.
Using a Macro
Finally, it is possible to use a macro to insert a check mark into an Excel cell. To do this, open the Visual Basic Editor by pressing the “Alt” + “F11” keys on the keyboard. In the Visual Basic Editor, create a new macro and add the following code: Range(“A1”).Value = “✓” This code will insert a check mark into the cell A1. If a different cell needs to be selected, the code can be modified accordingly. Once the code is added, save the macro and run it to insert a check mark into the cell.
Related Faq
Q1: What is a check mark in Excel?
A check mark in Excel is a symbol used to indicate a positive answer or result in a cell. It is represented by a checkmark or tick symbol within a cell. This symbol is commonly used to indicate the completion of a task or to show that an item is true or has been selected.
Q2: How can I enter a check mark in Excel?
You can enter a check mark in Excel by using a character code. To do this, first select the cell where you want to enter the check mark. Then, press the Alt key and type the character code 0252 using the numeric keypad. This will insert a check mark into the cell. You can also copy and paste a check mark from another source such as a web page or an image.
Q3: How do I format a check mark in Excel?
To format a check mark in Excel, you can change the font size, font color, and cell background color of the cell containing the check mark. You can also use the Format Cells option under the Home tab to format the check mark. This will allow you to change the font size, font color, and cell background color of the cell containing the check mark.
Q4: Can I create a check mark in Excel using a formula?
Yes, you can create a check mark in Excel using a formula. To do this, type in the following formula: =IF(A1=TRUE,”✔”,””) into the cell where you want the check mark to appear. This formula will check the value in the cell A1 and if it is TRUE, it will display a check mark in the cell.
Q5: How do I insert a check box in Excel?
You can insert a check box in Excel by using the Developer tab. To do this, first click on the Developer tab, then click on the Insert option and select the Check Box from the list of available shapes. This will insert a check box into the selected cell. You can also copy and paste a check box from another source such as a web page or an image.
Q6: How do I link a check box to a cell in Excel?
You can link a check box to a cell in Excel by using the Developer tab. To do this, first click on the Developer tab, then click on the Properties option and select the Linked Cell option. Then, enter the cell address into the Linked Cell field. This will link the check box to the specified cell.
How to input Check Mark in Excel
By following the steps above, you can quickly and easily enter a check mark in Excel. You can also use the same steps to quickly enter other symbols such as the trademark symbol or copyright symbol. Whether you’re a beginner or an experienced user, knowing how to enter special symbols like a check mark in Excel can help you ensure your data is accurate and up-to-date.


