


How to Format Windows 7?

Are you looking to get the most out of your Windows 7 operating system? Are you having trouble understanding how to properly format your computer? Don’t worry; formatting Windows 7 can be a tricky process, but with the right guidance, you can make sure your computer is in good working condition. In this article, we’ll walk you through the steps of formatting Windows 7, from setting up your partitions to ensuring the installation is complete. With our help, you’ll be able to get the most out of your Windows 7 computer in no time. So let’s get started!
language
Formatting Windows 7 involves erasing all of the data on your hard drive and reinstalling a fresh copy of the operating system. This can be done by booting your computer from a DVD or USB drive containing the installation media. Once you have the installation media, you can follow these steps:
- Insert the DVD or USB drive into your computer.
- Restart your computer and boot from the installation media.
- Follow the on-screen instructions to format your hard drive.
- Select the partition to install Windows 7 onto.
- Complete the installation process.
Formatting Windows 7: A Step-by-Step Guide
Formatting a computer’s operating system can seem daunting, but it’s a relatively simple process if you have the right steps and instructions. In this guide, we’ll walk you through the steps to format Windows 7 and get your computer up and running in no time.
Backing Up Your Data
Before you begin formatting the computer, it’s essential that you back up all of your data and files. Formatting the operating system will erase all of the data, so it’s important to back up anything you don’t want to lose. You can back up your data to an external hard drive, a USB flash drive, or an online storage service.
Once you’ve successfully backed up all of your data, you’re ready to begin formatting Windows 7.
Preparing the Installation Disc
To begin formatting Windows 7, you’ll need an installation disc. If you don’t have an installation disc, you can create one using a blank CD or DVD. To create the installation disc, you’ll need a Windows 7 installation file, which is available for purchase from Microsoft.
Once you have the installation file, insert the blank disc into your CD/DVD drive, open the installation file, and follow the prompts to create the installation disc.
Starting the Formatting Process
Now that you have your installation disc, you can begin the formatting process. Start by inserting the installation disc into the CD/DVD drive and restarting your computer. As the computer boots up, you should see a prompt to “Press any key to boot from CD or DVD.” Press any key to continue.
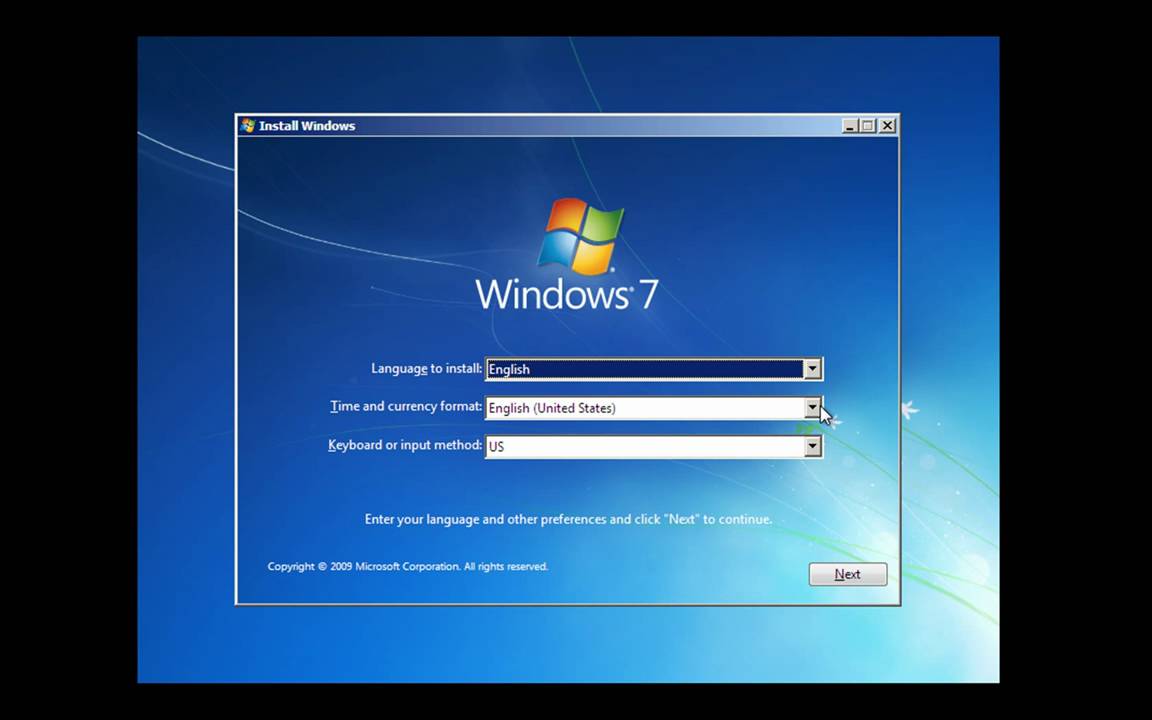
Next, you’ll see the Windows 7 setup screen. Select the language and time/currency format, then click “Next.” On the next screen, select “Install Now,” then follow the on-screen instructions to complete the installation.
Setting Up Your Computer
Once the installation is complete, you’ll need to set up your computer. You’ll need to enter your product key, create a username and password, and select a network type. Once you’ve completed the setup process, your computer will be ready to use.
Updating Windows 7
Once your computer is set up, you’ll want to make sure you’re running the most recent version of Windows 7. To do this, open the Start menu and select “Control Panel.” In the Control Panel, open “System and Security” and select “Windows Update.” Follow the on-screen instructions to install the latest updates.
Verifying Your Formatting
Once you’ve installed the updates, you can verify that Windows 7 has been successfully formatted by checking the version number. To do this, open the Start menu and select “Control Panel.” In the Control Panel, open “System and Security” and select “System.” On the System window, you’ll see the version number of your Windows 7 installation.
Installing Drivers and Software
Finally, you’ll want to install any drivers or software you need to use your computer. To install drivers, open the Start menu and select “Device Manager.” To install software, open the Start menu and select “Programs.” Follow the on-screen instructions to install the necessary drivers and software.
Conclusion
Formatting Windows 7 is a relatively simple process if you have the right steps and instructions. With this guide, you can be sure to get your computer up and running in no time.
Top 6 Frequently Asked Questions
1. How do I back up my files before formatting Windows 7?
To back up your files before formatting Windows 7, you will need an external storage device with enough space to store your files. Plug the storage device into your computer and open the Windows Backup and Restore Center. Select the “Create a system image” option and choose the external device as the location to store the backup image. Once the backup is complete, it is safe to proceed with formatting your Windows 7 computer.
2. What are the steps to format Windows 7?
Formatting Windows 7 requires several steps. First, back up your files to an external storage device as described above. Next, insert your installation media (e.g., a Windows 7 disc or USB drive) into your computer. Then, reboot your computer and press any key when prompted to boot from the installation media. After the Windows Setup appears, select the language, time and currency format, and keyboard input method. On the next screen, select the “Custom” installation option. Finally, select the disk partition where you want to install Windows 7 and follow the on-screen instructions to complete the process.
3. How do I format the hard drive for a clean installation of Windows 7?
To format the hard drive for a clean installation of Windows 7, you will need to create a separate partition for Windows 7. To do this, boot your computer from the installation media and select the “Custom” installation option. Then, select the disk partition where you want to install Windows 7 and select the “Format” option. Once the format process is complete, Windows 7 will begin installing to the partition.
4. How long does it take to format Windows 7?
The amount of time it takes to format Windows 7 depends on the size of the hard drive and the speed of your computer. Generally speaking, the formatting process can take anywhere from a few minutes to an hour or more. Once the formatting is complete, the installation of Windows 7 will begin and may take an additional hour or more to complete.
5. Is formatting Windows 7 the same as reinstalling Windows 7?
No, formatting Windows 7 is not the same as reinstalling Windows 7. Formatting a hard drive erases all data stored on the drive, while reinstalling Windows 7 preserves any existing data. To reinstall Windows 7, you will need to boot your computer from the installation media and select the “Upgrade” option instead of “Custom”.
6. Are there any risks to formatting Windows 7?
Yes, there are risks associated with formatting Windows 7. If you do not back up your files prior to formatting, all data stored on the hard drive will be erased. Additionally, if the installation media is not properly created, Windows 7 may not install correctly or may not install at all. Finally, if the formatting process is interrupted, it can cause serious errors that may require professional assistance to repair.
How to easily Factory Reset a Windows 7 PC
After following the steps outlined in this article, you should now have a better understanding of how to format Windows 7. Whether you are an experienced computer user or just a beginner, the process should now be much easier for you. With the help of this guide, you can now confidently format your Windows 7 computer and have the peace of mind that your system is running smoothly.


