


How to Insert Gridlines in Excel?

Are you having trouble formatting your Excel worksheet? Are you looking for ways to make your data more organized and visually appealing? Gridlines are one of the simplest ways to achieve that. In this article, we will discuss how to insert gridlines in Excel and the different methods you can use to do so. Let’s get started!
- Open the Excel file you want to add grid lines to.
- Go to the “Page Layout” tab and select “Page Setup”.
- In the “Sheet” tab, select the “Gridlines” checkbox.
- Click “OK” to confirm your changes.
How to Insert Gridlines in Excel?
Gridlines are a great way to make your Excel spreadsheet look more organized. In this article, we’ll show you the steps to insert gridlines in Excel.
In Excel, gridlines are lines that appear around each cell in the spreadsheet. They are used to make the spreadsheet easier to read and navigate. Gridlines can be added to an existing spreadsheet or created as part of a new spreadsheet.
Step 1: Open the Excel File
The first step is to open the Excel file that you want to add gridlines to. You can do this by double-clicking on the file or by opening the file from the File menu.
Step 2: Select the Cells
Once you have opened the file, you need to select the cells that you want to add gridlines to. You can do this by clicking and dragging your mouse over the cells or by using the arrow keys on your keyboard to select the cells.
Step 3: Open the Format Cell Dialog Box
Once you have selected the cells, you need to open the Format Cells dialog box. This can be done by right-clicking on the cells and selecting the Format Cells option from the menu.
Step 4: Select the Gridlines Option
In the Format Cells dialog box, select the Gridlines option from the Format tab. This will open the Gridlines tab where you can customize the gridlines.
Step 5: Customize the Gridlines
In the Gridlines tab, you can customize the gridlines by selecting the color, style, and width. Once you have customized the gridlines, click OK to apply the changes.
Step 6: Save the File
Once you have added the gridlines to the cells, you need to save the file. To do this, select the Save option from the File menu.
Step 7: View the Gridlines
Once you have saved the file, you can view the gridlines by opening the file. You should now see the gridlines in the spreadsheet.
Tips & Tricks
• You can also add gridlines by using the “Gridlines” button on the Home tab of the ribbon.
• You can customize the gridlines for each cell individually by selecting the “Gridlines” option in the Format Cells dialog box.
• If you want to remove the gridlines from a cell, select the “No Gridlines” option in the Gridlines tab.
Few Frequently Asked Questions
Q1: What is the purpose of using gridlines in Excel?
A1: Gridlines are used to organize data in an Excel spreadsheet. They provide visual cues to help quickly differentiate between columns and rows of data, making it easier to read and interpret the information. Gridlines also provide a way to quickly select cells, columns, and rows for formatting purposes. By inserting gridlines, you can make your data easier to understand and work with.
Q2: How do you insert gridlines in Excel?
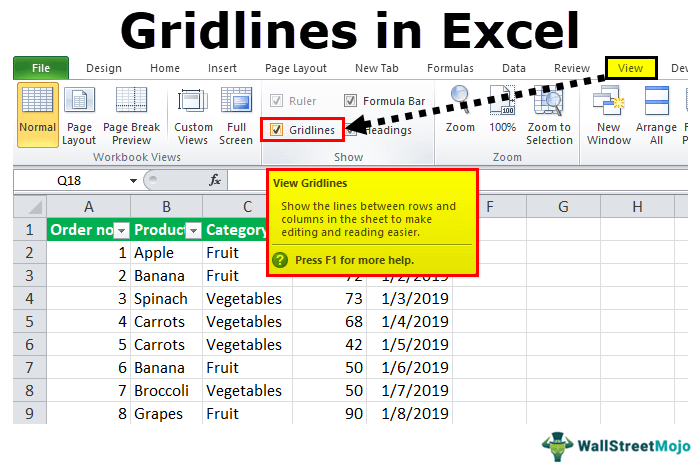
A2: Gridlines in Excel can be inserted in a few different ways. The easiest is to select the cells you want to add gridlines to, then go to the View tab and click on Gridlines. This will insert the gridlines around the selected cells. Alternatively, you can right-click on any cell, go to Format Cells, and then click on the Border tab. From here, you can add borders and gridlines to individual cells or ranges of cells.
Q3: What is the difference between gridlines and borders in Excel?
A3: Gridlines are lines that separate each cell in a spreadsheet and provide visual cues to differentiate between rows and columns. Borders are lines that can be added to individual cells or ranges of cells. Borders can be used to add more structure to a spreadsheet, and can also be used to highlight certain areas of the spreadsheet. Unlike gridlines, borders can be customized with different colors and line styles.
Q4: How do you remove gridlines in Excel?
A4: To remove gridlines from an Excel spreadsheet, go to the View tab and uncheck the Gridlines box. This will remove all gridlines from the spreadsheet. Alternatively, you can right-click on any cell, go to Format Cells, and then click on the Border tab. From here, you can remove any existing borders or gridlines.
Q5: Can you change the color of the gridlines in Excel?
A5: Unfortunately, it is not possible to change the color of the gridlines in Excel. If you want to add color to your spreadsheet, you can use borders to highlight certain areas. Borders can be customized with different colors and line styles.
Q6: Can you print the gridlines in Excel?
A6: Yes, you can print the gridlines in Excel. To do this, go to the Page Layout tab and click on the Print tab. In the Print dialog box, make sure the Gridlines box is checked. This will ensure that the gridlines are printed when you print the spreadsheet.
How to Add Grid Lines to Your Excel Spreadsheet?
Inserting gridlines in Excel can be a great way to create a visual representation of your data and make it easier to understand. Whether you’re a beginner or an experienced user, understanding how to insert gridlines in Excel will help you create professional-looking documents. With the help of the simple steps outlined in this guide, you’ll be able to quickly and easily insert gridlines into your Excel spreadsheets. So don’t delay, get started today and make your data look better than ever!


