


How to Put Gridlines in Excel?

Are you looking to make your spreadsheets easier to read and keep track of your data in Excel? One great way to do this is to add gridlines to your worksheets. Gridlines can give your work a professional and organized look, making it easier to make sense of the data you have. In this guide, we’ll show you step-by-step how to put gridlines in Excel so you can make the most of your spreadsheets.
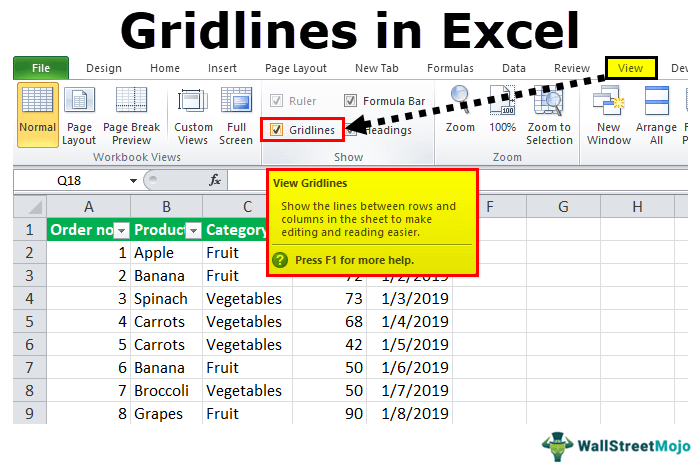
- Go to the View tab.
- Click on the Gridlines box in the Show group.
- Gridlines will be added to the spreadsheet.
How to Put Gridlines on a Spreadsheet in Excel?
Gridlines are an essential feature of Microsoft Excel that can help make data easier to read and understand. Gridlines are lines that divide the cells in a spreadsheet and can help to organize and differentiate between data. In this article, we will discuss how to put gridlines on a spreadsheet in Excel.
Step 1: Open Your Excel File
The first step is to open your Excel file. You can do this by going to the ‘File’ menu, selecting ‘Open’, and then selecting the file you want to open. Once the file is open, you can move on to the next step.
Step 2: Select the Cells You Want to Have Gridlines
The next step is to select the cells you want to have gridlines. To do this, you can click and drag your mouse to select the cells you want to have gridlines. You can also use the keyboard to select cells by holding down the ‘Shift’ key and using the arrow keys on your keyboard. Once the cells are selected, you can move on to the next step.
Step 3: Enable the Gridlines
Once the cells are selected, you can enable the gridlines. To do this, go to the ‘View’ menu and select ‘Gridlines’. This will enable the gridlines for the selected cells. If you want to disable the gridlines, simply go to the ‘View’ menu and select ‘Gridlines’ again.
Step 4: Adjust the Gridline Settings
Once the gridlines are enabled, you can adjust the settings for the gridlines. To do this, go to the ‘Format’ menu and select ‘Gridlines’. This will open a window where you can adjust the color, line style, line width, and other settings for the gridlines. Once you have adjusted the settings, click ‘OK’ to apply the changes.
Step 5: Save the Changes
The last step is to save the changes you have made. To do this, go to the ‘File’ menu, select ‘Save’, and then select the file you want to save. Once the file is saved, the gridlines will be enabled for the selected cells.
Tips and Tricks
Tip 1: Use a Different Color for the Gridlines
You can use a different color for the gridlines to make them stand out more. To do this, go to the ‘Format’ menu and select ‘Gridlines’. Then, select the ‘Color’ option and choose the color you want to use.
Tip 2: Adjust the Line Style
You can also adjust the line style for the gridlines. To do this, go to the ‘Format’ menu and select ‘Gridlines’. Then, select the ‘Line Style’ option and choose the style you want to use.
Tip 3: Adjust the Line Width
You can also adjust the line width for the gridlines. To do this, go to the ‘Format’ menu and select ‘Gridlines’. Then, select the ‘Line Width’ option and choose the width you want to use.
Related Faq
What are Gridlines in Excel?
Gridlines in Excel are the faint lines that appear between the cells in a spreadsheet. Gridlines make it easier to read the data in a spreadsheet by providing visual organization. They are not printed by default, but you can easily add them to your spreadsheet.
How Can I Put Gridlines in Excel?
You can put gridlines in Excel by selecting the cells that you want to add gridlines to and then going to the Ribbon to the View tab. In the View tab, there is an option for Gridlines. Check the box and your gridlines will appear.
How Can I Remove Gridlines in Excel?
You can remove gridlines in Excel by selecting the cells that you want to remove gridlines from and then going to the Ribbon to the View tab. In the View tab, there is an option for Gridlines. Uncheck the box and your gridlines will disappear.
Can I Change the Color of Gridlines in Excel?
No, you cannot change the color of gridlines in Excel. Gridlines are always displayed as faint, light gray lines.
Can I Print Gridlines in Excel?
Yes, you can print gridlines in Excel. To do this, go to the File tab and select Print. In the Print options, check the box for Print Gridlines. Your gridlines will then appear when you print your spreadsheet.
Can I Put Gridlines in Excel for Mac?
Yes, you can put gridlines in Excel for Mac. To do this, select the cells that you want to add gridlines to and then go to the View tab. In the View tab, there is an option for Gridlines. Check the box and your gridlines will appear.
How to Add Grid Lines to Your Excel Spreadsheet?
Now that you know how to put gridlines in Excel, you can easily use it as a tool to organize and display your data in a visually appealing way. With the help of gridlines, you can make your spreadsheet look clean and professional, and help you make better decisions quickly. So, if you want to make the most out of your data, using gridlines in Excel is a great way to go.


