


How To Remove Background From Picture In Powerpoint?

Do you want to make your Powerpoint presentations look professional and engaging? Are you tired of the plain, white background of your Powerpoint slides? If so, learning how to remove background from pictures in Powerpoint is a great way to make your presentations stand out. In this article, we will guide you through the steps of removing background from pictures in Powerpoint and show you how to use this feature to add a professional touch to your slides. Let’s get started!
How to Remove Background From Picture in Powerpoint?
- Open the Powerpoint presentation and insert the picture.
- Right-click the image and select Format Picture.
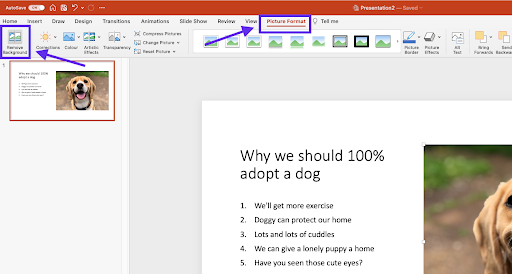
- Select the Picture tab then click the Remove Background button.
- Powerpoint will automatically detect the parts of the image you can remove.
- Adjust the handles and markers to fine-tune the selection.
- Press the keep changes button.
Removing the Background From Pictures in PowerPoint
Removing the background from a picture in PowerPoint is a relatively simple procedure. It can be done with a few clicks of the mouse and the results can be quite eye-catching and professional. In this article, we’ll walk you through the steps of removing a background from a picture in PowerPoint and explain how to do it using the Format Picture menu.
Step 1: Insert the Picture
The first step in removing the background of a picture in PowerPoint is to insert the picture into the desired slide. This can be done by clicking on the “Insert” tab and then selecting the “Pictures” option. From here, you can select the desired picture from your computer and click “Insert.”
Step 2: Format the Picture
Now that the picture has been inserted, you will need to format the picture. To do this, right-click on the picture and select “Format Picture” from the drop-down menu. This will open the “Format Picture” dialog box.
Select the Background
In the “Format Picture” dialog box, you will need to select the “Background” tab. From here, you can select the background color of the picture. Once you have chosen the desired background color, click “OK” to apply the changes.
Crop the Picture
The next step is to crop the picture. To do this, right-click on the picture and select “Crop” from the drop-down menu. This will open the “Crop” dialog box. From here, you can select the area of the picture that you would like to keep and click “OK” to apply the changes.
Step 3: Remove the Background
Now that the picture has been formatted and cropped, you will need to remove the background. To do this, right-click on the picture and select “Remove Background” from the drop-down menu. This will open the “Remove Background” dialog box. From here, you can adjust the settings and click “OK” to apply the changes.
Step 4: Save the Picture
Finally, once the background has been removed, you will need to save the picture. To do this, right-click on the picture and select “Save as Picture” from the drop-down menu. This will open the “Save As” dialog box. From here, you can select the desired file format and click “Save” to save the picture.
Conclusion
Removing the background from a picture in PowerPoint is a relatively simple procedure. The process involves four steps: inserting the picture, formatting the picture, removing the background, and saving the picture. With a few clicks of the mouse, you can create eye-catching and professional results.
Top 6 Frequently Asked Questions
Q1: How do I remove the background from a picture in Powerpoint?
A1: To remove the background from a picture in Powerpoint, first select the picture. Then, click the “Format” tab at the top of the screen. This will open the “Format Picture” pane on the right-hand side. Click the “Remove Background” option near the top of the pane. A pink background will appear around the picture, and you can use the various tools provided to adjust the selection of the picture. Once you are satisfied with the selection, click the “Keep Changes” button at the bottom of the pane. This will remove the background from the picture and leave only the foreground.
Q2: How do I add a new background for a picture in Powerpoint?
A2: To add a new background for a picture in Powerpoint, first select the picture. Then, click the “Format” tab at the top of the screen. This will open the “Format Picture” pane on the right-hand side. Next, click the “Background” option near the top of the pane. This will open a drop-down menu that allows you to choose from various background styles, including solid colors, gradients, textures, and images. Select the style you want and click “Apply” to apply the background to the picture.
Q3: What are the different tools available for removing a picture’s background in Powerpoint?
A3: There are several tools available for removing a picture’s background in Powerpoint. When you click the “Remove Background” option, you will see several tools on the right-hand side of the screen. The “Mark Areas to Keep” tool allows you to select which parts of the picture you want to keep. The “Mark Areas to Remove” tool allows you to select which parts of the picture you want to remove. The “Soft Edges” tool allows you to make the edges of the selection smoother. The “Preview” button allows you to view the selection before you apply it.
Q4: How do I change the size of a picture in Powerpoint?
A4: To change the size of a picture in Powerpoint, first select the picture. Then, click the “Format” tab at the top of the screen. This will open the “Format Picture” pane on the right-hand side. Next, click the “Size & Properties” option near the top of the pane. This will open a menu with various size and positioning options. Use the sliders or enter the exact size you want in the “Height” and “Width” fields. Once you are satisfied with the size, click the “Apply” button to apply the changes.
Q5: How do I add a border to a picture in Powerpoint?
A5: To add a border to a picture in Powerpoint, first select the picture. Then, click the “Format” tab at the top of the screen. This will open the “Format Picture” pane on the right-hand side. Next, click the “Borders and Fills” option near the top of the pane. This will open a menu with options for adding a border to the picture. Use the drop-down menus to select the type, size, and color of the border you want. Once you are satisfied with the border, click the “Apply” button to apply the changes.
Q6: How do I apply a shadow to a picture in Powerpoint?
A6: To apply a shadow to a picture in Powerpoint, first select the picture. Then, click the “Format” tab at the top of the screen. This will open the “Format Picture” pane on the right-hand side. Next, click the “Shadow” option near the top of the pane. This will open a menu with options for adding a shadow to the picture. Use the drop-down menus to select the type, size, and color of the shadow you want. Once you are satisfied with the shadow, click the “Apply” button to apply the changes.
How to Remove Background From Picture in PowerPoint
Removing the background from a picture in Powerpoint can be a great way to enhance the visual appeal of your presentation. With the help of this tutorial, you now have the knowledge and tools to quickly and easily remove the background from a picture in Powerpoint. Whether you’re a professional graphic designer or just looking to spruce up a presentation, you now have the ability to make any image look its best. So, give it a try and make your images truly stand out!


