


How To Remove Background Picture In Powerpoint?

Are you looking for an easy way to remove a background picture from your PowerPoint presentation? If so, then you have come to the right place. In this article, we will provide you with step-by-step instructions on how to quickly and easily remove a background picture from your PowerPoint presentation. We will also discuss some of the best practices for background picture removal to ensure that your presentation looks professional and polished. So, let’s get started!
- Open a PowerPoint presentation.
- Select the slide with the background picture.
- Click the ‘Format’ tab at the top.
- Locate the ‘Background’ group on the ribbon.
- Click the ‘Background Styles’ button.
- Choose the ‘Format Background’ option.
- Click the ‘Picture or texture fill’ option.
- Click the ‘Remove Background’ button.
- Adjust the image by using the ‘Mark areas to keep’ and ‘Mark areas to remove’ tools.
- Click the ‘Keep Changes’ button to remove the background.
Removing Background Pictures in Microsoft Powerpoint
Microsoft Powerpoint is one of the most popular and powerful presentation software tools available today. It allows users to easily create stunning presentations with a few clicks. One of the most common tasks that users need to perform is removing backgrounds from images or slides. Fortunately, Powerpoint makes this process easy and straightforward. In this article, we’ll discuss how to remove background pictures in Powerpoint.
Steps for Removing Background Pictures in Microsoft Powerpoint
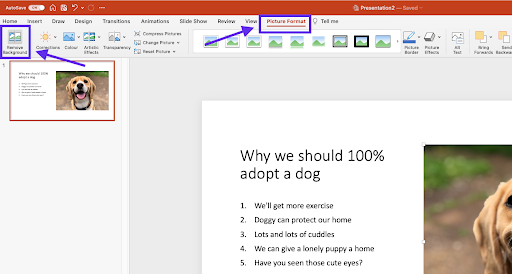
The first step in removing background pictures in Powerpoint is to select the slide or image that you want to remove the background from. To do this, simply click on the slide or image and then click the “Format” tab on the ribbon at the top of the window. Next, click “Remove Background” in the Adjust group.
The next step is to select the areas of the image that you want to keep or remove. Powerpoint will make a best guess at which parts of the image should be removed, but you can adjust this by clicking and dragging the “Mark Areas to Keep” and “Mark Areas to Remove” buttons. When you are satisfied with the results, click “Keep Changes”.
Cleaning Up the Image
Once the background has been removed, you may find that there are some parts of the image that need to be cleaned up. This can be done by selecting the “Adjust” tab on the ribbon at the top of the window. Here, you can use the various tools to make adjustments to the image, such as cropping, resizing, and adjusting the contrast.
Saving the Image
Once you are satisfied with the results of your edits, you can save the image by clicking the “Save As” button in the File tab on the ribbon. This will open a window where you can choose the file format, location, and name to save the image as.
Adding the Image to Your Presentation
The final step is to add the image to your presentation. This can be done by clicking the “Insert” tab on the ribbon at the top of the window. Then, simply select the image you just saved and click the “Insert” button. The image will now be added to your presentation.
Conclusion
Removing background pictures in Powerpoint is a simple and straightforward process. Once you know the steps, it can be done in a matter of minutes. With a few clicks, you can easily remove backgrounds from any image or slide in Powerpoint.
Related Faq
1. How do I remove a background picture in PowerPoint?
To remove a background picture in PowerPoint, go to the Design tab and select Format Background. In the Format Background dialog box, select the picture in the Background Contents list and then click Remove Background. You can also select the picture and press Delete on your keyboard.
2. How do I replace a background picture in PowerPoint?
To replace a background picture in PowerPoint, first remove the existing background picture as described above. Then click Insert in the ribbon and select the type of picture that you want to use for the background. Select the picture and click Insert. The picture will now be used as the background of your slide.
3. Can I remove the background from an image in PowerPoint?
Yes, you can remove the background from an image in PowerPoint. To do this, go to the Format tab and select Format Picture. In the Format Picture dialog box, select Remove Background from the Picture Corrections menu. PowerPoint will then automatically detect the background and allow you to remove it.
4. How do I make a picture transparent in PowerPoint?
To make a picture transparent in PowerPoint, go to the Format tab and select Format Picture. In the Format Picture dialog box, select Transparency from the Picture Corrections menu. Select the level of transparency that you want to use and then click OK.
5. How do I make an image background transparent in PowerPoint?
To make an image background transparent in PowerPoint, go to the Format tab and select Format Picture. In the Format Picture dialog box, select Remove Background from the Picture Corrections menu. PowerPoint will then detect the background and allow you to remove it. You can then use the Transparency setting to make the background transparent.
6. How do I remove a background from a picture in PowerPoint?
To remove a background from a picture in PowerPoint, go to the Format tab and select Format Picture. In the Format Picture dialog box, select Remove Background from the Picture Corrections menu. PowerPoint will then detect the background and allow you to remove it. You can also select the picture and press Delete on your keyboard.
How to Remove Background From Picture in PowerPoint
Removing a background picture in PowerPoint is easy, fast and efficient. With just a few clicks, you can quickly edit and customize your slides to your liking. Whether you need to remove a distracting background picture or simply want to add a more professional look to your presentation, you can do it with ease. With this helpful guide, you now know how to remove a background picture in PowerPoint quickly and easily.


