


How to Take Screenshot in Laptop Windows 7?

Taking screenshots on your laptop can seem like a daunting task, but it doesn’t have to be! In this article, we’ll be discussing how to take a screenshot on a laptop running Windows 7. We’ll be exploring the various methods for taking screenshots, as well as tips and tricks to make the process a breeze. So, if you’re looking to take a screenshot and want to know how to do it on Windows 7, this tutorial is for you!
How to Take Screenshot in Laptop Windows 7?
- Press the “Print Screen” key on your laptop to capture the entire screen.
- If you want to capture just the active window, press “Alt+Print Screen”.
- Open an image editor program such as Paint or Photoshop.
- Press “Ctrl+V” to paste the screenshot from the clipboard.
- Save the image file as a JPEG or PNG file.
Taking a Screenshot on a Windows 7 Laptop
Taking a screenshot on a Windows 7 laptop can be a useful way to capture information that you want to store or share. There are a few different methods you can use to take a screenshot on a Windows 7 laptop, each of which is fairly simple and straightforward.
Using the Print Screen Button
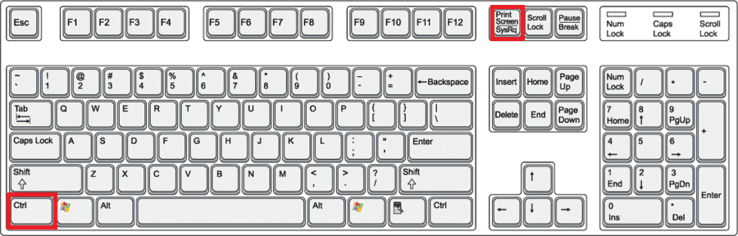
One of the easiest methods for taking a screenshot on a Windows 7 laptop is to use the Print Screen button. This button is usually located on the top row of the keyboard between the F12 and Scroll Lock keys. Pressing this button will take a screenshot of the entire laptop screen. To save the screenshot you can open an image editing program, such as Paint, and paste the screenshot.
You can also save the screenshot without having to open an image editing program by pressing the Windows logo key and the Print Screen key at the same time. This will automatically save the screenshot in the Pictures folder of your laptop in a folder labelled “Screenshots”.
Using the Snipping Tool
The Snipping Tool is a built-in feature of Windows 7 that can be used to take screenshots. To access the Snipping Tool, simply open the start menu and type “Snipping Tool” into the search box. Select the Snipping Tool icon when it appears and the program will open.
Once the Snipping Tool is open, you can select the type of screenshot you want to take. You can select from four options: free-form, rectangular, window, or full-screen. After you have made your selection, you can drag your mouse over the area you want to capture as a screenshot. Once you have created the screenshot, you can save it by clicking the “Save” button in the top left corner or by pressing the “Ctrl” and “S” keys simultaneously.
Using the Game Bar
The Game Bar is another built-in feature of Windows 7 that can be used to take screenshots. To access the Game Bar, press the Windows logo key and the “G” key simultaneously. This will open the Game Bar, which has a screenshot button that you can use to take a screenshot. The screenshot will be automatically saved in the Videos folder of your laptop in a folder labelled “Captures”.
Using Keyboard Shortcuts
You can also take a screenshot using keyboard shortcuts. To take a screenshot of the active window, press the Alt and Print Screen keys simultaneously. To take a screenshot of the entire screen, press the Print Screen key. Both of these screenshots will be saved to the clipboard and can be pasted into an image editing program or another program where you can save them.
Using Third-Party Programs
There are also a number of third-party programs that you can use to take screenshots on a Windows 7 laptop. These programs typically offer more advanced features than the built-in screenshot tools and can be used to take screenshots of specific areas of the screen, capture video, and more. Some popular third-party screenshot programs include Snagit, PicPick, and Greenshot.
Related Faq
Q1. How do I take a screenshot on a laptop with Windows 7?
A1. To take a screenshot on a laptop with Windows 7, press the ‘Prt Sc’ (Print Screen) button located on the top row of your keyboard. This will capture an image of your entire screen and save it to your clipboard. You can then paste it into a program such as Paint or Word and save it as a file. You can also press the ‘Alt’ and ‘Prt Sc’ keys at the same time to capture an image of the active window.
Q2. How do I save a screenshot on Windows 7?
A2. After taking a screenshot, the image will be saved to your clipboard. To save the image, open an image editing program such as Paint or Word and paste the image into the program. Then, save the file as an image file. You can also use the ‘Save As’ option to save the screenshot as a different file type, such as a PDF or JPEG.
Q3. Are there any other methods to take a screenshot on Windows 7?
A3. Yes, there are other ways to take a screenshot on Windows 7. You can use the Snipping Tool, which is a built-in program for Windows 7. This allows you to select an area of the screen to capture and edit before saving the image. You can also use third-party programs such as Lightshot or FastStone Capture to take screenshots and edit or annotate them before saving.
Q4. How do I take a screenshot of a single window?
A4. To take a screenshot of a single window, press the ‘Alt’ and ‘Prt Sc’ (Print Screen) keys on your keyboard at the same time. This will capture an image of the active window and save it to your clipboard. You can then paste the image into an image editing program such as Paint or Word and save it as a file.
Q5. What is the shortcut key to take a screenshot?
A5. The shortcut key to take a screenshot on Windows 7 is the ‘Prt Sc’ (Print Screen) key located on the top row of your keyboard. This will capture an image of your entire screen and save it to your clipboard. You can then paste it into a program such as Paint or Word and save it as a file.
Q6. Is there a way to take a screenshot without using the keyboard?
A6. Yes, there is a way to take a screenshot without using the keyboard. You can use the Snipping Tool, which is a built-in program for Windows 7. This allows you to select an area of the screen to capture and edit before saving the image. You can also use third-party programs such as Lightshot or FastStone Capture to take screenshots and edit or annotate them before saving.
How to take a Screenshot!!! – How to do a Screenshot on Windows 7 – Free & Easy
Taking screenshots in laptop Windows 7 is a simple task if you know the right steps. By following the steps outlined in this article, you can easily take screenshots for any purpose. Whether you are capturing an image for a project or to share with friends, these steps make taking screenshots a breeze. So go ahead and take advantage of this simple feature to capture any moment.


