


Where is Disk Management in Windows 7?

Are you a Windows 7 user looking for a way to manage your disks? Look no further! In this article, we will be exploring the location of the Disk Management tool in Windows 7, and what it can do for you. Disk Management is an important tool for computer users, as it allows you to view, manage, and format your disks. We will walk you through the steps of finding and using this powerful tool. So if you’re ready, let’s get started!
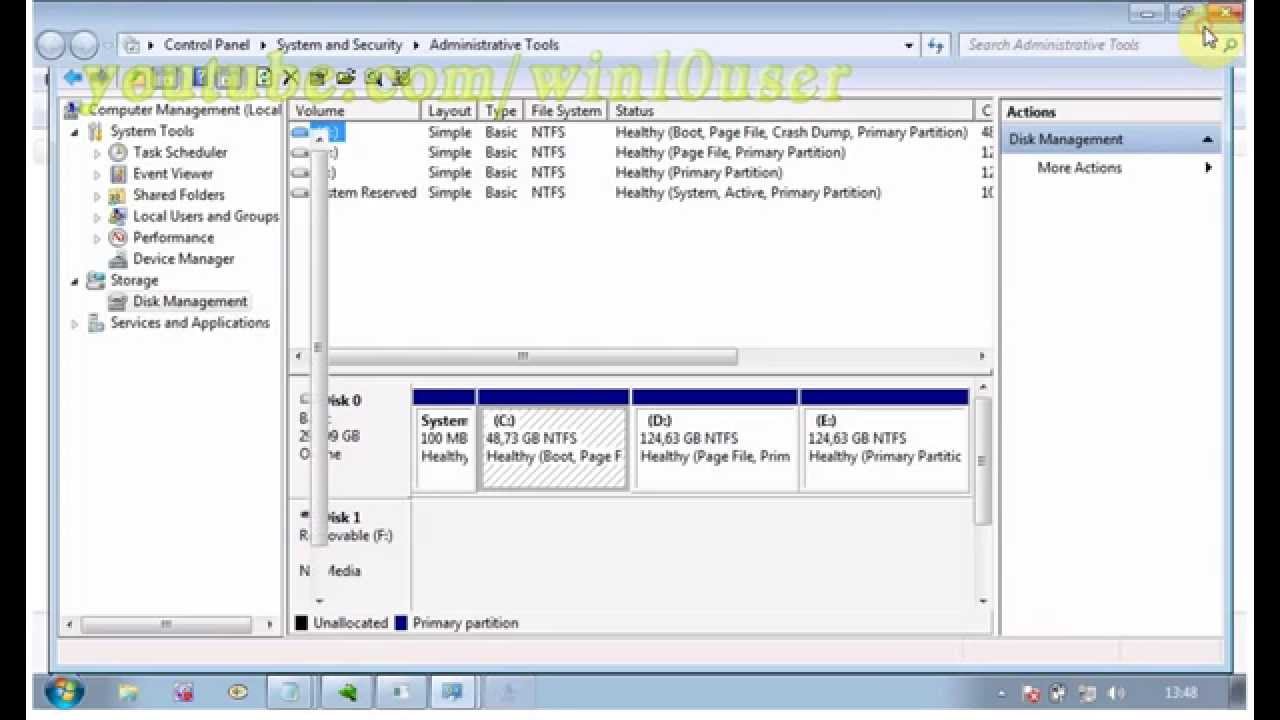
1. Go to the start menu.
2. Click on the Control Panel.
3. Select the ‘System and Security’ option.
4. Select the ‘Administrative Tools’ option.
5. Select ‘Computer Management’.
6. On the left side of the window, under the ‘Storage’ section, select ‘Disk Management’.
7. This will open the Disk Management window.
Where to Find Disk Management in Windows 7
Disk Management is a Windows 7 utility that allows the user to manage their hard drives and partitions. This tool can be used to create, delete, extend, or shrink the size of a partition. It also allows for the formatting of a drive, assigning a drive letter, and setting up a drive for use as a secondary storage device. In this article, we will discuss where to find Disk Management in Windows 7.
Steps to Access Disk Management in Windows 7
The first step to access Disk Management in Windows 7 is to open the Start Menu. From the Start Menu, click on the Control Panel. In the Control Panel, select System and Security. Then select Administrative Tools and double-click on the Computer Management icon. This will open the Computer Management window.
In the Computer Management window, select Storage. Then select Disk Management. This will open the Disk Management window. From here, you can access all the options for managing your hard drives and partitions.
Exploring the Disk Management Window
The Disk Management window is divided into two sections. The top section displays a list of all the drives and partitions on your computer. The bottom section displays information about each drive and partition.
The top section displays the drive letter, the type of drive (hard drive, USB drive, etc.), and the drive size. The bottom section displays the file system type, the total size, and the free space.
You can use the options in the top section to manage your drives and partitions. You can create, delete, format, or assign a drive letter to a partition. You can also extend or shrink the size of a partition.
Managing Hard Drive Partitions
When managing hard drive partitions, it is important to understand the options available in the Disk Management window. You can create a new partition, delete an existing partition, or extend or shrink an existing partition.
When creating a new partition, you will need to specify the size of the partition and the file system type. You can choose from FAT, FAT32, exFAT, or NTFS.
When deleting an existing partition, you will need to select the partition to be deleted. You will then be prompted to confirm the deletion.
When extending or shrinking an existing partition, you will need to specify the amount of space to be added or removed. You will then be prompted to confirm the action.
Conclusion
This article discussed where to find Disk Management in Windows 7 and how to use it to manage hard drive partitions. The steps to access Disk Management were discussed, as well as the options available in the Disk Management window. Finally, the process of creating, deleting, and extending or shrinking partitions was discussed.
Frequently Asked Questions
Q1. What is Disk Management?
Answer: Disk Management is a Windows utility that allows users to manage disk drives and their associated partitions. It includes features such as creating, deleting, and resizing partitions, formatting them, assigning drive letters, and changing their properties. It can also be used to convert disk drives from one file system format to another, and to enable or disable disk write protection.
Q2. What are the advantages of using Disk Management?
Answer: The advantages of using Disk Management are that it enables users to easily manage their disks and partitions, to convert file systems, to assign drive letters, and to enable or disable write protection. It also allows users to quickly and easily create, delete, and resize partitions, as well as to format them.
Q3. Where is Disk Management located in Windows 7?
Answer: In Windows 7, Disk Management is located in the Control Panel. To access it, open the Control Panel, then click on “System and Security”, then “Administrative Tools”, and finally “Computer Management”. In the Computer Management window, you’ll see the Disk Management option on the left side.
Q4. What are the different types of operations that can be performed using Disk Management?
Answer: Using Disk Management, users can perform a variety of operations, such as creating, deleting, and resizing partitions, formatting them, assigning drive letters, and changing their properties. It also allows users to convert disk drives from one file system format to another, and to enable or disable disk write protection.
Q5. Are there any risks associated with using Disk Management?
Answer: Yes, there are risks associated with using Disk Management. It is important to ensure that you are familiar with the various operations that you are performing and to always back up your data before making any changes. Improper use of Disk Management can lead to data loss or corruption.
Q6. Is Disk Management available in other versions of Windows?
Answer: Yes, Disk Management is available in other versions of Windows, such as Windows 8, Windows 8.1, and Windows 10. In these versions, it can be accessed in the same way as in Windows 7.
How To Get To Disk Management in Windows 7
In conclusion, Disk Management in Windows 7 is an invaluable tool for managing your system’s storage capacity. It allows you to view, create, format, and delete drives, as well as view and change drive letters, manage partition sizes, and more. With its easy to use interface, you can quickly and easily manage your system’s storage capacity.


