


Can You Rename A Sharepoint Site?

If you are using SharePoint as a collaboration platform, you may find the need to rename your site at some point in time. Whether you need to update the name to reflect a new project, change the focus of the site, or just want a fresh start, understanding how to rename a SharePoint site is an important part of using the tool effectively. In this article, we will discuss how to rename a SharePoint site, the challenges that may arise, and the best practices to ensure a successful transition.
Yes, you can rename a SharePoint site. Here’s how:
- Log in to your SharePoint admin center.
- Click on the Sites tab, then select the site you want to rename.
- Click Settings, then click Rename.
- Enter a new name for your site, and click Save.
language.
Can You Rename a SharePoint Site?
SharePoint sites are a great way to store and share information within an organization. It provides users with a secure and organized platform to store and access data. But sometimes, it may be necessary to rename a SharePoint site. This can be done in a few simple steps.
Step 1: Identifying the Site to be Renamed
The first step in renaming a SharePoint site is to identify the specific site to be renamed. This can be done by accessing the SharePoint admin center. The admin center allows users to view all the sites that have been set up within the organization. Once the specific site to be renamed is identified, the user can proceed to the next step.
Step 2: Changing the URL
The second step in renaming a SharePoint site is to change the URL. This can be done by accessing the SharePoint admin center and selecting the specific site to be renamed. Once the site is selected, the user can click on the ‘Change URL’ option. This will open a new window where the user can enter the new URL of the SharePoint site.
Step 3: Adjusting Site Settings
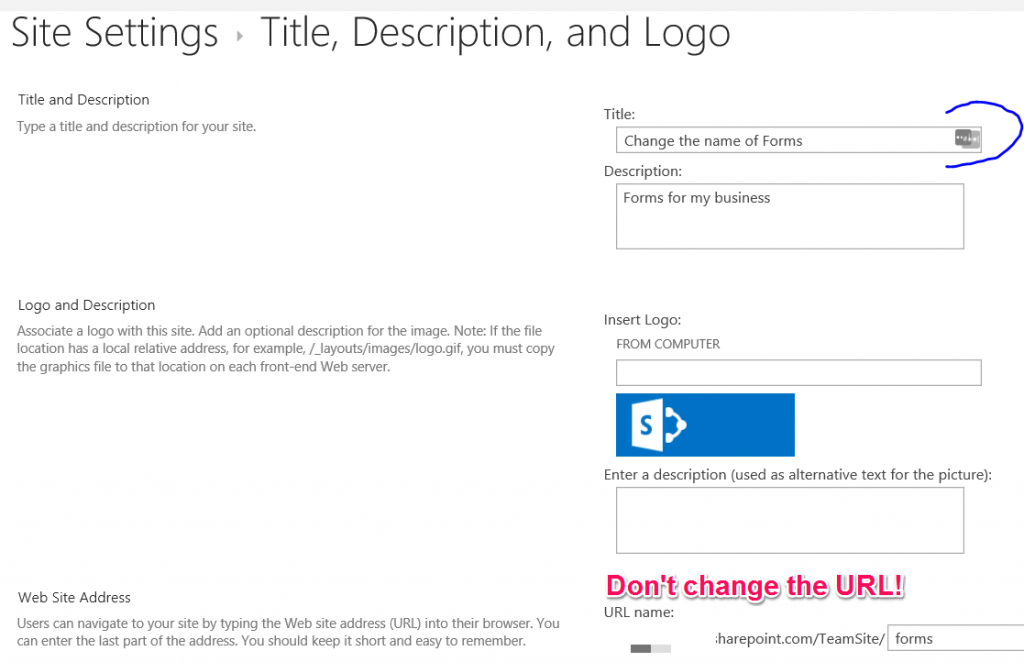
The third step in renaming a SharePoint site is to adjust the settings of the site. This can be done by accessing the ‘Site Settings’ page from the SharePoint admin center. Here, the user can change the name of the site, the URL of the site, and other settings related to the site. Once the settings have been adjusted, the user can save the changes and proceed to the next step.
Step 4: Updating Permissions and User Access
The fourth step in renaming a SharePoint site is to update the permissions and user access of the site. This can be done by accessing the ‘Permissions and User Access’ page from the SharePoint admin center. Here, the user can assign permissions to different users and groups to access the site. The user can also restrict access to certain parts of the site. Once the permissions and user access have been updated, the user can save the changes and proceed to the next step.
Step 5: Verifying the Changes
The fifth and final step in renaming a SharePoint site is to verify the changes. This can be done by accessing the SharePoint site from a web browser. Here, the user can verify that the new name and URL have been applied to the site. Once the changes have been verified, the user can save the changes and the site will be successfully renamed.
Tips for Renaming a SharePoint Site
Choose a Meaningful Name
When renaming a SharePoint site, it is important to choose a meaningful name. This will make it easier for users to remember the site and access it quickly.
Use Descriptive URLs
When changing the URL of a SharePoint site, it is important to use a descriptive URL. This will make it easier for users to find the site and access it quickly.
Provide Appropriate Permissions
When updating the permissions of a SharePoint site, it is important to provide appropriate permissions to the users and groups. This will ensure that only authorized users can access the site.
Test the Changes
After making changes to a SharePoint site, it is important to test the changes. This will ensure that the changes have been applied correctly and that the site is working as expected.
Backup the Site
Before renaming a SharePoint site, it is important to backup the site. This will ensure that all the data stored on the site is safe and secure.
Conclusion
Renaming a SharePoint site is a simple process that can be done in a few simple steps. It is important to follow the steps outlined above and to take the necessary precautions to ensure the security of the site. By taking the proper steps, users can easily rename a SharePoint site and maintain the security of their data.
Frequently Asked Questions
What is a SharePoint Site?
A SharePoint Site is a web-based platform that allows users to collaborate, manage, and share documents and information. It provides tools for communication, organization, and data storage, and is used by organizations for creating websites, intranets, and extranets.
SharePoint Sites are typically organized into different workspaces and libraries, allowing users to easily access and share documents, lists, surveys, calendars, and other information.
Can You Rename a SharePoint Site?
Yes, you can rename a SharePoint Site. This can be done through the Site Settings page, which can be accessed by clicking the gear icon at the top right of the SharePoint Site. Once in the Site Settings page, you will find an option to rename the site.
It is important to note that renaming a SharePoint Site will also change the URL of the site, so you must be careful when renaming your site. Additionally, if you have any links that are pointing to the old URL, those links will no longer work.
What Are the Benefits of Renaming a SharePoint Site?
Renaming a SharePoint Site can be beneficial in a few different ways. For example, it can help to make the site more organized, or it can be used to reflect changes in the purpose of the site. Additionally, renaming a site can help to make it more user-friendly, as users may more easily recognize and remember the new name.
Renaming a SharePoint Site can also help to make the site more accessible, as the new URL can be shared with more people. This can be especially useful if the purpose of the site has changed, as the new URL can be shared with those who may not have had access to the old one.
What Are the Steps to Renaming a SharePoint Site?
The steps to renaming a SharePoint Site are relatively straightforward. First, log in to the site and click the gear icon at the top right of the page. Next, select the “Site Settings” option. Once in the Site Settings page, you will find an option to rename the site. Enter the desired name and click “OK” to confirm the change.
It is important to note that renaming a SharePoint Site will also change the URL of the site, so you must be careful when renaming your site. Additionally, if you have any links that are pointing to the old URL, those links will no longer work.
What Are the Potential Issues With Renaming a SharePoint Site?
When renaming a SharePoint Site, there are a few potential issues to be aware of. First of all, as mentioned above, renaming a site will change the URL of the site, so if you have any links pointing to the old URL, those links will no longer work. Additionally, renaming a site can cause issues with permissions, as the permissions of the old site will not automatically be applied to the new site.
Finally, renaming a SharePoint Site can cause issues with external integrations, as the new URL may not be recognized by external applications. This can lead to errors and other issues, so it is important to be aware of any external integrations before renaming a site.
To conclude, renaming a SharePoint site is not as complicated as it may seem. With the right steps and guidance, you can easily rename a SharePoint site with ease. Remember to always follow the SharePoint guidelines, double-check all of your changes, and test them before making them live. Doing so will help ensure that your SharePoint site is properly renamed and that it functions optimally.


